Installation and configuration
Introduction
This manual describes Qflow’s installation requirements and the installation procedure of all its components. It also explains how to configure Qflow.
To better understand the installation process, it is convenient to know which are Qflow’s components:
Qflow’s database
Backend services: they access the database and provide services to the web sites, web services and the client tools.
The web sites, which are sites used by the final users to design flows and manage the system and the organigram:
Qflow Access: provides a single point of access to all Qflow tools.
Qflow Task: where the users can start flows and interact with them.
Qflow Design: site where processes are designed to be started in Qflow Task.
Qflow Team: where user accounts are created and managed, hierarchical relationships between them are defined, and the structure of the organization is modeled
Qflow Admin: allows you to manage the system, monitor the status ofthe different Qflow sites and services. It also provides the ability to manage extended properties, system parameters and licenses.
The web services
The client tools are applications that are used by users who design flows and take care of administrative tasks:
The business process modeler [deprecated]
The business process administrator
All of these components can be hosted in different computers. Installation of the web services is optional, given that they are only necessary if the organization wishes to develop an application that uses Qflow as a base.
Manual organization
This manual is divided into the following sections:
Requirements for the standard installation: it describes the software and hardware requirements of each of Qflow’s components.
Installation: it describes the prerequisites and permissions required to install each component and the procedure for installing them.
Licensing: it explains how to load Qflow licenses.
Configuration: explains how to use the Qflow configuration tool and describes the parameters that can be modified. Also how to configure settings related to attachment storage, unified session or sending mails with Google SMTP.
Installation of other components: it explains how to install and configure the directory synchronization service, which allows the periodic update of Qflow’s organizational model based on the model defined in an LDAP-compatible directory.
Sizing: it discusses Qflow sizing, analyzing various scenarios.
Architecture and deployment: it presents deployment options for Qflow.
Requirements for the installation
Requirements for the standard installation: it describes the software and hardware requirements of each of Qflow’s components.
Next, the software requirements are described. The hardware requirements are those of the required software. For example: all components of Qflow require Microsoft .NET Framework 4.7.2. The hardware requirements of the components are the requirements of that framework.
Installation of Microsoft .NET Framework 4.7.2
All Qflow components require .NET Framework 4.7.2 (or any posterior, compatible version, such as 4.8) to be installed. Users who only use Qflow’s web site do not need to install any Qflow component and thus, do not need to have the framework installed.
If at the time of installing a component it is detected that the framework is not installed in the computer in which the installation is being performed, a message will appear indicating that the 4.7.2 framework is required.
Microsoft .NET Framework 4.7.2 requirements
As all Qflow components use Microsoft .NET Framework 4.7.2, its requirements are requirements for all Qflow components. These are the following.
Software requirements
Any of the following operating systems for the client:
Windows 7 SP1
Windows 8.1
Windows 10
Windows 11
Some of the following operating systems for the server:
Windows Server 2008 R2 SP1 or higher
Hardware requirements
The Microsoft .NET Framework 4.7.2 hardware requirements are the following:
1 GHz Processor or higher
512 MB of RAM
4.5 GB of free disk space
Web clients’ requirements
Qflow users, those who participate in flows, design flow templates, manage the organizational model or administer and monitor the system will only need to have a web browser. They can also use an e-mail client to receive notifications about Qflow that way, but this is not indispensable.
The web browser used by the users that participate in flows must be:
Google Chrome
Mozilla Firefox
Microsoft Edge
As for process designers, organizational model managers, and system administrators and monitors, the web browser should be:
Google Chrome
Mozilla Firefox
Microsoft Edge
Client tools requirements
The client tools (business process designer and business process administrator) only require that Microsoft .NET Framework 4.7.2 is installed on the computers on which they are installed. Also, they must have network access to the backend services.
Web server requirements
The web server is the server in which Qflow Task will run. The same server can host the web services.
It has the following requirements:
Microsoft .NET Framework 4.7.2
Windows (any version compatible with Microsoft .NET Framework 4.7.2, but it cannot be Home or Starter editions)
Internet Information Services 7 or higher
Also, it requires some Windows components to be installed:
ASP.NET
Windows Authentication
These components can be installed without being enabled. For information on how to enable them, see the Enabling IIS components section. The Windows edition that you use on the web server must be able to host these components. For example, the Windows authentication component cannot be installed on a computer running Windows Home or Starter edition. Therefore, you will not be able to use the integrated Windows authentication on that computer.
Enabling IIS components
The components of Internet Information Services (IIS) that are needed to install the web sites can be present without being enabled. In these cases, before executing the installer, you must enable the features required by Qflow. This section explains how to do this in non server specific Windows versions. For Windows Server versions, the procedure is different.
Open the Control Panel.
In the Control Panel, go to Programs.
Select the “Turn Windows features on or off” option.
In the Windows Features window, turn on the following components:
ASP.NET Internet Information Services/World Wide Web Services/Application Development Features/ASP.NET (see
ASPNet_Activation). From Windows 8 onwards, this is equivalent to activating the ASP .NET components in their available versions. InASPNet_Win10_Activationthe versions are ASP .NET 3.5 and 4.7.2, the ones available in Windows 10 and Windows 11.Windows Authentication: Internet Information Services/World Wide Web Services/Security/Windows Authentication (see
Windows_Auth_Activation).Static Content: Internet Information Services/World Wide Web Services/CommonHTTP Features/Static Content.

ASP .NET activation
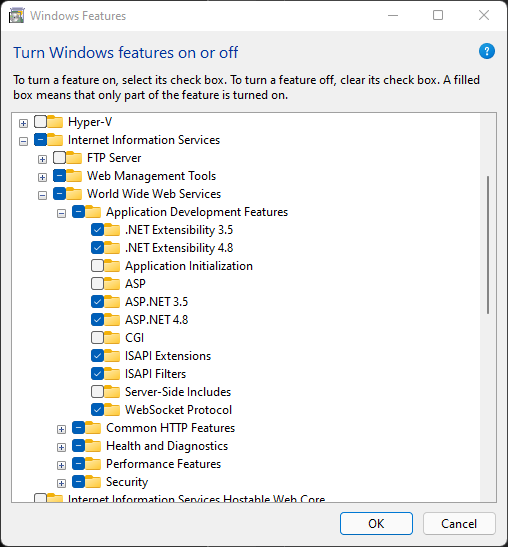
ASP .NET activation on Windows 11
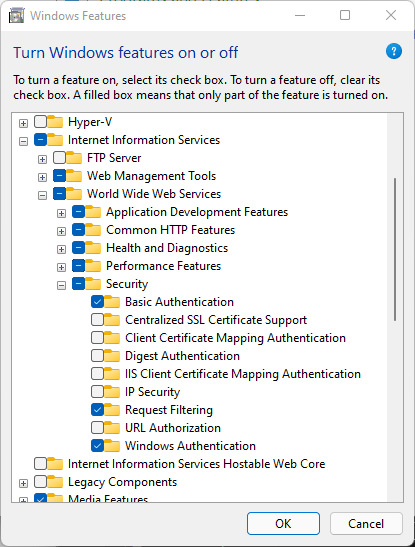
Windows Authentication
Enabling IIS components on Windows Server
The components of Internet Information Services (IIS) that are needed to install the web sites can be present without being enabled. In these cases, before executing the installer, you must enable the features required by Qflow. This section explains how to do this in Windows Server. For non server specific Windows versions, go to the Enabling IIS components section.
Open the Server Manager.
Select the Add roles and features option.
In the Roles section select the following options:
ASP.NET Web Server (IIS)/Web Server/Application Development/ ASP .NET 3.5 and 4.7 (see
AspNetActivationAndWindowsAuthentication).Windows Authentication: Web Server (IIS)/Web Server/ Security/Windows Authentication (see
AspNetActivationAndWindowsAuthentication).Static Content: Web Server (IIS)/Web Server/Common HTTP Features/Static Content

Enabling ASP .NET and Windows Authentication for Windows Services
Backend server requirements
The backend server is where the services used by the other components of Qflow run. This has the following requirements:
Microsoft .NET Framework 4.7.2
Windows (any version compatible with Microsoft .NET Framework 4.7.2, but it cannot be Home or Starter editions)
Internet Information Services 7 or higher
Also, it requires some Windows components to be installed:
ASP.NET
Optional:
SMTP mail server
Exchange mail server (delivery of e-mail messages)
Each Qflow site accesses the BackendAPI using the http protocol, using standard ports, unless otherwise specified.
However, in case it is necessary to install any of the tools that are deprecated, each of them, including the web site and web services asmx, accesses its corresponding backend service through a specific port. These ports must be taken into account in the firewall configuration. By default, the ports corresponding to each tool’s service are shown in the following table:
Tool / Site |
Port |
|---|---|
Business Process Modeler |
6000 |
Business Process Administrator |
6006 |
WebForms/WebServices .asmx Web site |
6003 |
Database
The requirements to be met by the equipment hosting the database are as follows:
Some of the Windows versions mentioned previously
Some of the following database managers:
SQL Server 2012 or higher
SQL Server 2012 Express or higher (not recommended for production environments)
Optional:
Acrobat Reader 7.0.5 or higher (requisite to perform full-text searches of documents in PDF format).
Microsoft Filter Pack 2010 (requisite to perform full-text searches of documents in Office 2007 format or more recent versions of Office).
Full-text searches on files of other types require specific components (corresponding iFilter).
Hardware requirements depend on the database manager that is being used. See the database manager’s documentation to get more information.
Infrastructure requirements
SMTP or Exchange mail services
Active Directory (recommended), LDAP security provider or NTDomain
Permissions and user account requirements
You must have a database server account that allows the creation of new databases (SQL Server).
You must use a Windows account with sufficient permissions to act as a service: it must have the Log on as a service and Log on locally permissions active. The Act as a part of the operating system and Log on as a batch job permissions are also recommended.
To send notifications:
SMTP
A mail account must be provided for the service
Exchange
Create a MailBox for mail sending. This MailBox must be associated to the account created in the previous step (this applies if Exchange is being used)
Create a mail profile in the user profile and associate it to the MailBox created previously (only for Extended MAPI).
Installation
To install Qflow:
Execute the Setup.exe file found in the CD. If the user account control is active, Windows will ask if you wish to allow Setup.exe to make changes in your computer. Click “Yes”.
Window_Installer_SQLServershows the main screen of the installer. The installers for all Qflow components are shown in the order they should be executed. These installers are as follows:Database installer.
Backend Services installer.
Backend API installer.
Web Services API installer.
Qflow Task installer (Task).
Qflow Design installer (Design).
Qflow Team installer (Team).
Qflow Admin installer (Admin).
Qflow Access installer (Access).

Main screen of Qflow’s installer
NOTE: although the tools work correctly using the HTTP protocol, for security reasons it is recommended to use HTTPS instead. In addition, for websites, this enables the execution of a service worker that improves the user experience by caching some resources or handling notifications in real time.
Database installation on SQL Server
This section explains how to install Qflow’s database on SQL Server.
Prerequisites
Some of the following database managers:
SQL Server 2012 or higher
SQL Server Express 2012 or higher
Microsoft .NET Framework 4.7.2 in the computer where the installation is running.
Permissions
The user that performs the installation must have the following permissions:
Permission to create databases (only necessary during installation)
It is not necessary to login to the database server in order to perform the installation.
Procedure
Run the Qflow installer, place the cursor over the “Database” icon and select the “SQL Server” option (see
Window_Installer_SQLServer). This will start the database installer (First_Windows_Installer_Database_SQL_Server). Click on the “Next” button.

First screen of the database installer (SQL Server)
In the new screen, if you are performing a new Qflow installation, select the “Create new Qflow database” option (
Second_Windows_Installer). If, on the other hand, you already have a Qflow database installed and you want to update it, select the “Update Qflow database” option.
Click on the “Next” button.

Second screen of the installer
The following screen (
Configuration_Connection_SQL_Server) will prompt you to enter certain data:Server name: it is the name of the database server.
Windows authentication: check this option if the SQL Server installation of the server whose name you entered above is configured to use Windows authentication, or if it uses mixed authentication, but you wish to connect using the current Windows user.
SQL Server authentication: mark this option if the SQL Server installation of the server whose name you entered above is configured to use mixed security. In this case, you will need to enter the User name and Password.
Database: it is the name you want to give to the database.
Test connection: it allows you to test the connection before continuing, to make sure the entered data is correct. The “Next” button will not be enabled unless you have tested the connection and found it to work.
Once the information has been entered, click on “Next”.
NOTE: remember that the user with which you connect to the database must have permissions to create a database.

Database connection configuration
The next screen (
Configuration_User_And_Language) allows you to configure the following properties:
Content properties
Language: Qflow’s default language. The names of the system views and other predefined elements of the Qflow database will be created in the selected language.
Default user properties
User name: the default user’s user name. The default user is the first Qflow user that is created.
Domain name: the name of the domain that will be used to authenticate the default user.
Logon name: the name of the Windows user that corresponds to the default user.
Click on “Next” to continue.

User and default language configuration
The next screen (
Configuration_Organization_Name_Server_And_Virtual_Directory_Name) allows you to configure the following properties:Organization name: the name of your organization. Qflow uses this name to validate licenses. Therefore, if you already have licenses, it is important that you use the same name you used to generate them. If you do not have licenses yet, when requesting them, remember that this is the name that should be used.
Web server name: it is the name of the server that will host Qflow’s web site.
Virtual directory name: the name of the IIS web application that will host Qflow’s web site.
Click on “Next” to continue.

Organization name, server name and virtual directory configuration
The following screen shows the information entered in previous screens. Review the information. If you find any incorrect information, click on the “Previous” button until you return to the screen in which you entered the information and modify it. Otherwise, click “Next” to start the installation.

Database installation
External database installation on SQL Server [Optional]
Flows executed in Qflow can have attachments, which can be stored in th
Prerequisites
Some of the following database managers:
SQL Server 2012 or higher
SQL Server Express 2012 or higher
Microsoft .NET Framework 4.7.2 in the computer where the installation is running.
Permissions
The user that performs the installation must have the following permissions:
Permission to create databases (only necessary during installation)
It is not necessary to login to the database server in order to perform the installation.
Procedure
Run the Qflow installer, place the cursor over the “Database” icon and select the “SQL Server” option (see
Window_Installer_SQLServer). This will start the database installer (First_Windows_Installer_Database_SQL_Server). Click on the “Next” button.In the new screen, select the “Create new attachments database (optional) (
Second_Windows_AttDB_Installer).
Click on the “Next” button.

Second screen of the installer
The following screen (
Configuration_Connection_SQL_Server) will prompt you to enter certain data:Server name: it is the name of the database server.
Windows authentication: check this option if the SQL Server installation of the server whose name you entered above is configured to use Windows authentication, or if it uses mixed authentication, but you wish to connect using the current Windows user.
SQL Server authentication: mark this option if the SQL Server installation of the server whose name you entered above is configured to use mixed security. In this case, you will need to enter the User name and Password.
Database: it is the name you want to give to the database.
Test connection: it allows you to test the connection before continuing, to make sure the entered data is correct. The “Next” button will not be enabled unless you have tested the connection and found it to work.
Once the information has been entered, click on “Next”.
NOTE: remember that the user with which you connect to the database must have permissions to create a database.

Database connection configuration
The following screen shows the information entered in previous screen. Review the information. If you find any incorrect information, click on the “Previous” button until you return to the screen in which you entered the information and modify it. Otherwise, click “Next” to start the installation.

Database installation
Problem solving
This section describes some of the most common errors that can occur during the database installation.
The error shown in Error_Name_Database appears when you are trying to update an existing database and the installer cannot find a database with the indicated name. In this case, make sure that you wrote the database name correctly. This error will appear when testing the connection.

Wrong database name
If the error shown in Inability_To_Connect_To_The_Server appears, make sure that the database server is accessible and working. This error should be very rare, given that the installer forces you to test the connection before continuing. If this error occurs, it is because the server was rendered inaccessible or had a problem after the connection was tested.

Unable to establish connection to the server
The “Incorrect syntax near ‘XML’” error possibly means that the “CREATE XML SCHEMA COLLECTION” permission is missing.
Enabling full-text search
Qflow provides the possibility to search for words and phrases in the content of attached files (full-text search). For this feature to be available, SQL Server’s full-text search service must be enabled. Keep in mind that, if your database engine is SQL Server Express, this feature will not be available, unless you have the SQL Server Express with Advanced Services version.
By default, SQL Server indexes the content of a limited number of files, so while it indexes documents with DOC and various other extensions, it does not index files in other common formats, such as PDF files by default. However, it is possible to make SQL Server index these other files by using iFilters, which are components that, once installed, allow you to get the content of a document in different formats.
For SQL Server to index files in Office 2007 format, or from a more recent version of Office, install the iFilter that can be downloaded from the following URL: http://support.microsoft.com/kb/945934/en-us.
For SQL Server to index files in PDF format, you must install Adobe Reader 7.0.5 or a more recent version of the product (installing the latest version is recommended), as long as you need the 32 bit version. If you need the 64 bit version, you must download it from the following address: http://ftp.adobe.com/pub/adobe/acrobat/win/11.x/PDFFilter64Setup.msi. It could also be necessary to add the path to the folder where the iFilter component is located to the “PATH” environment variable.
Once any of these components are installed, do as follows:
Run the following scripts in the database server:
exec sp_fulltext_service 'load_os_resources', 1
exec sp_fulltext_service 'verify_signature', 0
Restart the SQL Server engine service.
To verify that the file extensions are now indexed, execute the following SQL query:
SELECT document_type, path FROM sys.fulltext_document_types
This query shows a list of all the file extensions that are indexed by the full-text service.
Backend services installation
Prerequisites
Microsoft .NET Framework 4.7.2
Optional: Messaging service client (SMTP or MAPI)
Permissions
For the installation:
Local administrator with permissions to login interactively on the server (to install).
To run the services (permissions of the user that will run the services):
Run as a service
Execute as batch process
Procedure
Run the Qflow installer and select the “Backend Services” option. Windows will start the backend services installer (
Installer_Backend_Services).

Backend services installer
Click on “Next”.
In the following screen (
Select_Folder_Install_Backend_Services), on the “Folder” field, type the path of the folder where you want to install Qflow’s backend services. If you wish to install the services for all users in the computer, check the “Everyone” option. Otherwise, check the “Just me” option. Click on “Next”.

Selection of the folder to install Qflow’s backend services.
At this step (
Screen_Prior_To_first_Part_Installation), everything will be ready to perform the first part of the installation. Click on “Next” to continue.

Previous screen to the first part of the installation

Execution of the first part of the installation
Once the first part of the installation is finished, a window will appear (
Configuration_Login_Service) that will require you to enter a username and password. This is the user that will execute the backend services (if in doubt, see the section on required permissions). The user name must be preceded by the name of the domain to which it belongs and a slash (in the figure, the domain name is “soft”).

Service login configuration
Next, a screen will appear (
Installation_Parameter) that will allow you to configure various parameters of the service:
Data base properties
Data provider: the database provider (for example, SQL Server).
Server name: the name of the server that hosts Qflow’s database. It must have been installed previously.
Database name: the name of the Qflow database created with the database installer.
Integrated security: it specifies if the backend services must be connected to the database using integrated security. If the option is checked, Qflow will connect to the database with integrated security, with the user that executes the service. Otherwise, the installer will enable two text boxes to enter the SQL Server username and password to be used to connect to the database using SQL Server security.
Notification services: select the mail services that you want to use. You can choose more than one, and later configure the users of Qflow to use different services. After being installed, these services must be correctly configured from the System Administration and Monitor site, check the manual to see the necessary configuration.
SMTP: it uses SMTP for sending mails. The mail step (see the business process modeler manual for more information) uses the settings of this service. Therefore, if you do not install it, you should at least add the system configuration manually, as explained on the “Service configuration” section.
Extended MAPI: Extended MAPI mail, to use with Windows Exchange. It does not require Microsoft Outlook nor the Exchange Web Services, instead using native interfaces from Windows.
Exchange Web Services: it uses Exchange through the Exchange Web Services API. This is the recommended option to use with Exchange, given that it uses a Microsoft API supported by that company, which avoids potential compatibility issues.
Firebase Push Notifications: it uses Firebase to send notifications to user devices by using push notifications.
Deprecated services: you are allowed to select deprecated services, which are services that are no longer being maintained. That is why, unless they are necessary, it is recommended not to install them. In the case that you need any of them, simply select it in the installer.
Check the option “Start backend services when setup completes” if you want the installer to automatically start the backend services once the installation finishes. Otherwise, uncheck it.
Press the “Test connection” button to check that Qflow can establish a connection with the database using the information provided. If the test fails, check the information, correct it and test the connection again.

Application parameters
When you are done entering the information and checking the connection, click on “OK”.
Once the mail services have been configured, Qflow will finish the installation of the backend services (
Finish_Installation_Backend_Services).

End of the installation of the backend services
Installation of the backend API
Prerequisites
Microsoft .NET Framework 4.7.2
IIS
ASP.NET 4.5
Permissions
Local administrator, with permission to login interactively on the server
Permission to create virtual directories or write to the defined virtual directory
Procedure
Run the Qflow installer and select the “Backend API” option. This brings up a window, like the one in
Installation_Backend_APIBackend API installer.

Backend API installer
Click on “Next”.
In the same screen (
Select_Folder_Install_Backend_API), choose the IIS site in which you want to install Qflow’s site and the name of the virtual directory to be used. You must also select the Application pool. Click on “Next”.

Selecting the folder to install the backend API.
At this point (
Select_Folder_Install_Backend_API), everything will be ready to perform the first part of the installation. Click on “Next” to continue.

Previous screen to the first part of the installation

First part of the API installation
Once the first part of the installation is complete, a window will appear (
First_Part_Installation_Backend_API) that will require you to enter the path in which you have installed the backend services.

Selection of the folder in which the backend services were installed.
If you have installed the backend API in a different server than the backend services, a folder containing the corresponding system.config file will be requested.
After a few seconds, Qflow will finish the installation of the backend API (
Finish_Installation_Backend_API).

End of backend API installation
Installation of Qflow’s web services
Prerequisites
Microsoft .NET Framework 4.7.2
IIS
ASP.NET 4.5
Permissions
Local administrator, with permission to login interactively on the server
Permission to create virtual directories or write to the defined virtual directory
Procedure
To install the web services, do as follows:
Run the Qflow installer and select the “Web services” option. This brings up a window like the one in
First_Windows_Installer_Web_Services.Click on “Next”. This brings up a window like the one in
Second_Windows_Installer_Web_Services.

First screen of the web services installer
The second screen asks for the following data:
Site: it is the IIS site where you want to install the web services.
Virtual directory: the name of the virtual directory where the web services will be installed. If the virtual directory does not exist, it will be created by the installer. The virtual directory must be configured to use integrated security (if the directory is created by the installer, the security will be correctly set by the installer).
Application Pool: select the Application pool that you want to use for the web services.

Second screen of the web services installer
Click on “Next”. This brings up a window that announces that the installation is ready (
All_Set_Installer_Web_Services).Click on “Next”. The installer brings up a window that shows the installation progress (
Install_Web_Services_In_Progress).

All set to install the web services

Installation in progress
After some time, the installer will prompt a window that asks for information about the location of the backend Web API (
Installer_Web_Servoces_Parameters). Type on the “Server name” field the name of the server where the backend Web API is located. Then, modify if applicable the Virtual directory, Port and Protocol, by default the correct values are loaded. Finally, click on “OK”.The installation of the web services is done.

The installer will ask for information about the location of the backend services

Installation finished
Qflow Task installation
Prerequisites
Microsoft .NET Framework 4.7.2
IIS
ASP.NET 4.5
Permissions
Local administrator, with permission to login interactively on the server
Permission to create virtual directories or write to the defined virtual directory
Procedure
To install Qflow Task, do as follows:
Login on the server and run the Qflow installer.

Qflow Task installer icon
Select the icon shown in
Icon_Qflow_installation. This will start the Qflow Task’s installer (Install_Web_Site). Click on “Next”.

Qflow Task’s installer
In the following screen, choose the IIS site where you want to install it and the name of the virtual directory to use (see
Select_IIS_Site_and_Virtual_Directory). You must also select the Application Pool.

Site, virtual directory and Application Pool selection.
At this point (
Ready_To_Install_The_Web_Site), everything will be ready to start the installation. Click on “Next” to start the installation.

All ready to install

Execution of the installation
Once the installation is finished (
Ejecute_The_Web_Site_Installation), you must indicate the name of the server that hosts the backend Web API (Parameters_of_the_Web_Site_Installation). Then, modify if it corresponds the Virtual directory, Port and the Protocol, by default they will have the correct values.

Site parameters
Click on “OK”.
At this point, the installation should finish (
Installation_Complete). Click on “Close”.

Installation complete
Error solving
If you are having problems accessing the web site, it is possible that you have not modified the site’s Application Pool configuration to use at least ASP.NET 4.0 with integrated pipeline (that configuration is compatible with .NET Framework 4.7.2). Change the configuration and try again.
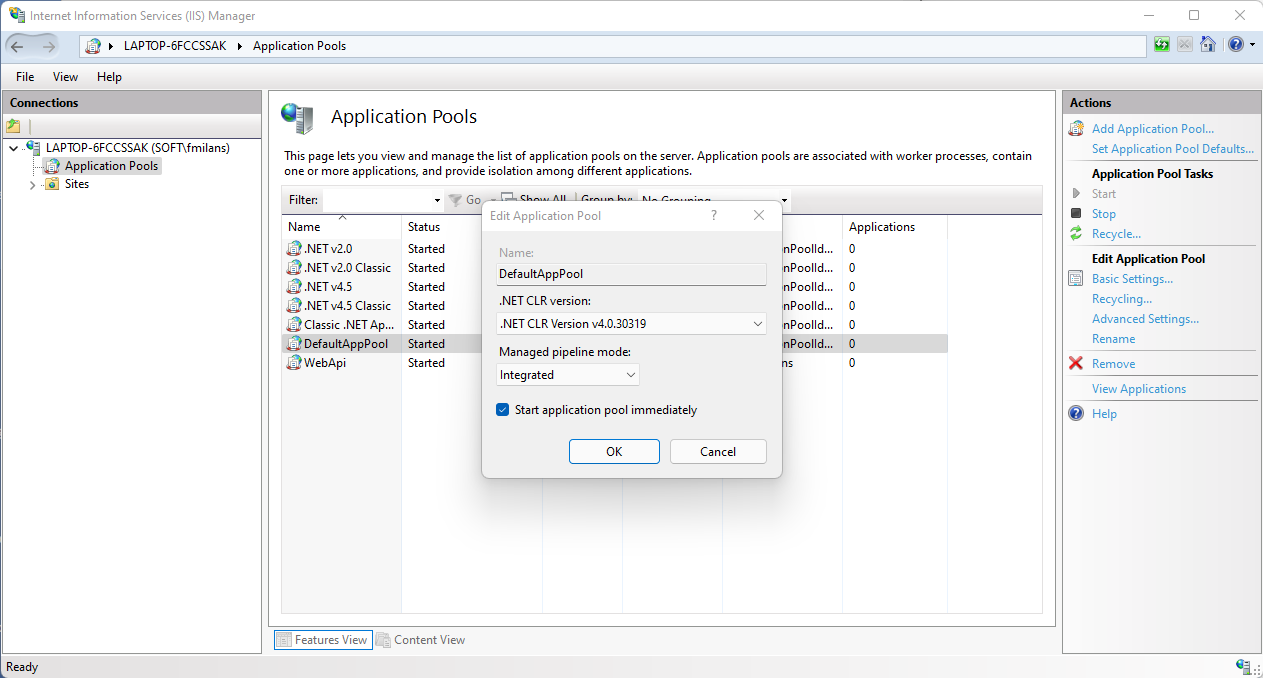
Correct configuration of the Qflow site Application Pool.
Qflow Team installation
Prerequisites
Microsoft .NET Framework 4.7.2
IIS
ASP.NET 4.5
Permissions
Local administrator, with permission to login interactively on the server
Permission to create virtual directories or write to the defined virtual directory
Procedure
To install Qflow Team, do as follows:
Login on the server and run the Qflow installer.

Qflow Team installer icon
Select the icon shown in
Icon_Qflow_installation. This will start the Qflow Team’s installer (Install_Web_Site). Click on “Next”.

Qflow Team’s installer
In the following screen, choose the IIS site in which you want to install it and the name of the virtual directory to be used (see
Select_IIS_Site_and_Virtual_Directory_OMM). You must also select the Application Pool.

Site, virtual directory and Application Pool selection.
At this point (
Ready_To_Install_The_Web_Site_OMM), all is ready to start the installation. Click on “Next” to start the installation.

All ready to install

Execution of the installation
Once the installation is finished (
Ejecute_The_Web_Site_Installation_OMM), you must indicate the name of the server that hosts the backend Web API (Parameters_of_the_Web_Site_Installation_OMM). Then, modify if it corresponds the Virtual directory, Port and the Protocol, by default they will have the correct values.

Site parameters
Click on “OK”.
At this point, the installation should finish (
Installation_Complete_OMM). Click on “Close”.

Installation complete
Error solving
If you are having problems accessing the web site, it is possible that you have not modified the site’s Application Pool configuration to use at least ASP.NET 4.0 with integrated pipeline (that configuration is compatible with .NET Framework 4.7.2). Change the configuration and try again.

Correct configuration of the Qflow site Application Pool.
Qflow Design installation
Prerequisites
Microsoft .NET Framework 4.7.2
IIS
ASP.NET 4.5
Permissions
Local administrator, with permission to login interactively on the server
Permission to create virtual directories or write to the defined virtual directory
Procedure
To install the Qflow Design, do as follows:
Login on the server and run the Qflow installer.

Qflow Design installer icon
Select the icon that is shown in
Icon_BPM_Web_designer_installation. This will start Qflow Design’s installer (Install_BPM_Web_Designer). Click on “Next”.

Qflow Design’s installer
In the following screen, choose the IIS site where you want to install it and the name of the virtual directory to be used (see
Select_IIS_Site_and_Virtual_Directory_BPM). You must also select the Application Pool.

Site, virtual directory and Application Pool selection.
At this point (
Ready_To_Install_The_Web_Site_BPM) everything will be ready to start the installation. Click on “Next” to begin the installation.

All ready to install
Execution of the installation
Once the installation is done (
Ejecute_The_Web_Site_Installation_BPM), you must enter the name of the server that hosts the backend Web API (Parameters_of_the_Web_Site_Installation_BPM). Then, modify if necessary the Virtual directory, Port and the Protocol, by default they will have the correct values.

Site parameters
Click on “OK”.
At this point, the setup should finish (
Installation_complete_BPM). Click on “Close”.

Installation complete
Qflow Admin installation
Prerequisites
Microsoft .NET Framework 4.7.2
IIS
ASP.NET 4.5
Permissions
Local administrator, with permission to login interactively on the server
Permission to create virtual directories or write to the defined virtual directory
Procedure
To install the Qflow Admin, do as follows:
Login on the server and run the Qflow installer.

Qflow Admin installer icon
Select the icon shown in
Icon_BPM_Web_administrator_installation. This will start the Qflow Admin installer.

Qflow Admin’s installer
In the following screen, choose the IIS site where you want to install it and the name of the virtual directory to use (see
Select_IIS_Site_and_Virtual_Directory_SAM). You must also select the Application Pool.

Site, virtual directory and Application Pool selection.
At this point (
Ready_To_Install_The_Web_Site_SAM), all is ready to start the installation. Click on “Next” to begin the installation.

All ready to install

Execution of the installation
Once the installation is done (
Ejecute_The_Web_Site_Installation_SAM), you must indicate the name of the server that hosts the backend Web API (Parameters_of_the_Web_Site_Installation_SAM). Then, modify if it corresponds the Virtual directory, Port and the Protocol, by default they will have the correct values.

Site parameters
Click on “OK”.
At this point, the installation should finish (
Installation_complete_SAM). Click on “Close”.

Installation complete
Error solving
If you are having problems accessing the web site, it is possible that you have not modified the site’s Application Pool configuration to use at least ASP.NET 4.0 with integrated pipeline (that configuration is compatible with .NET Framework 4.7.2). Change the configuration and try again.

Correct configuration of the Qflow site Application Pool.
Qflow Access installation
Prerequisites
Angular 14.
IIS.
IIS Rewrite
Procedure
To install Qflow Access, do as follows:
Login on the server and run the Qflow installer.

Qflow Access installer icon
Select the icon shown in
Icon_Qflow_installation. This will start the Qflow Access installer (Install_Web_Site). Click on “Next”.

Qflow Access installer
In the following screen, choose the IIS site where you want to install it and the name of the virtual directory to use (see
Select_IIS_Site_and_Virtual_Directory_QflowAccess). You must also select the Application Pool.

Site, virtual directory and Application Pool selection.
At this point (
Ready_To_Install_The_Web_Site_QflowAccess), everything will be ready to start the installation. Click on “Next” to start the installation.

All ready to install

Execution of the installation
During installation (
Ejecute_The_Web_Site_Installation_QflowAccesss) you must indicate where Qflow Task is installed (Parameters_of_the_Web_Site_Installation_QflowAccesss).

Site parameter
Click on “OK”.
At this point, the installation should finish (
Installation_complete_QflowAccess). Click on “Close”.

Installation complete
CORS configuration for Qflow Access
In case of installing Qflow Access on a different server than the rest of the tools, it is necessary to add an extra configuration in the web.config file.

CORS configuration for Qflow Access
Where QflowAccessURL should be replaced by the path where Qflow Access was installed. For example, https://default.<server>/QflowAccess. When new workspaces are created, their paths must be added in the same configuration, separated by comma: https://default.<server>/QflowAccess,https://workspace.<server>/QflowAccess
Tool installation
Prerequisites
Microsoft .NET Framework 4.7.2
Permissions
Local administrator, with permission to login interactively on the client computer.
Procedure
Qflow provides two Windows tools: the Business Process Modeler and the Business Process Administrator. These tools are being substituted by the different web sites, however, they can still be used.
To install the Business Process Modeler:
Login on the computer and search for the tool’s installers in the installers folder, depending on the language, for example: “~/Tools/English/BPMSetup.msi”. To start the installation open a Windows console as an administrator and then run it. This will start the Business Process Modeler installation (
BPMSetup_installation). Click on “Next”.

Start of the Business Process Modeler installer
In the second screen (Select_Installation_Folder_BPMSetup), specify the folder where you want to install the tool. Choose also if the tool must be available only for the user that is executing the installation or if all the users of the computer will be able to access it. Click on “Next”.

Installation folder selection
At this point (
All_Ready_To_Install) everything will be ready for the installation. Click on “Next”.

All ready to install

Installation in progress
When the screen shown in
BPMSetup_Installation_completeis displayed, the installation will be finished. Click on “Close”.

End of the Business Process Modeler installation
In order to install the other tools, proceed in the same way. All of them have the same requirements and are installed in the same way, by running the .msi file of the corresponding installer and following the instructions that are presented on screen.
Tools language
Qflow’s tools are available in three languages:
Spanish
Portuguese
English
The installer is available in these same languages.
Manual installation of notification services
If Qflow’s notification services were not installed during the installation of Qflow’s services, and you wish to install any of them, you must do it manually.
The manual installation of a mail service has two stages:
Creation of the Windows service
Configuration of the service
Creation of the Windows service
The InstallUtil tool is used for creating a Windows service, which is provided by the .NET Framework. This tool is an executable file that can be found in the system disk, inside the .NET Framework folder. To run it:
Open the Windows Command Prompt tool (Start, Run, “cmd”).
Navigate to the folder where the InstallUtil tool is located. It can be found on the .NET Framework folder, usually C:\Windows\Microsoft.NET\Framework64\v4.0.xxxxx (xxxx can vary; the folder can be named, for example, v4.0.30319). Example: run the following command: “cd C:\Windows\Microsoft.NET\Framework64\v4.0.30319”.
Run “InstallUtil” followed by the complete path of the file that corresponds to the mail service that you want to install. The notification services files are located in the folder where Qflow’s backend services are installed, typically C:\Program Files (x86)\Urudata\Qflow Backend Services. The following table shows which file corresponds to which service.
Service |
Service file |
SMTP |
Qframework.Listener.SMTP.exe |
ExtendedMAPI |
Qframework.Listener.ExtendedMAPI.exe |
ExchangeWS |
Qframework.Listener.ExchangeWS.exe |
FcmPushNotifications |
Qframework.Listener.FcmPushNotifications.exe |
Example: to install the SMTP service, assuming that the drive unit is “C” and that the files are in the default location, the command to run would be the following:
InstallUtil “C:\Program Files (x86)\Urudata\Qflow Backend Services\Qframework.Listener.SMTP.exe”
Once the command has been executed, a dialog box will be displayed which allows you to enter the credentials with which the service must be executed.

Configuration of the account that will run the service
Enter the user name, password and password confirmation of the user that will be used to execute the service.
Configuration of the notification service
Once the service has been created, it is necessary to register it in Qflow’s configuration so that it may be available to users. To do this, use the System Administrator and Monitor. For more details on how to use it, see the corresponding manual.
After these modifications are made, restart the engine service and make sure that the notification service that you just installed is running.
The new service will appear in the “User notification services” section of the user property panel in the Organizational Model Manager (see the corresponding manual). There, you can enable notifications for each user via the new service.
Files corresponding to each installer
The Qflow installer (Setup.exe) opens a screen from where it is possible to run the installers of Qflow’s components. Therefore, it is not usually necessary to manually run the installers of each component. However, knowing which file corresponds to which installer can be useful. The files that correspond to each of the installers are the following:
Database installer (SQL Server): DatabaseSetup_SqlServer.exe
Backend services installer: BackendSetup.msi
Backend API installer: BackendAPISetup.msi
Qflow Task installer: QflowTaskSetup.msi
Qflow Admin installer: QflowAdminSetup.msi
Qflow Team installer: QflowTeamSetup.msi
Qflow Admin installer: QflowAdminSetup.msi
Qflow Access installer: QflowAccessSetup.msi
Web services API installer: WebServicesAPISetup.msi
Deprecated
Business Process Modeler installer: BPMSetup.msi (it is found inside a folder with the name of the installer’s language, in the Tools folder).
Business Process Administrator Installer: BPASetup.msi (it is found inside a folder with the name of the installer’s language, in the Tools folder).
Web services installer: WebServiceSetup.msi
Web site installer (WebForms): DesktopFormsSiteSetup.msi
Updating Qflow
This section explains how to install a new version of Qflow in a computer in which Qflow is already installed. Make sure that all packages, templates and other elements are checked in (see the changes control sections on the business process modeler manual).
Updating the database
To update the database, run the Qflow installer, select the “Database setup” option, and select the “Update Qflow database” option (SQL Server, DatabaseSetup_SqlServer). For more information about the first steps, check the “Database installation on SQL Server” section.

Updating the database
Updating the backend services
Before updating the backend services, it is convenient to back up the “System.config” file, to avoid losing any changes made in the configuration.
To update the backend services, you must uninstall the existing ones and install the new ones. To do this, use the “Add or remove programs” tool.
Once the new version of the backend services has been installed, use the System.config file backup and compare it to the System.config file that was installed, you can modify the latter to restore the configuration from before the update. It is not recommended to replace the new System.config file with the backup, as there might be parameters that were not contained in the backup file that are necessary for the new version of Qflow to work. The proper way is to modify the new System.Config file so that it is consistent with the backup file and has the configuration changes that it had.
Upgrading the web sites
Before updating each web site, it is convenient to back up the pages of Qflow that have been modified, as these will be overwritten when the new version of the site is installed.
Once the update is completed, the installed pages must be compared to the ones that were backed up and they must be modified to be consistent with the backup and compatible with the new version of Qflow.
It is not necessary to back up custom forms, as the installer does not delete them.
If modifications have been done to the web.config file, it is convenient to back up the file before updating. Once the update is complete, the web.config file must be modified to be consistent with the backup and reflect the changes that were previously made.
If you wish to maintain the WebForms site and allow the use of custom forms of this site, you must update it manually. To do this, uninstall it using the “Add or remove programs” tool. Then, run DesktopFormSiteSetup.msi, which is found on the installation folder. This must be done from a Windows console ran as an administrator.
Updating the web services
For web services the same considerations apply to the web.config file as for the web site.
To update them, uninstall them by using the “Add or remove programs” Windows tool. Then, install the new version with its installer.
If you wish to keep the Web services.asmx, install them by running WebServiceSetup.msi that can be found in the installation folder. This must be done from a Windows console ran as an administrator.
Updating the client tools
To update the client tools (business process modeler and business process administrator), uninstall them by using the “Add or remove programs” Windows tool. Then, install them by using the installer of Qflow’s new version.
Uninstalling and repairing Qflow components
To uninstall a Qflow component, run the corresponding installer and select the “Remove…” option. For example, to uninstall the business process modeler, you must run the installer of said tool. Because the tool is already installed, two options will be available: “Repair Qflow BPM” and “Remove Qflow BPM”. Select the second option, and the tool will be uninstalled. The repair option can be used to fix installation problems, checking that all the necessary files exist and that the system’s configuration is correct. For example, if any files of an installed component were deleted, this option will install the missing files.
Alternatively, all of Qflow’s components, with the exception of the database, can be uninstalled from the control panel. To do this, use the “Uninstall a program” option, under “Programs”.
To delete the database, use its installer and select the “Remove Qflow Database” option. It is recommended to back it up before proceeding, unless you have only used it for tests and there isn’t any important data stored in it.
Licensing
The usage of Qflow is free if the number of users is less than or equal to 10, using the default workspace. Organizations in which more than ten users use Qflow must get a license to use it. This section of the manual explains how to load the license.
Licensing is given by server, workspace (tenant) and number of enabled users. The server is identified by: name, port and VirtualDirectory of the BackendAPI. License files must be available for each server where backend services are installed.
It is possible to load licenses in Qflow Admin, in the “License Viewer” view (see License_Viewer). To know more about this site read the Qflow Admin manual.
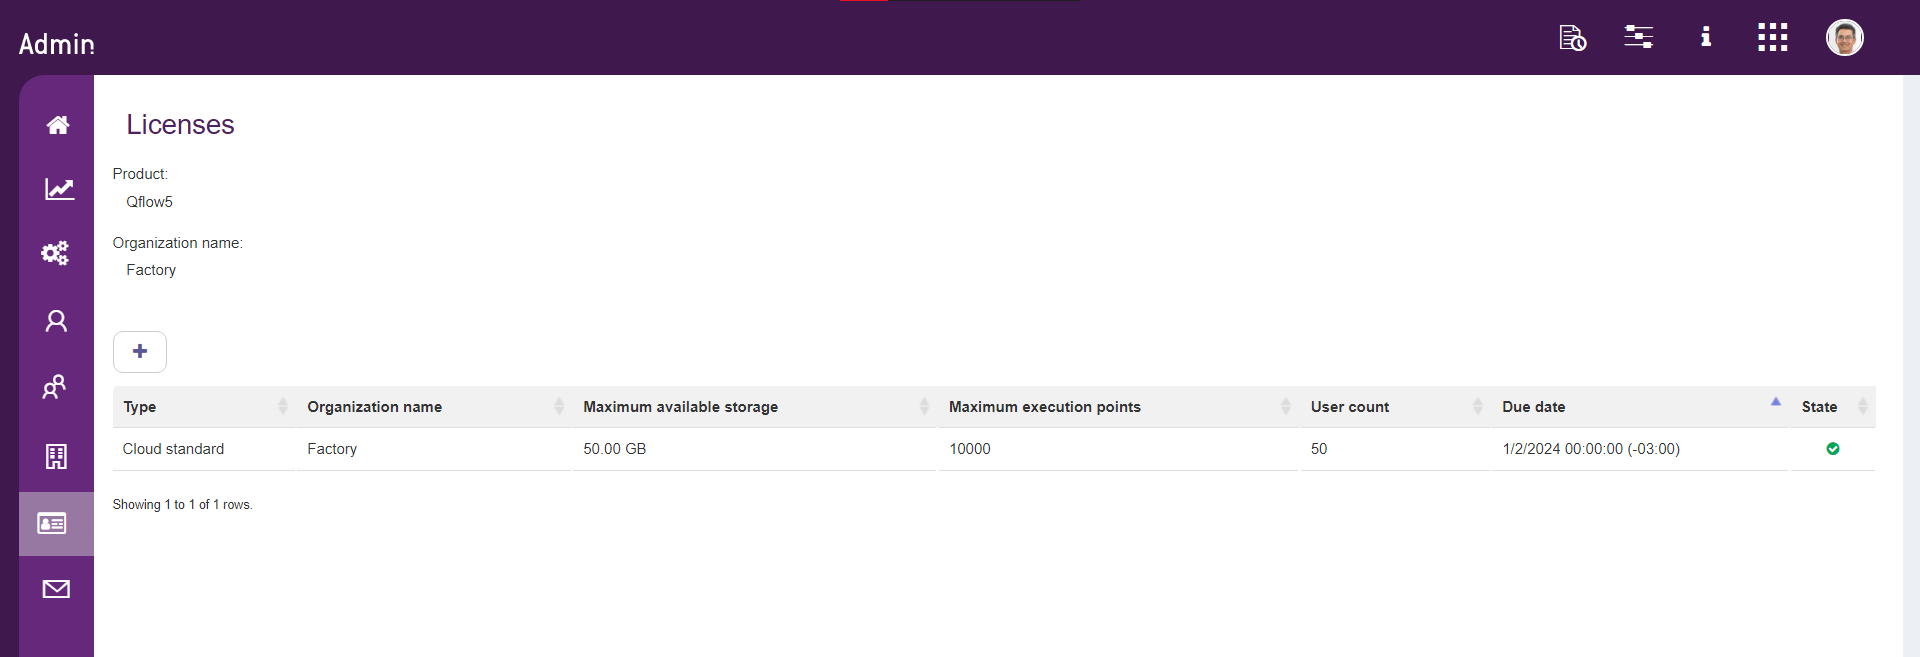
License viewer
The view shows the list of installed licenses in the current workspace (tenant). For each license in the list, it indicates:
The license’s type
The name of the organization for which the license was generated
The server’s name
The number of users enabled by the license
The license’s expiration date
The license’s status
The status of a license can be valid, invalid or expired.
To add a license, click on the Add button (“+” icon). This will open a window that will allow you to select the license file (Load_License_File). Qflow license files have the .qlic extension.
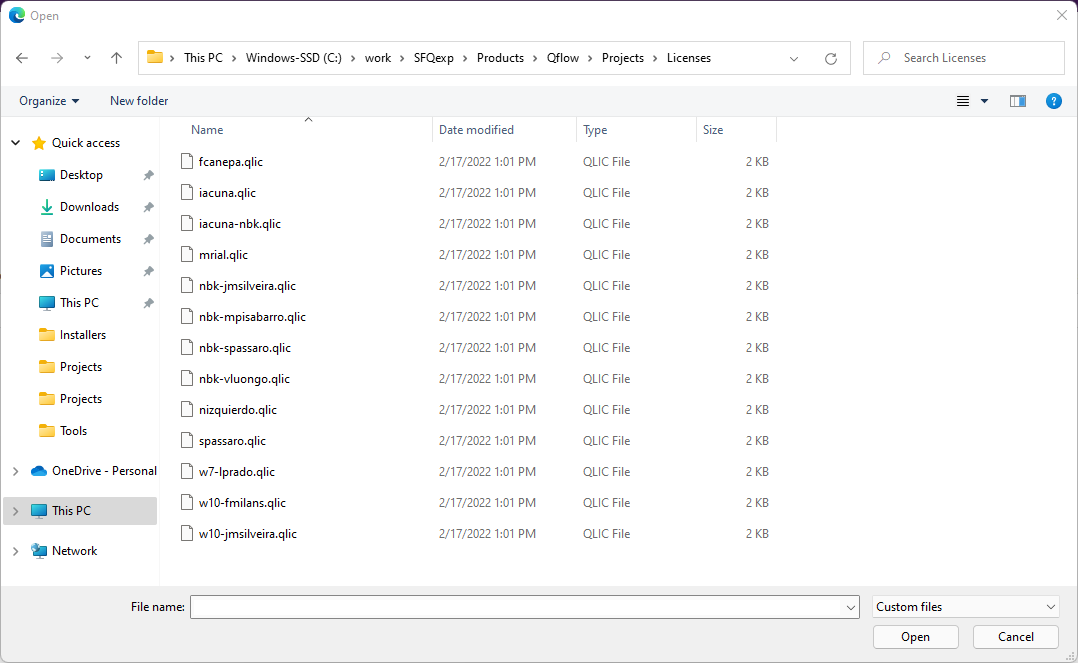
Loading licenses
Choose the file corresponding to the license that you want to load and click on “Open”. This will add the license to the list.
Configuration
This section explains how to configure Qflow. Qflow configuration is stored in the System.config file in the installation folder of Qflow’s backend services and on Qflow’s database. Qflow provides a configuration tool that makes it easy to modify the System.config file. The System Administrator and Monitor site can be used to manage the configuration that is stored in the database.
In order to run Qflow’s configuration tool run the ConfigurationEditor.exe file. For changes made with the configuration tool to take effect, restart the backend services whose parameters were modified.
On the other hand, some configurations and recommendations are provided to improve the user experience in the different tools.
Configuration tool
Configuration_Tool shows the screen of Qflow’s configuration tool. The screen is divided in two parts:
Parameter tree: it is found on the left.
Edit panel: it is found on the right and on the figure it appears blank. When the user clicks on some of the elements that appear on the parameter tree, the edit panel will show the data of the selected element, and will allow you to modify it.

Configuration tool
Parameter tree options
The parameter tree has the following branches:
System parameters: it shows Qflow’s system parameters. System parameters are predefined parameters that control various aspects of Qflow’s functionality
Database configuration: the database’s configuration.
Attachment properties: the properties of attached files.
Redis configuration: the Redis connection configuration. It is necessary if you use Redis as the cache type.
System parameters
Each system parameter has a key that identifies it (a name) and a value. The format of the value depends on the system parameter.
Most of the system parameters are stored in the database and can be configurated in the System Administrator and Monitor site, to see more about the configuration of system parameters see the System Administrator and Monitor manual.
In the tree you can find the parameters that can be seen in Configuration_Tool_Tree. These are the only system parameters located in the System.config file since they are needed before connecting to the database.

System.config file parameters
Database: |
Service |
QueryCommandTimeout |
Indicates the time in seconds after which a query to the database that returns values is considered unresponsive. The default value is 60 and it is not recommended to modify it. |
NonQueryCommandTimeout |
indicates the time in seconds after which a query to the database that does not return values is considered unresponsive. The default value is 60 and it is not recommended to modify it. |
MaxDBConnectionRetries |
The limit of reconnection attempts to the database before returning an error. |
FilterMultivalued |
Boolean, by default “False”, indicating whether searches performed in views search in the values of the different instances of a data or only in the first one. Qflow is optimized when filtering only by the first instance, so if you modify it, the performance in these queries may be affected. |
CacheType |
String, indicating the type of cache to use in the Backend. Possible values are: “Default” or “Redis”. “Default” is the default value and will use an in-memory cache. If you select “Redis”, a Redis cache will be used, and its connection must be configured; for this, see the Redis Configuration. |
Database configuration
To modify the database configuration, select the “Database configuration” element of the parameter tree. This makes the edit panel show the configuration properties of the database (Configuration_Tool_Database).

Database configuration
The configuration properties of the database are the following:
Database:
Data provider: SQL Server database provider.
Server: the name of the server in which the database is hosted.
Database: the name of the Qflow database.
Authentication:
Integrated security: if this option is checked, Qflow will connect to the database using integrated security (Windows user).
User: if the option “Integrated Security” is not checked, this property indicates the user name that Qflow must use to connect to the database.
Password: if the option “Integrated Security” is not checked, this property indicates the password that Qflow must use to connect to the database with the user name indicated in the “User name” field.
Connection properties:
Timeout: it specifies the timeout in seconds of the connection to the database.
The Test connection button allows you to test the connection data to ensure that it is correct.
Redis Configuration
To modify the Redis configuration, select “Redis configuration” on the parameter tree. This makes the edit panel show the configuration properties of Redis (Configuration_Redis).

Redis Configuration
The configuration properties of Redis are the following:
Server: The connection URL to the Redis instance. For example: redis-instance.azure.cloud.redislabs.com:11855.
Password: The password that Qflow must use to connect to the Redis instance.
Retry timeout: The number of seconds to wait, when an error is detected in the connection with Redis, to retry the connection. When a failure in the connection with Redis is detected, in memory cache is used until the connection can be reestablished.
The Test connection button allows you to test the connection data to ensure that it is correct.
Login configuration with Google and Microsoft
Login configuration with Google
To enable the login with Google it is necessary to configure the domain in Google’s administration console. The Google account in which the configurations are done must be the one that acts as the service provider.
Create a new project.
Go to the Credentials window.
Click on “Create credentials” and select “OAuth client ID”.

Menu to activate OAuth for Google login
Then, select the “Web” option and add the authorized redirection URIs of the sites of Qflow that you wish to authorize, as shown in the following figure:

Add authorized URIs for Google login
In the example figure, the redirection URI that corresponds to the web business process modeler is shown. To add the other sites, you must change the WebServerName and Site values in the URI to their corresponding values.
https://{WebServerName}/{Site}/signin-google
The default URIs are:
Qflow Task: https://UrudataSoftware.com/QflowTask/signin-google
Qflow Design: https://UrudataSoftware.com/QflowDesign/signin-google
Qflow Team: https://UrudataSoftware.com/QflowTeam/signin-google
Qflow Admin: https://UrudataSoftware.com/QflowAdmin/signin-google
Qflow Access: https://UrudataSoftware.com/QflowAccess/signin-google
When you click on “Create”, the Client ID and Client Secret keys will be generated.
Then, you must go to the web.config file of the corresponding site and add, in the appSettings section, the Google sign in settings with the generated Client ID and Client Secret values.
<appSettings>
   <add key="MicrosoftClientId" value="<MSCLIENTID>" />
   <add key="MicrosoftClientSecret" value="<MSCLIENTSECRET>" />
</appSettings>
Google sign in configuration
Microsoft login configuration
To activate the login with Microsoft you must first go to the Azure portal. The Microsoft account in which the settings are applied must be the account that acts as the service provider.
Go to the “App registrations” section (you can access it by searching for it on the portal’s general search bar).
Select the “New registration” option.

Microsoft Azure Application registration (step 1)
Add the Redirect URI of the site that you want to add as shown in
Register_applications_in_Azure. The URI type must be Web.

Microsoft Azure Application registration (step 2)
Once the application has been registered a Client ID will be generated, which will be needed for the configuration.
To add more redirection URIs click on the link next to the “Redirect URI” of the application that you just registered. In the previous image the redirect URI corresponding to the web business process modeler is shown. To add the other sites you must change the WebServerName and Site for corresponding ones.
https://{WebServerName}/{Site}/signin-microsoft
The default URIs are:
Qflow Task: https://UrudataSoftware.com/QflowTask/signin-microsoft
Qflow Design: https://UrudataSoftware.com/QflowDesign/signin-microsoft
Qflow Team: https://UrudataSoftware.com/QflowTeam/signin-microsoft
Qflow Admin: https://UrudataSoftware.com/QflowAdmin/signin-microsoft
Qflow Access: https://UrudataSoftware.com/QflowAccess/signin-microsoft

Access redirect URIs
Then, go to the “Certificates & secrets” section of the side menu.

Certificates & secrets (step 1)
Select the “New client secret” option in the “Client secrets” group. Generate the Client secret that you will need for the configuration.

Certificates & secrets (step 2)
Once these steps have been completed, you must go to the web.config file of the corresponding site and add, in the appSettings section, Microsoft’s sign in settings with the generated Client ID and Client secret values. The following image shows the configuration that must be modified:
<appSettings>
   <add key="MicrosoftClientId" value="<MSCLIENTID>" />
   <add key="MicrosoftClientSecret" value="<MSCLIENTSECRET>" />
</appSettings>
Microsoft sign in configuration
Configuration in Qflow Team
Once the login configuration has been completed, you must go to Qflow Team and add an OAuth type security provider. To see how to add a new security provider go to the “Security providers” section of the Web Organizational Model manual.
Then, for a user to be able to log in directly with Google or Microsoft, they must have their Google or Microsoft email address as the value of the login field, depending on which one corresponds. For more information about this field and how to modify it go to the “User properties” section of the Web Organizational Model manual.
Once the configuration is finished, the user will be able to log in to the corresponding application with their Google or Microsoft account. Additionally, to stay logged in between browser sessions, the system parameter “Enable remember user session when logging in with Google and Microsoft” must be set to “true” in Qflow Admin.
Through additional configuration, these sessions may be remembered by the browser. In order to do this, it will be necessary to set the system parameter “Enable remember user session when logging in with Google and Microsoft” to “true” within SAM.
Optimization of the web site’s performance
This section explains how to make adjustments on Internet Information Services (IIS) to improve the performance of the web site. This applies to any web site hosted on IIS. The two methods described are the use of expires headers and HTTP compression.
Expires headers
The first visit to a web site can require several HTTP requests to load all of its contents (scripts, style sheets, images, etc.). Expires headers make the content cacheable, which avoids sending unnecessary HTTP requests on subsequent visits to the site.
From the IIS Manager it is possible to assign expires headers both on the server level as well as site and application level. In any case, you must open, in Features View, the HTTP Response Headers option, and through the context menu, select the Set Common Headers… option.

Expires headers configuration (step 1)

Expires headers configuration (step 2)
This makes the IIS Manager open a window like the one on the next figure. In it, check the Expire Web content option and define an expiration criterion as shown in the image.

Expires headers configuration (step 3)
Compression
The compression of HTTP responses reduces their size, which lowers the site’s response time.
When a browser handles compressed responses, their requests to the server include a header named Accept-Encoding, which indicates which compression algorithm it accepts.
If the server uses compression on its response, it includes the Content-Encoding header to indicate in which way the response has been compressed.
A proxy that receives a request without the Accept-Encoding header cannot serve a file that was sent in response to a request that did have it (and vice versa)
IIS uses two different types of compression:
Static compression: it is applied to static files such as images, HTML pages and documents. All HTTP responses of the same file are identical: they consist of taking the file from the hard drive and sending it. The content of an HTML page, for example, is always the same; it is not generated every time a request to send it is received. This is different to, for example, the response of a request from an ASPX page, whose content is different every time a response must be sent, and it is generated when a request is received. Since the content of static files does not vary, it is possible to compress them once and store them in cache, in order to save resources (CPU) on the server, because it does not have to compress them each time when they must be sent as a response to some request.
Dynamic compression: it is applied to dynamic files, such as ASPX pages whose content is different when responding to different requests. For these files, the content must be compressed every time a request is received. Therefore, the result of compressing the resources of this type is not cacheable, and if the server makes intensive use of the processor, the CPU load imposed by the dynamic compression can result in degraded performance on the site. In this case, you must evaluate if it is convenient to reduce the size of responses at the cost of greater use of the CPU.
To be able to activate compression on IIS, first you have to enable the feature on Windows, on the window that allows you to activate and deactivate Windows characteristics (see Enable_Compression_in_Windows; the Enabling IIS components section explains how to access that window).

Enable compression on Windows
From the IIS Manager it is possible to configure compression on a server level as well as per site and application. In any of these cases, open the Compression option in the Features View and define the desired compression criteria (static and/or dynamic).

Compression option in IIS

Enabling compression in IIS
To confirm the changes, click on Apply.
Other configurations
Attachments storage
Qflow allows attachments in processes. By default, these files are stored in the default database with the rest of the information. Qflow also provides attachment storage using Azure containers or a specific database for them.
This section explains the settings required for the selection and correct operation of each of the options.
Azure Blob Storage
For this option it is necessary to have a storage account in Azure. For information about the creation and step-by-step instructions on how to do it, please visit: Create a Storage account.
Now, it is necessary to configure the connection to the storage account from Qflow. We add in the system.config file of the backend services a section as shown in Azure_Blob_Storage_Connection. Where account_key must be replaced by the corresponding access key.

Connection to Azure Blob Storage.
To get this connection data, we go to the storage account in the Azure Portal and then to Access Keys in the left panel. numref: `_Azure_Blob_Storage_Access_Keys

Access keys in Azure Portal.
In Connection chain we have the necessary information, as shown in Azure_Blob_Storage_Connection_String..

Connection string in Azure Portal.
Finally, in Qflow Admin you must assign the value Azure blob storage to the system parameter Attachment storage type. For more information about system parameters see the Qflow Admin manual.

Configuration Azure Blob Storage
External database
For this option it is necessary to have installed and configured a database as explained in External database installation on SQL Server [Optional].
It is also necessary to add the information so that the backend can establish a connection with the database. It is added in the System.config file of the backend services as seen in External_Database_Connection_Data.

External database connection data
Where:
Server: is the name of the server in which the database is hosted.
database is the database name.
In case SQL Server authentication was checked when creating it and IntegratedSecurity is false, UserName and Password are the credentials used to authenticate in the database. Otherwise IntegratedSecurity must be true.
Finally, in Qflow Admin you must assign the value External database to the system parameter Attachment storage type.

Configuration External database
Unified session management
By default Qflow handles a unified session. After the user logs in to Qflow Access or any of the tools, the session is valid for all tools in which he/she has permissions. Also when logging out of one site, it logs out of all sites.
If this behavior is not desired, it is possible to have a customized one. For a tool to maintain a session independently from the rest, in the corresponding web.config file, the value false is set to the UseUnifiedSession parameter in the appSettings section.

Unified session management
Setting up authentication with Google SMTP service
Google made changes to the authentication for its SMTP service. For the correct operation in Qflow of a notification service of this style, we must make some configurations in the Google account with which the emails will be sent
First, we must have two-step verification enabled for this account.
Then an application password must be created:
Go to the Google account settings panel to the security section.

Manage Google Account Security
Go to Application Passwords.

Google security section
In application we select Email, as device we can choose Windows Computer or Other and click on GENERATE.

Application passwords
Then we will see a screen like the one shown in
Generated_Application_KeyWhat you see in the yellow box is the 16-character key that we must use in the SMTP service in Qflow.

Generate application password
Finally, in Qflow Admin, we go to the configuration panel of the corresponding SMTP notification service and use the generated password in the Password field in the SMTP User group. For more information on configuring notification services, see the Qflow Admin manual.
TLS connection configuration
It is possible to configure Qflow’s tools and notification services to use the TLS security protocol for their connections if, for example, we need to connect to a system that requires it.
The following examples show the configuration to work with servers that require their connections to use the TLS 1.2 protocol.
To configure the use of the TLS protocol on the tools, we must modify the corresponding web.config file. In this file, we must find the webAPIConfiguration node, and modify its securityProtocol attribute, which by default has SystemDefault as value. We must replace this value for one that represents the protocol that we wish to use, for example TLS 1.2, in which case the value will be Tls12. The node should look similar to the following:
<webAPIConfiguration serverName="{serverName}" connectionMethod="RESTWebServices" connectionPort="{port}" connectionProtocol="http" namespace="{namespace}" toolName="{toolName}" securityProtocol="Tls12" />Configuration of TLS 1.2 connection protocol for tools
To make the same change to notification services, we have to make a similar change on the services’ configuration files, which can be typically found on C:\Program Files (x86)\Urudata\Qflow Backend Services.
In this folder, the executable files of the notification services can be found, as well as their configuration files. These are the following:
Qframework.Listener.Smtp.exe.config, for the SMTP service
Qframework.Listener.ExtendedMAPI.exe.config, for the extended MAPI service
Qframework.Listener.ExchangeWS.exe.config, for the Exchange service
Qframework.Listener.FcmPushNotifications.exe.config, for the Push Notifications service
In these files, we must look for the appSettings node, which has a node in it with the attribute key=’SecurityProtocol’, and the attribute value which by is by default SystemDefault. In the same way, this is the value that we must change. To use TLS 1.2, we must replace this value with Tls1.2. The node should look similar to the following:
<appSettings>
   <add key="RenewSessionMode" value="false" />
   <add key="TraceLevel" value="Exceptions" />
   <add key="ClientSettingsProvider.ServiceUri" value="" />
   <add key="SecurityProtocol" value="Tls12" />
</appSettings>
TLS 1.2 connection protocol configuration for notification services
Configuration of reCaptcha for anonymous/external flow start
It is possible to configure a Captcha challenge to control the initiation of external/anonymous processes, which provides a security measure to ensure that the system’s integrity is not compromised by malicious agents.
To use it, each client must create and configure their own instance of reCaptcha. To do this, they should follow these steps:
Go to the reCaptcha configuration site and click on “v3 Admin Console”:
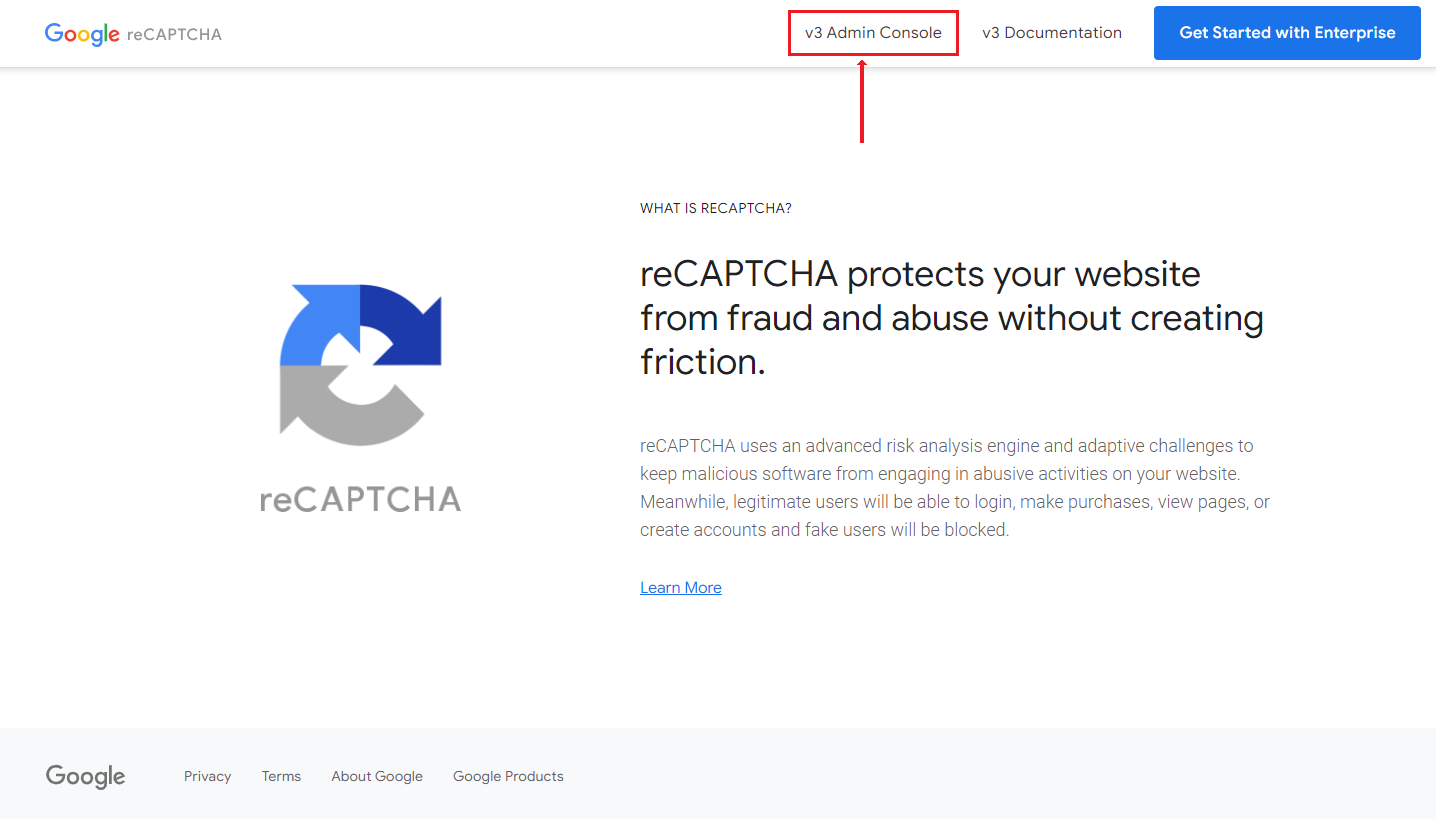
reCaptcha site
In the “Label” field, choose a name that represents the website, such as “Qflow”.

Captcha label
In the “reCaptcha Type” section, select “Challenge (v2)” and in the options that appear, choose “I’m not a robot Checkbox”.

reCaptcha type selection
In the “Domains” section, enter the name of the server where Qflow Task is hosted. In this example, “localhost”. Click on the “+” icon to create the domain and then click “Submit” to continue.
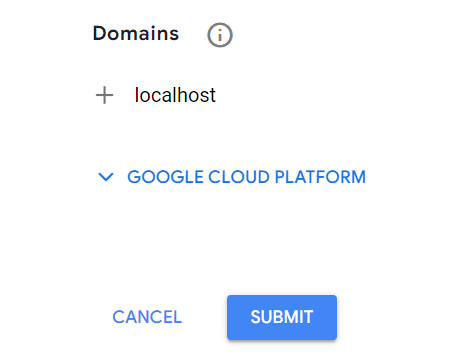
Domain creation
We have now configured our Captcha. Next, we need to copy the site key and the secret key data.
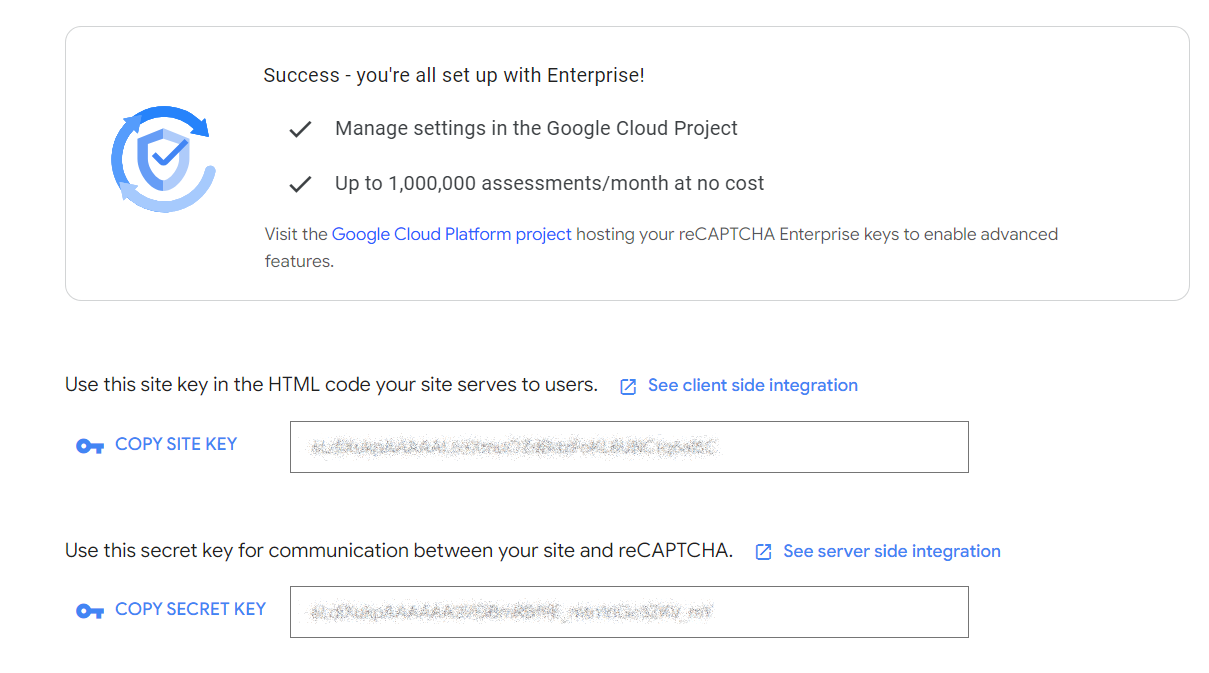
Site key and secret key
In the web.config file, located in the Qflow Task installation directory, look for the reCaptcha configuration, which by default is as follows:

reCaptcha configuration section in the web.config file
In the value attributes of the nodes with the key attribute “ReCAPTCHASiteKey” and “ReCAPTCHASecretKey”, copy the site key and secret key obtained in the previous step. Additionally, you need to uncomment this part of the file. The final result should look like this:

reCaptcha configuration section completed
Save the file. Now, in the default form for starting an external/anonymous process, you will see the Captcha challenge that must be completed before being able to initiate the process.
Installing other components
Installing the directory synchronization service
Qflow includes a directory synchronization service that allows synchronizing the Qflow organizational model with LDAP compatible directory services.
To install said service:
Open Windows command prompt tool (Start, Run, “cmd”). For Windows Vista and newer versions, you must run said tool as an administrator.
Navigate to the folder in which the InstallUtil tool is located. By default it can be found at \WINDOWS\Microsoft.NET\Framework64\v4.0.xxxxx (xxxxx can vary; the folder can be called, for example, v4.0.30319). Example: run the command “cd C:\Windows\Microsoft.NET\Framework64\v4.0.30319\”.
Run “InstallUtil” followed by the complete path of the Qflow.Listener.DirectorySynchronization.exe file. For example, if the Qflow services were installed at C:\Program Files (x86)\Urudata\Qflow Backend services, you must run the following command:
InstallUtil "C:\Program Files (x86)\Urudata\Qflow backend services\Qflow.Listener.DirectorySynchronization.exe”
Running this command will open a window in which you must enter the user name and password of the account with which the service being installed will be executed (it is the same window that appears when installing the other backend services; see
Configuration_Account_Service). In general, that account is the same that is used to run the other services. Enter the user name and password and click on “Accept”.After this, the installation will continue and will be ready after a few seconds.
To check that the service was correctly installed, open the Windows services window and check that the “Qflow directory synchronization listener” service is installed.
Start the service.
Configuration of the directory synchronization service
To configure the directory synchronization service, you must modify the Qflow.Listener.DirectorySynchronization.exe.config file (File_Configuration_Directory_Synchronization). Said file is located in the backend services installation folder.

Directory synchronization service configuration file
The parameters that can be configured are the following:
DirectorySynchronizationPeriod: it specifies the time period in seconds between each synchronization with the directory services. By default it is 3600 (1 hour).
DirectoriesToSynchronize: a list of FQDN, separated by commas, of the directories that you want to synchronize with. It is empty by default, so synchronization is performed with all directories.
OutputGatheredData: if it is set to “true”, it writes a file in the services folder that includes the collected information of the directory services. It can be useful to analyze the synchronized information in the event of an error. The generated file is called “DirectorySynchronizationOutput.xml” and it is in the same folder as the service.
SynchronizeUsersWithoutEmail: if it is set to “true”, it considers and imports the users that do not have email accounts. By default, its value is “false”, since these accounts are not usually associated with individuals.
DisableNotFoundUsers: if it is set to “true”, it disables those users who are in the organizational model, but not in the directory. By default, its value is “false”.
Installation of iFilter for full-text searches on PDF documents
This section explains how to install the iFilter that allows you to perform full-text searches of PDF in Qflow documents.
The iFilter installer can be downloaded in the following URL:
http://ftp.adobe.com/pub/adobe/acrobat/win/11.x/PDFFilter64Setup.msi
Once the installer is downloaded, run it and follow the instructions. Once the component has been installed, follow the next instructions:
Add the path in which the component was installed to the PATH environment variable. The path must include the “bin” subfolder.
Restart SQL Server’s services and full-text search.
In SQL Server, run: sp_fulltext_service ‘load_os_resources’, 1
Check the installation by running the following command: EXEC sp_help_fulltext_system_components ‘filter’. If the installation was performed successfully, in the result there must be a record with the value “.pdf” for the “ComponentName” column.
IIS - URL Rewrite installation
To install this extension, it is necessary to have IIS 7, 7.5, 8, 8.5 or 10 installed. Follow these steps to download and install this extension:
Go to the URL Rewrite page and download the executable that matches the language of your IIS installation and the architecture of your computer.
URL Rewrite download section
Follow the steps on the installer wizard until you complete the installation.
Restart the computer in where the installation was done to finish the configuration.
Dimensioning
The dimensioning of the Qflow support systems must be done largely based on the dimensioning of the base software to be used (relational database, internet server and messaging server).
When users outside the organization use Qflow Task, the security infrastructure complementary to the system must be foreseen, such as firewall and security mechanisms with digital certificates that allow the creation of a secure site. Such mechanisms generally imply an additional load on the processing capacity of the web server.
As for Qflow’s disk storage, this requires the following space to be assigned:
Space in system disks: 200 MB
Storage of structures on the relational database: it is recommended to have a space of 10 GB available.
Growth of the relational database:
Variable, in average 30kb per process.
Storage in the attachments repository: the size of the files to store plus 40% of structures and indexes (if full-text search for documents is not used, the additional 40% is reduced to an additional 2%).
Note that, regarding the space necessary on the disk, in addition to the already mentioned aspects, the space for backup should be taken into account (for example, the space used by the Transaction Log). This is not taken into account in the data mentioned above, since it depends on the backup policy of each organization and on the database engine being used.
To get more information about these aspects, see your database engine’s manual.
Examples of a Qflow server’s dimensioning:
Users |
Flows started per day |
Process life time |
Web server on the same computer |
DB on the same computer |
Recommended computer |
|---|---|---|---|---|---|
10 |
10 |
1 week |
Yes |
Yes |
Inter Core2 Duo 2 Ghz 2 GB RAM |
100 |
100 |
1 week |
Yes |
Yes |
Intel Core i5 2 Ghz 2 GB RAM |
100 |
1000 |
1 week |
Yes |
No |
Intel Xeon E3 3.2 Ghz 2 GB RAM RAID disk subsystem |
1000 |
1000 |
1 week |
No |
No |
Intel Xeon E3 3.2 Ghz 4 GB RAM RAID disk subsystem |
In scenarios of very scarce interaction, such as initial implementation stages or settings with little workload, it is recommended to implement Qflow as an additional service on the existing infrastructure.
If the number of simultaneous active flows exceeds 50.000, it is recommended to separate the engine and application services, implementing specialized servers for flow processing, managing application requests and notification services. This configuration requires a specific factory-made sizing.
Architecture and deployment
Qflow has a SOA (Service Oriented Architecture) type of architecture. It has a set of services that group similar functionalities, conforming the backend layer. The backend services are uncoupled from each other, and provide functionality to the Frontend layer, which is the layer that the users interact with.
The communication between the Frontend and the Backend is done through messages, so that it is possible to distribute the components of the architecture on several servers, which makes it possible to maintain a high level of scalability and fault tolerance.
The frontend layer is composed of the following components:
Business Process Modeler (design tool)
Organizational Model Manager (administration tool)
Business Process Administrator (administration tool)
System Administrator and Monitor (administration tool)
Qflow’s web site
Each frontend application communicates with a WebAPI on the backend, which manages its requests. The flow execution service or “flow engine” can also be found on the backend layer. This service is responsible for making the flows advance.
Other services included on the backend are:
The notification services, responsible for sending messages through different mail servers.
The directory synchronization services, which allow you to keep the organizational model data synchronized with the company’s security provider (for example, Active Directory).
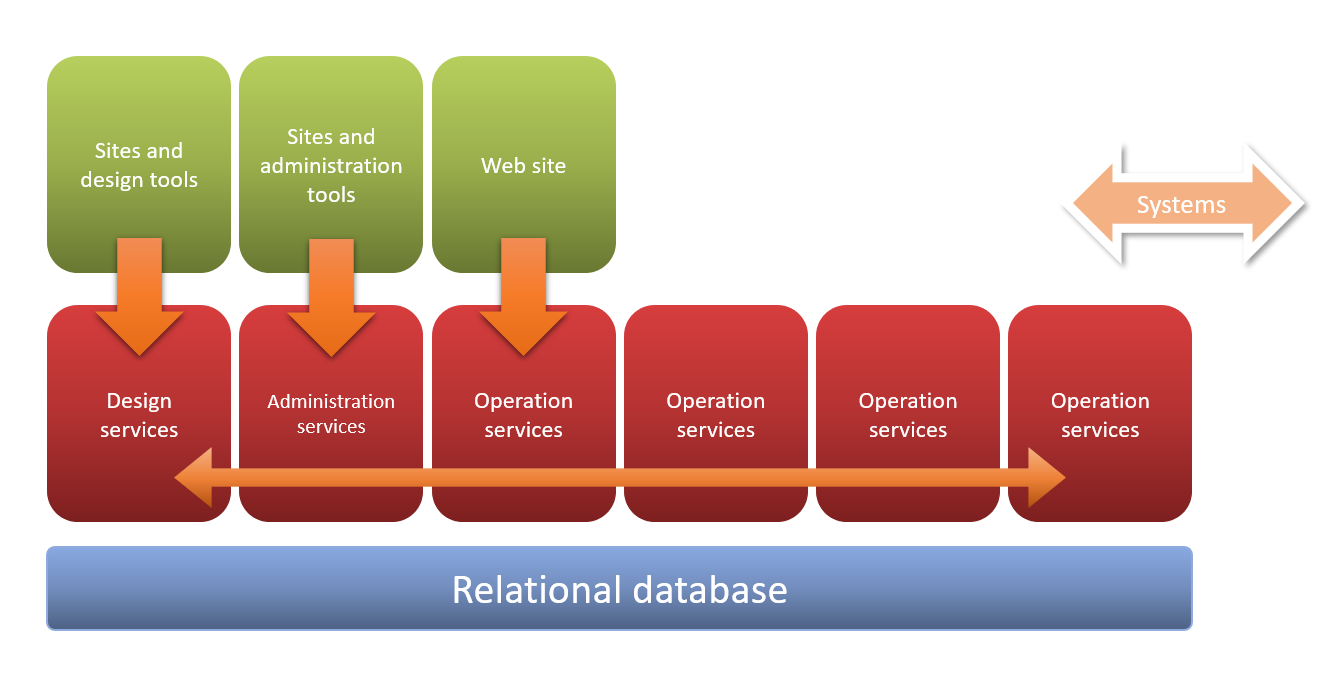
Qflow architecture diagram
Some deployment options
This section describes some of Qflow’s deployment options, according to its basic architecture, and can be used as a guide when evaluating alternatives and making decisions about Qflow’s deployment in your organization.
Simple deployment
In this scenario, all of Qflow’s services are running on the same server, although they consume network services such as those provided by the database, mail and directory services. It is recommended that these services be hosted on different servers, but nothing prevents them from being hosted in the same server as the Qflow services.
The following scheme is commonly used as a development environment.
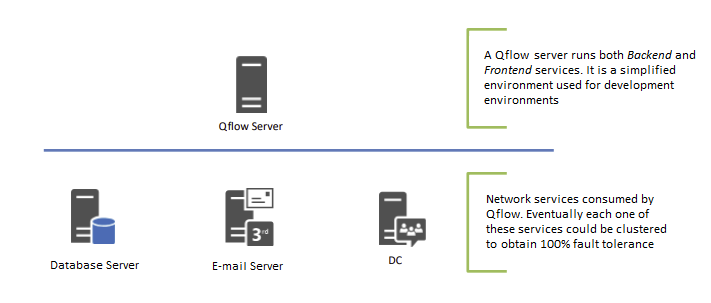
Simple deployment diagram
Standard deployment
In this scenario, Qflow’s services are divided into two groups: backend and frontend.
Backend services cannot be clustered by Qflow itself, but it is possible to set up a Windows cluster to achieve the same goal. The frontend services, on the other hand, can be put on various servers to set up a farm using NLB (Network Load Balancing). This makes fault tolerance possible in this layer, and provides load balancing.
This type of scenario is generally used by medium-level implementations of Qflow, which generally do not have fault tolerance in all layers.
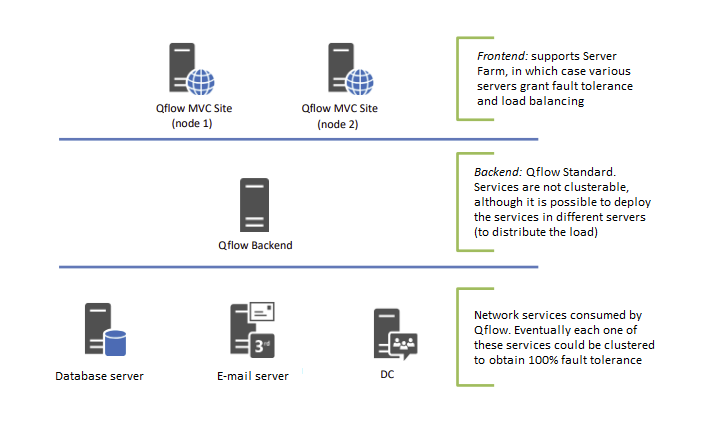
Standard deployment diagram
Enterprise deployment
In this scenario, fault tolerance exists in all layers. It is used by large implementations that require high availability.
In this case, the architecture is comprised of:
a layer called frontend, in which you can have several web servers that provide fault tolerance and load balancing.
a backend layer, which can have various servers in Active/Active cluster mode. It is worth noting that the backend services that have load balancing and fault tolerance internally are the flow engine and the notification services. The other services that are part of the backend must be set on a Windows NLB farm to achieve the same effect.
This type of scenarios occur on large implementations that require fault tolerance on the production environment. It is common to set a similar scenario for the pre-production or homologation environment
This type of deployment requires a Qflow “Enterprise” license.

Enterprise deployment diagram
In all the scenarios presented, it is possible to run the Qflow services on virtualized servers.