Business process administration [Deprecated]
Introduction
The purpose of this manual is to explain the operation of the business process administrator. The business process administrator allows you to perform operations over flows: pause, step back, etc. These operations can be done massively, meaning, it is possible to select several flows simultaneously to perform any action over them.
Deprecated product warning
Note that this tool is deprecated, and it can only be used with the default workspace. For more information about workspaces, see the Qflow Admin manual.
Connection with the server and security
The first time you run the business process administrator, you must indicate how it connects to the server. This section describes how to configure the tool’s access permissions as well.
Server connection configuration
The first time that you try to open the tool Qflow will show the window in which you configure the connection with the backend server (Fig. 1037). The window shows the following options:
Server name: name of the server you want to connect to.
Sub address: sub address of the server. This information must also be known beforehand, but by default this is 6006 and, in general, it is not necessary to change it. If 6006 is not working, contact your network administrator.
Log in information
Use my network credentials: use the credentials of the current user.
Use the following credentials: it allows you to specify a user name and password that will be used to connect to the server.
Automatically connect to this server: this option makes the tool connect automatically to the server the next time you open it, using the specified settings.

Fig. 1037 Connection with the server
Once all of the settings have been configured, click on the “Connect” button to connect to the selected server
Security options
The security options allow you to determine who can and who cannot access the business process administrator, and in the case of having access, which operations the users can perform.
To access the security options window, select it from the “Tools” menu. Qflow will display a window like the one shown in Fig. 1038.
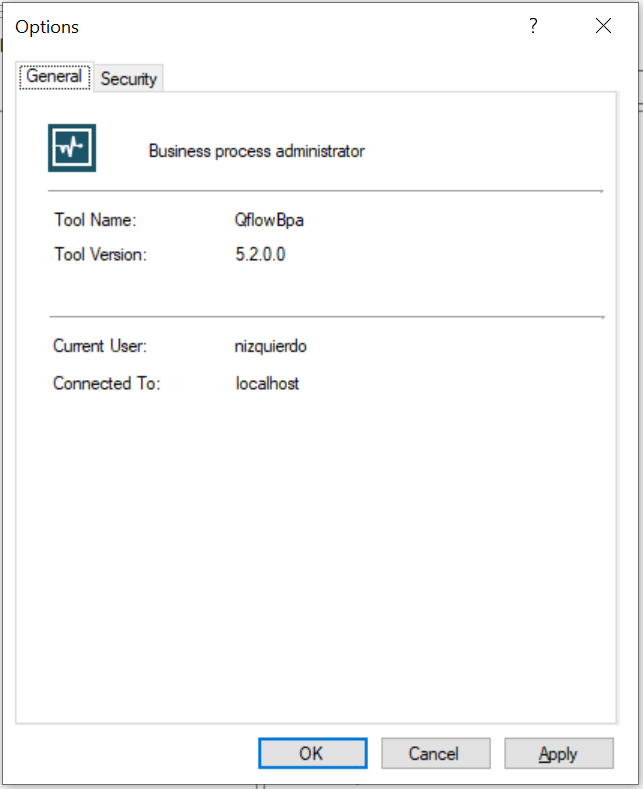
Fig. 1038 Options
The first tab of the window shows the following information:
Tool name
Tool version
Current user: the user that is running the tool.
Connected to: name of the server to which the tool is connected.
The second tab (Fig. 1039) allows you to configure the access to the tool:
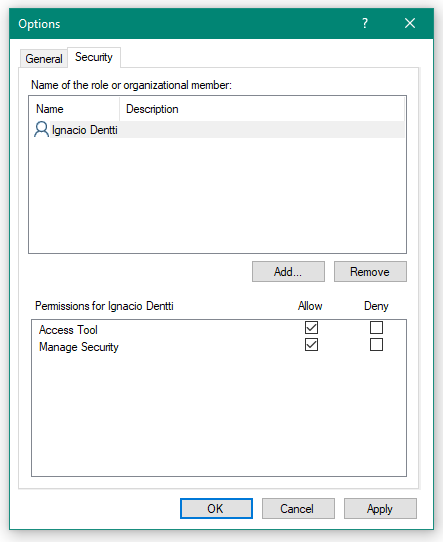
Fig. 1039 Security
In the upper part of the window (where it says “Name of the role or organizational member”), the security roles, groups and users that have access to the tool are shown. The “Add…” button allows you to add security roles, groups and users to the list, and the “Remove” button lets you to remove the selected element. For more information about the security roles, see the Qflow Team manual.
In the lower part of the window, the permissions of the currently selected element are shown. There are two types of operation:
Access tool: it allows you to open the business process administrator.
Manage security: it allows you to modify the tool’s access permissions.
Description of the user interface
The Fig. 1040 shows the window of the business process administrator. On the left of the window the package tree is displayed (the concept of package is explained on the Qflow Design manual).
The flows of the selected package are displayed on the right side of the screen.
The meaning of each of the columns shown in the list of flows is explained on the Flow data section.
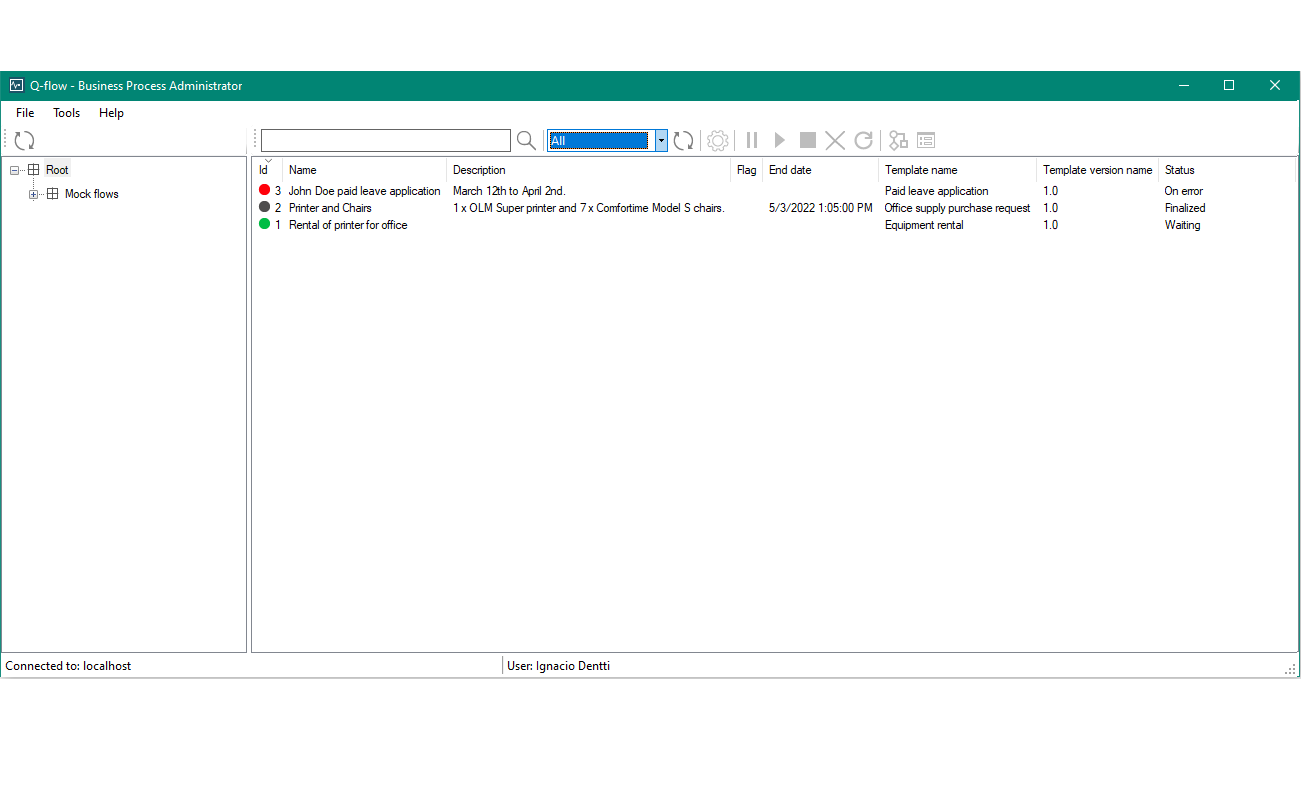
Fig. 1040 Main screen
Flow data
For each flow, the following data is shown:
Id: numeric and correlative flow identifier.
Name: flow name.
Description: flow description.
Flag: flow flag. For each flow step, you can define a start flag, and for some, an end flag for the step. When a flow reaches a certain step, the flow’s flag is replaced by the text of the step’s start flag, and when the flow leaves this step, its flag will now be the step’s end flag. The flag, therefore, in a certain way, indicates the current status of the flow, or where it is in the process.
End date: if the flow is completed, this column indicates the date of completion.
Template name: name of the template to which the flow belongs.
Template version name: name of the template version to which the flow belongs.
Status: current state of the flow. The possible states are:
Active: the flow is running and has no errors nor is it waiting. A flow can be on this state if, for example, it is moving from one step to another, or if it is running an operation.
Waiting: the flow is waiting for a user’s action.
On error: at least one thread of the flow is halted due to an error.
Finalized: the flow ended its execution naturally (arrived at an end event).
Finalized by user: the flow was terminated by some user before reaching an end event.
Paused: someone has paused the flow and it is suspended.
For each flow, there is also an icon with a color that indicates its status. The icon does not make a distinction between a flow that finished normally and a flow that was finalized by a user.

Fig. 1041 Icon that indicates the status of a flow
To see information on each thread of a flow, double click on the flow, or click on the option that is on the right of the refresh flow list button (Fig. 1040).
Flow sorting
One click on the header of any column will make the list sorted using the values of that column. The order can be ascending or descending, and it is indicated by an arrow that is shown next to the name of each column. To change the order from ascending to descending or vice versa, click again on the column’s header. For example, if the list is currently sorted by name in ascending order, clicking on the name column header will change the list to descending order.
Actions
At the top of the flows list, there is a tool bar that allows you to perform various actions (Fig. 1042). Most of these actions can also be done through a context menu that appears when right-clicking on a flow.
Refresh packages: refreshes the packages tree to show the latest changes from the last time it was updated.
Filters: you can filter the flows list by name and status. For more details, see the Filter the flows list section.
Filter by name: it allows you to enter text and filter the flow list so that it shows only flows whose name contain that text.
Apply filter by name: filters the list of flows according to the text that was written on the name filter.
Filter by status: it allows you to select a status for the list of flows to only show those flows that are on the selected status.
Refresh flows list: updates the list of flows to reflect the changes that occurred from the last time it was updated. For example, someone could have started a flow, and this does not appear on the list because the list was loaded before this happened. The list must be refreshed for it to be loaded.
View threads: opens a window that shows the threads of the selected flow. The Flow threads section explains how that window works.
Operations: actions that allow you to make operation over the flows. The Operations on flows section explains each operation in detail.
Pause flow
Resume flow
Finalize flow
Delete flow
Retry error threads
View flow details: opens the browser and shows the flow’s details form on the web site. For more information about this form, see the Qflow Task manual.
Go to flow edit form: opens the browser and shows the flow’s edit form on Qflow Task. For more information about this form, see the Qflow Task manual.

Fig. 1042 Actions
Filter the flows list
As indicated by Fig. 1042, it is possible to filter the list of flows.
Filter the flows by their name or identifier
Above and to the left of the flows list there is a text box in which you can write text (in Fig. 1042, the text box is indicated with the label “Search for a flow”). If you click on the icon represented by a magnifying glass (as shown in Fig. 1042), Qflow will apply a filter to the flows list of the selected package, in such a way that only the names that contain the entered text are shown on the list. If the entered text is a number, Qflow will search for the flow whose correlative identifier is that number.
Filter flows by their status
To the right of the name filter text box, there is a combo box that allows filtering the flows list by their status (“Filter flows by status”, Fig. 1042).
The options that can be selected on the list are all the possible states of the flows:
All: all the flows of the selected package are shown.
Active: shows only active flows. Active flows are those that are running (not finalized nor paused).
Waiting: shows only the flows that are waiting for the action of some user (for example, for a user to respond to a question on a question step).
On error: shows only those flows that have at least one thread on error.
Paused: shows only paused flows.
Finalized: if this option is selected, the list will show only flows that are finished. Flows that have been finalized by a user are also included.
Operations on flows
The operations that you can perform on flows are the following:
Pause: pause a flow. When a flow is paused, it does not advance, and the pending tasks of that flow are not included on the waiting tasks. In order for a flow to be able to be paused, at least one of its threads must not be advancing.
Resume: returns a paused flow to its original state.
Finalize: forcibly finalizes the flow, meaning that its execution is interrupted and it is set as finalized.
Delete: it allows you to delete a finalized flow from the database.
Retry error threads: it allows you to retry the execution of all the threads that are on an error state. It is equivalent to running the “Retry execution” (see below) for all threads, without the need of running it individually for each one.
To execute any of these operations, right-click on the flow you wish to apply the operation on and select the operation on the context menu.
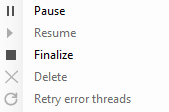
Fig. 1043 Operations
It is possible to step back a flow, or retry the execution of one of its steps. These operations, however, are operations that are performed on threads, and as such, the flow’s threads window must be open to perform the operation.
It is also possible to run an operation over various flows at the same time. To do this, select various flows by holding the “Ctrl” key and clicking on the desired flows one by one, and then right-click on any of the selected items to open the context menu and select the desired operation.
If the operation that you wish to perform is not available for all the selected flows, it will not be enabled on the context menu. For example, you cannot resume a flow that is not paused, so if you select a paused flow and an active flow simultaneously, the “Resume” option will not be enabled. For these cases, you must unselect the flows that prevent the operation from appearing.
Flow threads
The threads window of a flow shows information on all of its threads. To open it, perform any of the following actions:
Double-click on the flow
Right-click on the flow and select the “View threads” option
Select the flow and click on the “View threads” button (the button on the right of the button used to refresh the flows list, see Fig. 1042).
Fig. 1044 shows the window of a flow’s threads.
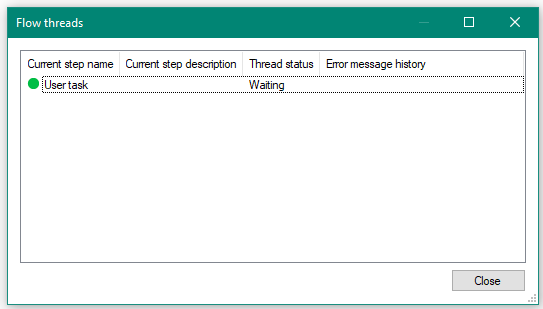
Fig. 1044 Flow threads
The column that indicates the name of the current step also has an indicator that will turn red if the thread is in an error state.
Operations over flow threads
A right-click on any thread of the flow opens the thread context menu. It presents two options, corresponding to the operations that can be performed on a thread.
Retry execution: it is useful for threads that are on an error state. This operation retries the execution of the last step of the thread, so that if the circumstances that provoked the error changed, the thread can resume its execution normally.
Step back: makes the thread step back to the step previous to the current one. After the step back, the flow will be in an error state, thus it does not advance, and the operation can be repeated as many times as desired, under certain conditions.
You cannot step back a thread if it has child threads, unless all of them are running their first step. For example, in the flow of Fig. 1045 a, the main thread cannot be stepped back, because it has two child threads, and the current steps of these threads are not their first one. In the flow of Fig. 1045 b, this is possible. Each one of the child threads is on its first step. It is sufficient that one of the child threads is not in this condition for it not to be possible to roll back the parent thread.
You cannot step back a thread if its current step is the first step of the thread. In this case you must step back the parent thread. It is the case of Fig. 1045 b. In the case of Fig. 1045 a, you can step back any of the child threads.
You cannot step back a finalized thread, unless its parent thread is currently on the Split step that created it. When a flow reaches a Split step, it creates child threads of the thread that is on that step. The moment in which a parent thread resumes its execution depends on the configuration of the Join step that corresponds to the Split step. One option, for example, is for the parent thread to continue its execution as soon as one of its child has finished its execution. In this case, it is not possible to step back the thread, because the parent thread is not on the split step anymore.
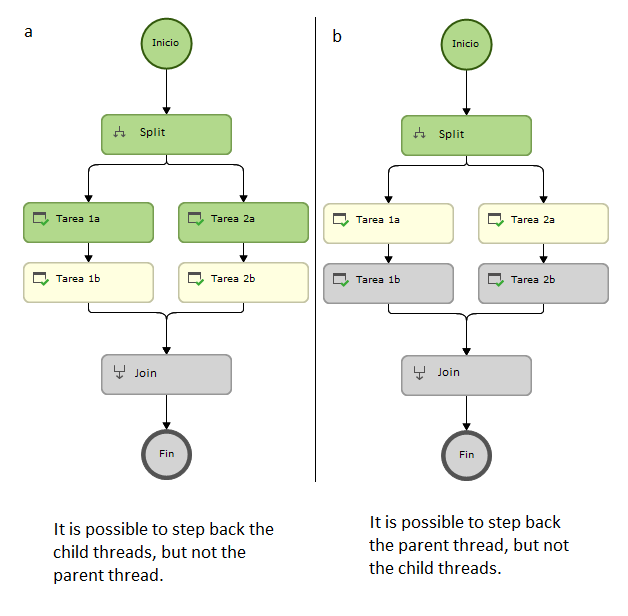
Fig. 1045 Flow with one parent thread and two child threads
In the threads windows you can also select various threads to apply an operation on all of them.