Qflow Team
Introduction
This manual describes the organizational model used by Qflow and the tool that allows you to modify it.
Manual organization
This manual has two parts. The first part explains the organizational model used by Qflow and the concepts that this model uses. It includes a section about permissions handling in Qflow.
The second part explains the way in which Qflow Team, the tool that allows you to modify the organizational model.
Organizational model
This section describes the organizational model, the elements that comprise it and some concepts that are necessary to understand it.
Organizational model elements
Qflow’s organizational model handles three types of elements:
Nodes
Groups
Users
Nodes
Nodes are used to organize the organizational model’s structure in a hierarchical way. There is a node that is the structure’s root. A node can contain groups and users, as well as other nodes. Is a container of other elements, and a set of nodes form a tree structure similar to the folder structure that is used to organize a computer’s files. Qflow Team shows that tree structure.
Just like folders, nodes have names that allow you to identify them. Additionally, nodes have security properties that allow you to define who can see or modify them and the ways in which they can do it.
Nodes can behave like work queues. Work queues can be selected as task addressees. When a task is assigned to a node that behaves as a work queue, any user that has permission to respond to tasks in that queue can respond to the task.
Groups
Groups allow you to group users who share certain properties. In addition to containing users, a group can contain other groups. They are normally used, for example, to group users who perform the same function, without it being reflected in the organization’s structure: a user can belong to several groups, but only belongs to one node, which represents the department or division to which the user belongs.
Users
A Qflow user can be a member of several groups, but cannot be in more than one node. Users and their data can be imported from a directory service such as Active Directory.
Permissions handling in Qflow
Almost all the tools that comprise Qflow allow you to define access permissions of some kind. For example, all the customer tools (Qflow Team, Qflow Design, Qflow Task and Qflow Admin) allow you to define who can access them. This section explains the security mechanisms that are common to all of the tools.
Inheritance
Qflow handles the concept of permissions inheritance. This concept is known by those who assign permissions to folders in Windows. In Window’s file system, when someone defines a permission for a folder, that permission is inherited by that folder’s subfolders. Windows’ file system structure is a tree structure: each element of the structure has a parent, except for the root.
Qflow has two tree structures with elements in which permissions can be defined:
Organizational nodes tree: it is the tree that represents the organization’s structure and it contains nodes, groups and users. The tool that allows you to modify the tree and determine who has permission to access its elements is Qflow Team.
Packages tree: it is the structure that allows you to organize the elements that represent Qflow’s processes. The tool that allows you to modify this tree is Qflow Team. In it, permissions to access those elements are handled from the perspective of process designing. The same structure is used to organize the processes being executed, and in Qflow Task, permissions for that structure’s elements are handled from the perspective of processes’ execution.
Both structures’ elements can inherit permissions, but this is optional and is defined for each node or package. For example, if a user is assigned an inheritable permission to see the root node’s items, that user will be able to see the items of the root node and all its descendants, i.e. all the tree’s nodes. In the same way, if an inheritable permission for the root package is assigned to them, the user will have permissions for all of Qflow’s packages.
It is important to take into account that the concept of inheritance always refers to objects for which permissions are defined, such as packages or nodes in Qflow and folders in Windows. There are other hierarchical structures in Qflow apart from nodes and packages trees. An example is the structure defined by group membership relations. This is not different from Windows, where a group can contain users and also other groups, thus forming a tree. The difference is that while nodes and packages are the objects for which permissions are defined, users and groups are the subjects to whom permissions are given. A permission gives someone (subject) access to something (object). Every time we refer to the concept of inheritance we refer to objects and not subjects.
Types of Qflow permissions
There are three types of Qflow permissions:
Permissions to access a tool: they are permissions related to the access to a tool (Qflow Design, Qflow Team, Qflow Admin and Qflow Task). These permissions are defined independently for each of Qflow’s tools. In general, the tools have two permissions: “Access tool” and “Manage security”, as well as others specific to each of them. The objects of those permissions are the tools themselves, which are not part of any hierarchical structure, so inheritance makes no sense in this case. Permissions for accessing a tool are modified in the tool itself.
Node permissions: they are the permissions related to operations on organizational nodes. For each of these permissions, whether they are inheritable or not can be specified. Some nodes can also be work queues. This is why there are two types of permissions for a node:
Permissions for a node as an organizational element: they are the permissions that are defined in the “Security” group of a node’s properties form in Qflow Team.
Permissions for a node as a work queue: in Qflow, it is possible to determine that a node should also be a work queue. In that case, the permissions that determine which users can respond to tasks from that work queue must be defined. These permissions are defined in the “Security” group of a work queue’s properties form.
Packages permissions: they are permissions related to operations on packages. For each of these permissions, whether they are inheritable or not can be specified. There are two types of permissions for packages:
Permissions for a package as a process definition container: they are defined in Qflow Design. These are related to operations that allow you to define processes and see the representations of the defined processes. Check the Qflow Design manual for more information.
Permissions for a package as an executing process container: they are defined in Qflow Task and are related to operations related to the processes’ operation. Check the Qflow Task manual for more information.
Permissions subjects: users, groups, nodes and security roles
A permission can be assigned to a user, a group, a node or a security role. Security roles are associated to nodes, groups and users, and are used to group permissions and organize them to simplify their administration. Cases in which several permissions are assigned all together to many users who perform the same role are common. For example, a “Security manager” role that has permission to manage the security of all of Qflow’s tools could exist. In that case, the role could be created and be assigned, in each tool, the tool access and tool security management permissions. Afterwards, that security role could be associated to the corresponding users, or a group that contains those users. This permissions organization system is called RBSA (Role Based Security Administration).
Since a user can be associated to several security roles and belong to many groups, sometimes it can be complicated to determine which permissions a user effectively has. This is why it is useful to have good knowledge of the rules that determine how a permission that is assigned to an element affects the elements that are related to it.
A permission that is conceded to a user affects only that user.
A permission that is conceded to a group affects all the users that belong to that group and all the nodes and groups that belong to that group.
A permission that is conceded to a node affects all the users, groups and nodes that belong to that node.
A permission that is conceded to a security role affects all the users, nodes and groups that are associated to that security role. The security role’s permissions affect elements associated to that role in the same way that each of the permissions would affect them if they were assigned in an independent way. For example, if a permission is conferred to a security role and there is a group associated to that security tole, all users, nodes and groups that belong to that group will have the permissions specified in the security role.
Security roles must not be confused with process roles, which are a way of abstracting a process’ tasks from the users that perform them and that are defined in Qflow Design.
Conflicts between permissions
Aside from giving someone permission to perform an operation, this permission can be explicitly denied. A user can belong to more than one group. It may happen, therefore, that there are contradictions between the permissions of one group and the other.
Given a user and a permission, there are four possibilities:
The permission is not defined for the user.
There is at least one definition that confers the permission to the user and none that denies it.
There is at least one definition that denies the permission to the user.
There is at least one definition that confers the permission to the user and at least one that denies it.
The only case in which the user will effectively have the permission is the second one. To summarize, for a user to have permission to perform an operation, there must be at least one definition that concedes that permission to them and there cannot be any definitions that deny it to them.
The deny permissions option has two common uses:
Excluding an organizational element from a permission given to an organizational element that includes it (for example, if a user belongs to a group that has permission for something and you wish to deny that permission to the user without removing them from the group).
Avoiding inheritance in a branch of the nodes or packages tree (for example, a user has a certain permission for the root node, but you wish to prevent them from having said permission for a certain node).
Other important concepts
The following are other concepts that should be taken into account to take advantage of the organizational model’s features.
Managers
The manager role is a special role that can be performed by a user or a group and that allows you to establish hierarchical relationships inside the organizational model. Managers can be chosen as addressees for alerts of flows that are waiting for their subordinates’ actions.
Substitutions
Qflow allows you to define substitutions. A person can take a leave of absence from the organization (for example, because they are sick or on holiday). While they are not there, it is likely that they will still be assigned tasks, or that they will continue to receive notifications, according to the functions they perform. To prevent those tasks from being left unfinished, or delayed too long, making notifications go unanswered, it is possible to assign a substitute to the person for the duration of their absence.
Qflow will automatically handle the task of sending all the notifications that the absent person is receiving to the substitute. They will also have access to the tasks of the user who they are substituting, with enough permissions to be able to perform them in their place (but no more than those permissions).
A user can be substituted even when they are disabled in Qflow and even then, their substitute will have the permissions that allow them to perform the tasks of the user who they are substituting.
Qflow Team
Qflow Team is the tool that allows you to modify and maintain Qflow’s organizational model.
Accessing the web site
To access the web site it is necessary to open an Internet browser and enter the Qflow Team’s address, whose default URL is http://<<server>>/QflowTeam where <<server>> must be replaced by the name of the Qflow server.
The system supports three user authentication models: integrated security, user and password or authentication with Google or Microsoft accounts. If it is configured for integrated security, the system will recognize the user registered in Windows and will attempt to use those credentials to access Qflow Team.
In the case that the user does not have permissions or the system does not recognize them, the authentication form will be presented as shown in Fig. 631.
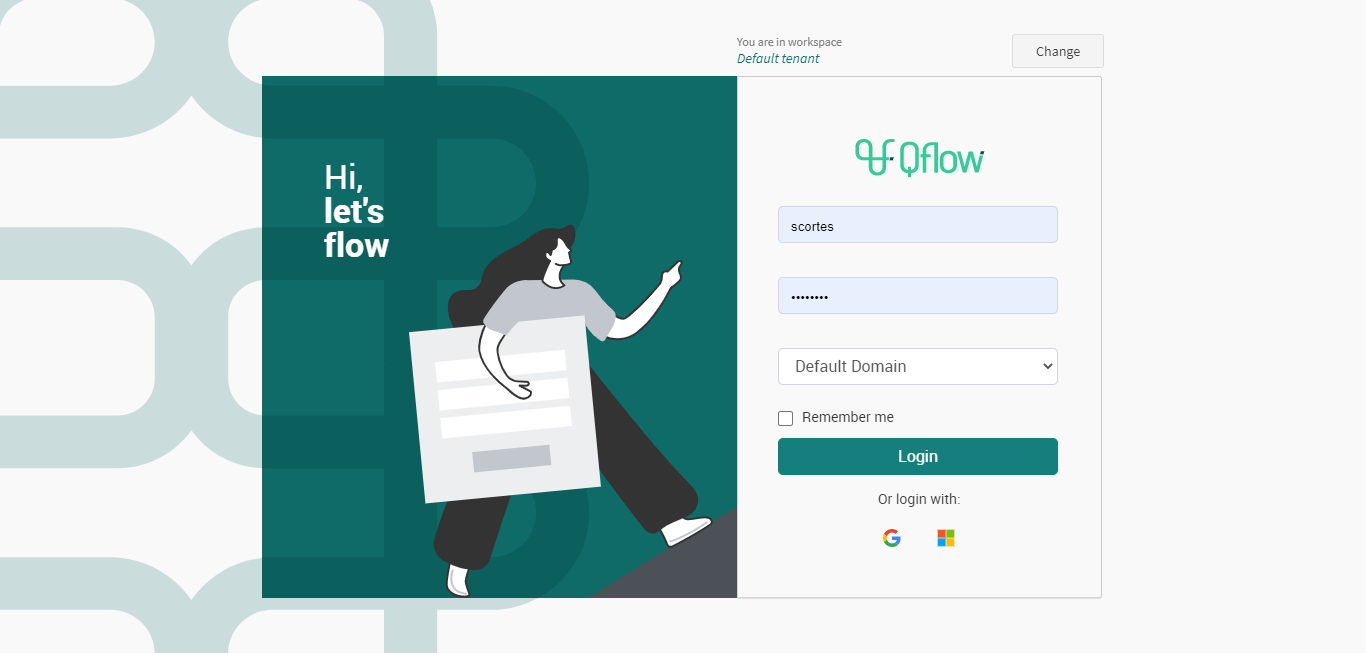
Fig. 631 Accessing the web site
The screen shows the following options:
Username: the name of the user with which you wish to log in.
Password: the password with which you wish to log in.
Security provider: the security provider that authenticates the user (for example, the company’s domain).
Login with Microsoft account: selecting this option will take you to a view where the user’s Microsoft credentials will be requested to authenticate the account.
Login with Google account: selecting this option will take you to a view where the user’s Google credentials will be requested to authenticate the account.
General user interface description
The interface’s main elements are:
Main screen: it allows you to visualize the currently enabled users, their history and the 10 most recent logins.
Upper menu: it presents options to search for elements, access the settings screen, go to the home, configure your preferred time zone and log out.
Side menu: it allows you to show/hide the solution tree (by default Root) and operate on the tree’s organizational nodes.
Organizational nodes tree: it allows you to see the organizational model’s hierarchical structure and to select the element on which you wish to operate.
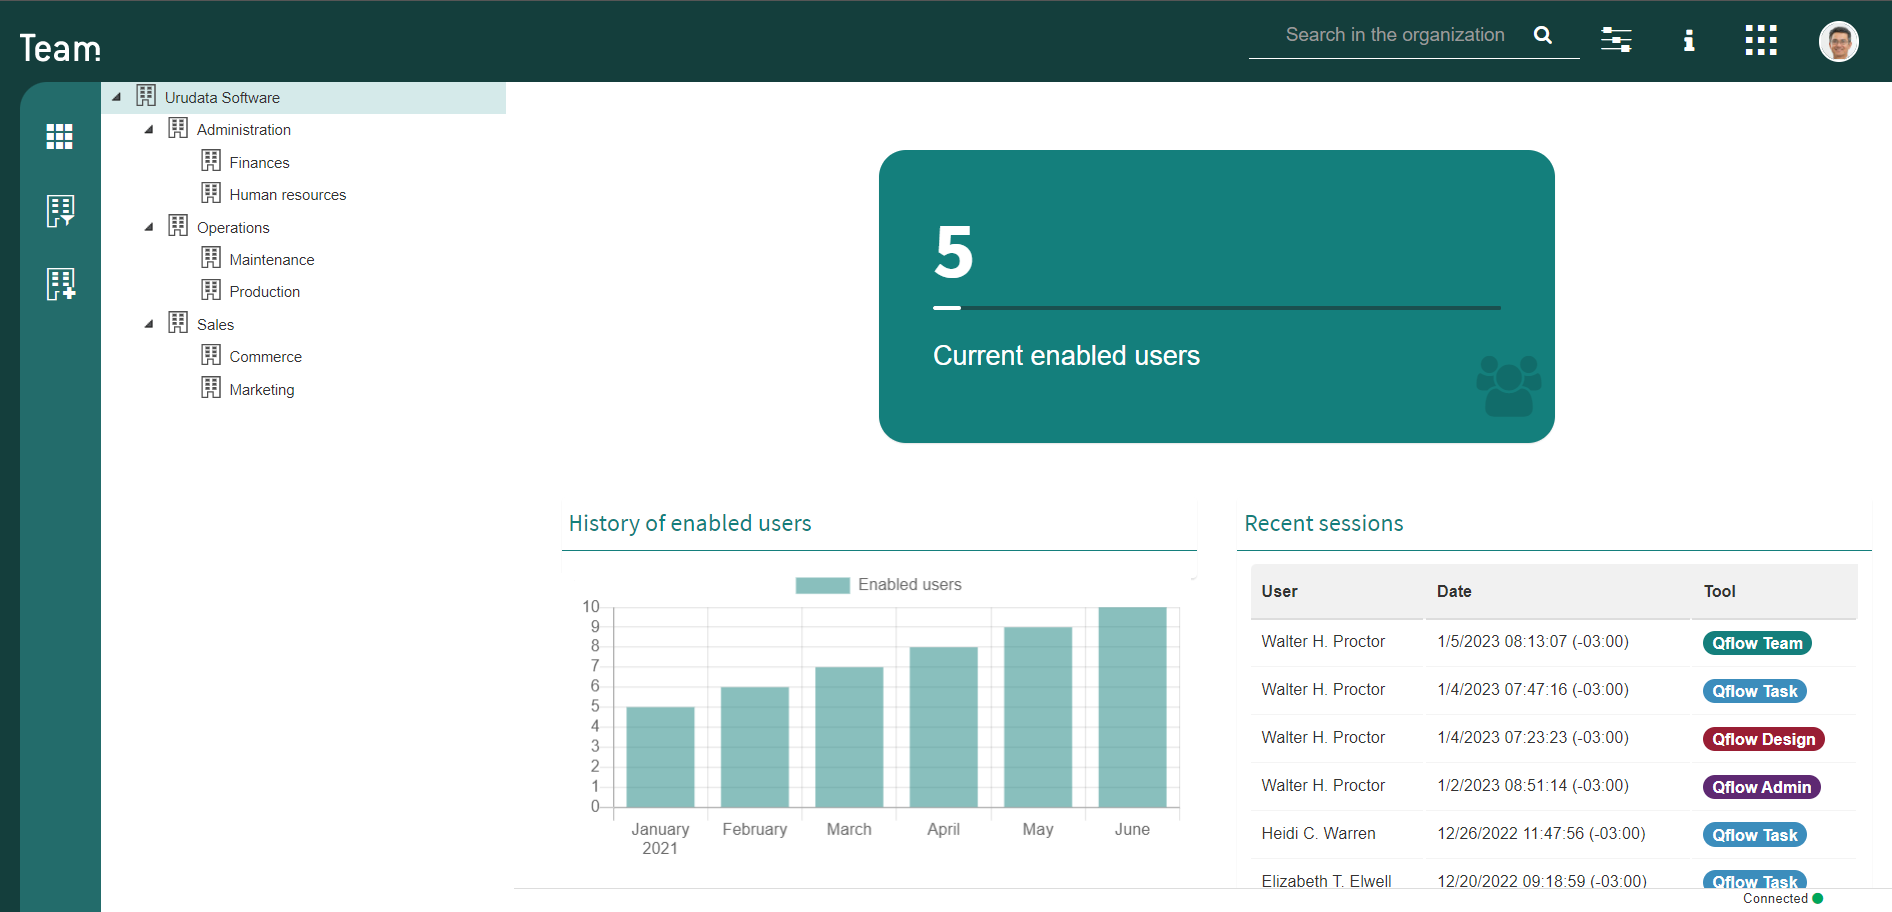
Fig. 632 Qflow Team main screen
Upper menu
Fig. 633 shows the upper menu options and describes the function they perform.
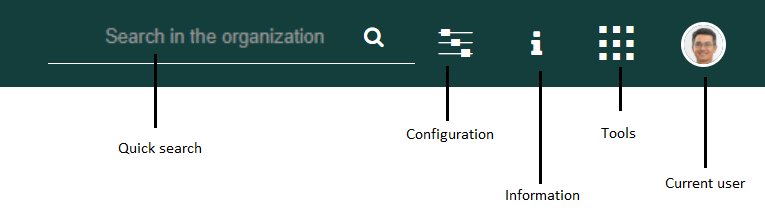
Fig. 633 Upper menu
The options that require clarification are explained next:
Quick search: it allows you to search for a user, group or node. When an element is sought, Qflow will show a list with all the found elements that contain the entered text. In the case of users, both their name and login will be searched.
Settings: when this option is selected, the system displays a set of options like Fig. 634 shows. More details in Settings.
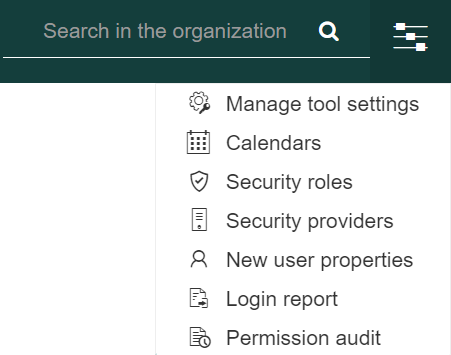
Fig. 634 Settings
Information: when this option is selected, the system displays links to the product news, this manual and the Qflow forum, as well as being able to see the version of the product that you are using.
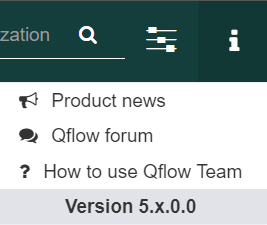
Fig. 635 Information
Tools: when this option is selected, the system displays the links to all the tools to which the user has permissions. Clicking on one of them will open it in a new tab. In case the user only has permissions in the current tool, this icon will not appear in the header.
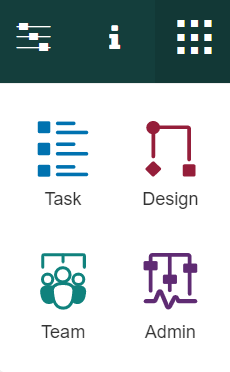
Fig. 636 Tools
When you open the “Current user” option, the system displays the user’s preferred time zone and the sign out button. This time zone is used in all of Qflow’s dates and times for the current user. The preference is shared with all the product tools, so modifying it in one of them will affect the others.

To edit the time zone, the “Current user” option in the menu must be selected. This will open a right panel with the list of available time zones. Once the time zone has been selected, when the panel is saved, the page will automatically refresh so that the change takes effect. If more windows are open with Qflow’s tools in them, they must be manually refreshed for the change to take effect.

Main screen
When a user enters Qflow Team, or clicks the tool’s icon in the upper left section, Qflow shows them the main page.
The main page has the following elements:
Enabled users indicator: it allows you to view the number of users that are currently enabled, as well as comparing it to the number of users that the current license allows.
Enabled users history: it allows you to view the number of enabled users in the last 12 months.
Recent sessions: it allows you to view the 10 most recent logins, considering all of Qflow’s tools.
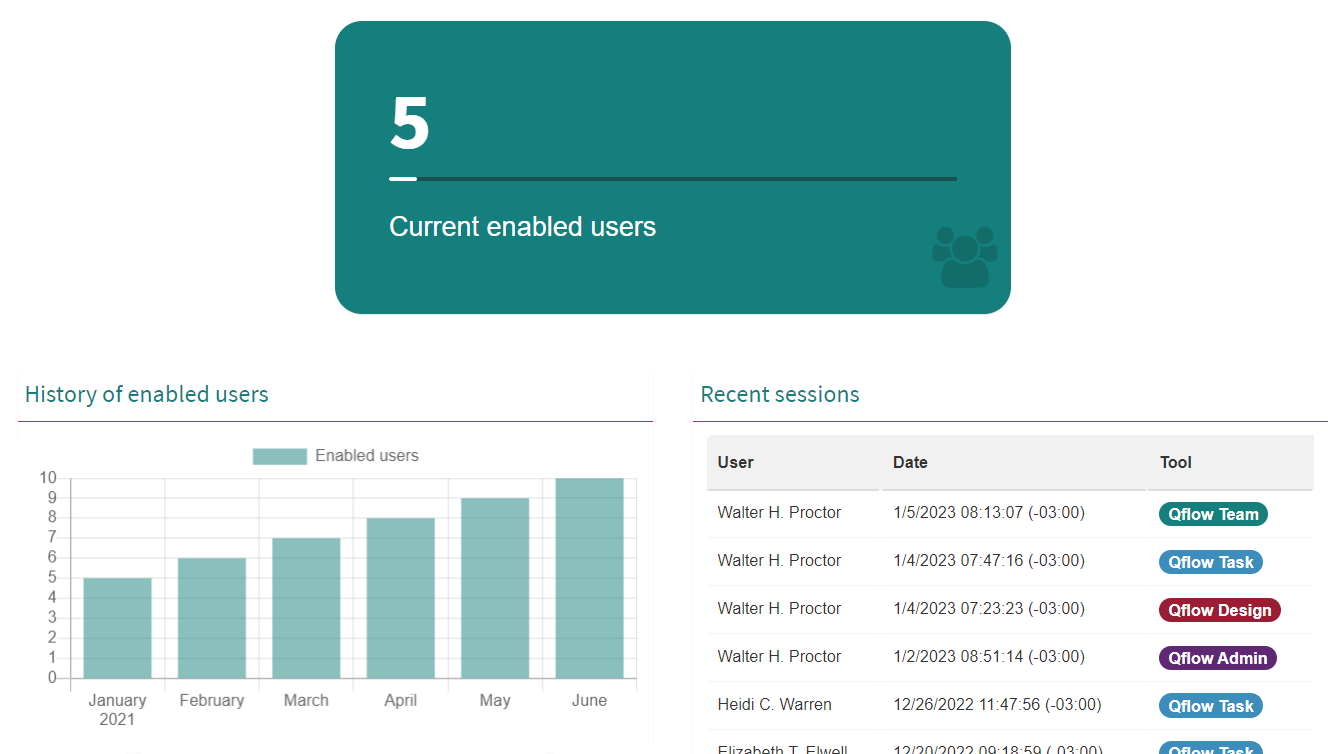
Fig. 637 Qflow Cloud main screen
Difference in versions
Unlike the product’s Cloud version, the OnPremise version does not have the “History of enabled users” chart.

Fig. 638 Qflow OnPremise main screen
Side bar
The side bar allows you to show or hide the organizational nodes tree, as well as the disabled nodes that are in it. You can also quickly access the common operation “New organization node”, which is also available through the tree elements’ context menu.
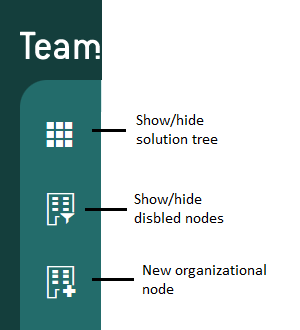
Fig. 639 Side bar
Organizational nodes tree
A node can be shown open (its children are shown) or closed (they are not shown). To open a node, click the triangle to its left, which indicates if it is open or closed. For example, in Fig. 640 the Root and Operations nodes are open while the Administration node is closed. You can see that the Operations node contains two others: Maintenance and Production.
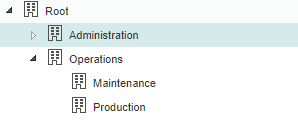
Fig. 640 Organizational nodes tree
It is also possible to move nodes by dragging them from their original place to the new destination. To do this, click the node you wish to move, drag it to the destination and let go of the mouse button.
If you double click a tree node, a list will open in the main panel with the users and groups that belong to the node selected in the tree (Fig. 641).

Fig. 641 Tree element properties panel
In the upper left section there is a tool bar. Fig. 642 shows said bar’s elements and their purpose is later described.
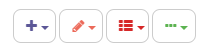
Fig. 642 Left panel toolbar
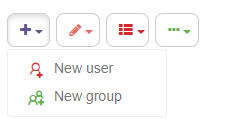
Fig. 643 Toolbar - New user/group
New user: it creates a new user. When the user clicks this icon, a panel is shown that allows you to enter the user’s name, a description and their main data, such as e-mail and login. After it is created, by default Qflow sends a welcome email to the user. More details in User properties.
New group: it creates a new group. When the user clicks this icon, Qflow shows a panel that allows you to enter the group’s name and a description. More details in Group properties.
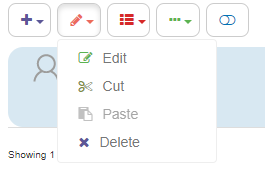
Fig. 644 Toolbar - Edit/Cut/Paste/Delete
Edit: when the user clicks this icon, a panel is shown that allows you to edit the selected user or group’s data. Another way to access this option is to select the element you wish to edit and then double click it.
Cut and paste: these options allow you to cut the selected user or group from a node to then paste it in another node. In other words, they allow you to move the selected user or group. This is the only way to do this, since dragging users or groups from a node to another is not allowed.
Delete: when the user clicks this icon, a warning sign is shown and if you click the Ok button, the selected user or group is deleted.
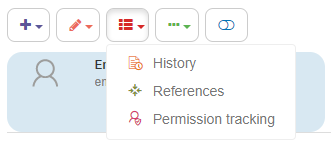
Fig. 645 Toolbar - History/References/Permission tracking
History: it shows a panel that lists the modifications made to the selected element (node, user or group), as well as the dates on which they were made and the name of the user who made them (Fig. 646). The time zone of the shown dates is also indicated.
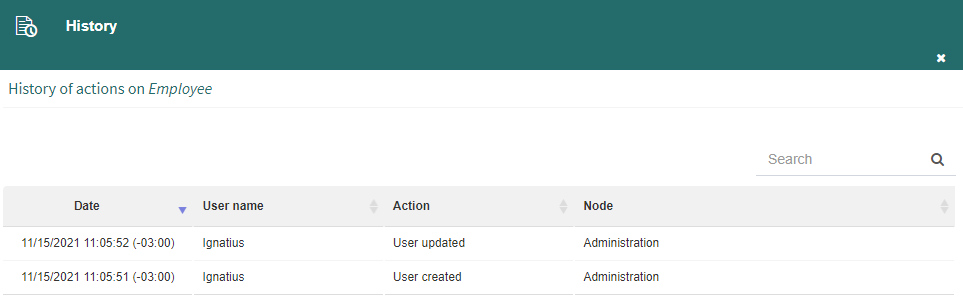
Fig. 646 Node history
References: it shows the elements related to the selected object, including process template roles, security roles, nodes, groups and security definitions. For example, if a user has permissions for Qflow Team, when viewing that user’s references, those permissions will appear (Fig. 647). The user references that you can view are: package log, flow log, flows, attachments, flow roles, flow steps, timed actions, flow stages, groups, managed, substituted, permissions, packages, template roles, links and node log.
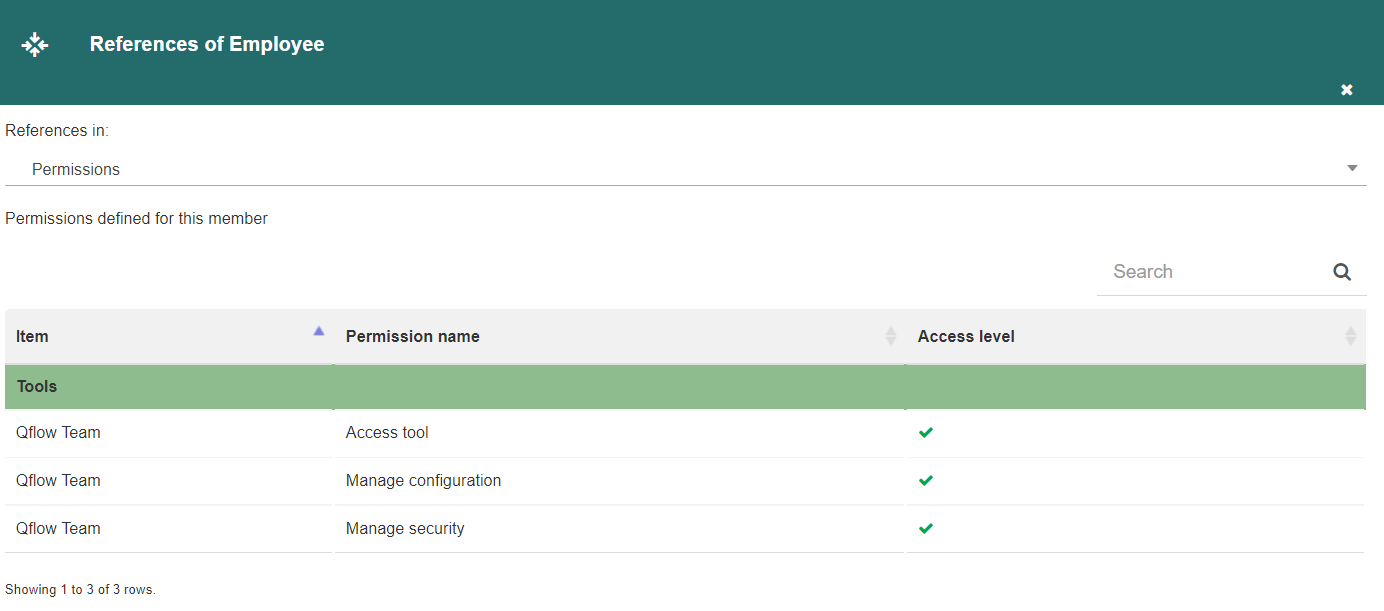
Fig. 647 User references
Permission tracking: this option is only available for users. It shows a panel (Fig. 648) in which all the user’s effective permissions regarding nodes appear. Effective permissions are all the permissions that the user has, that is, not only the ones that were directly given to them, but also the ones that were indirectly given, through a group, node or security role. The panel has an option to only show the permissions that the user has for work queues.
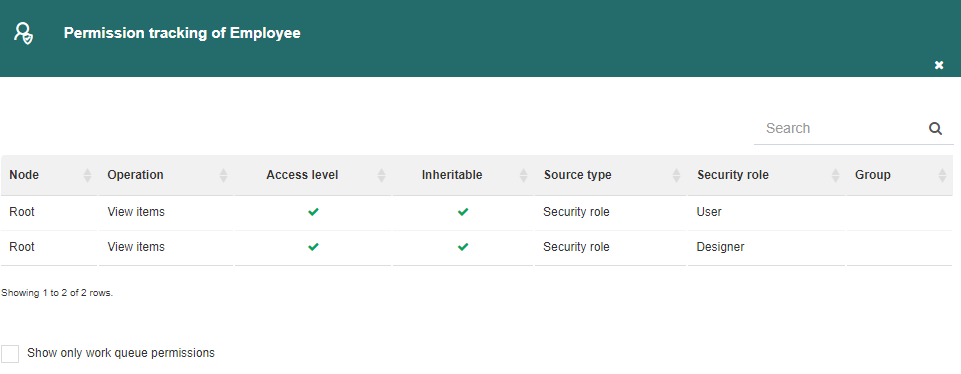
Fig. 648 Permission tracking
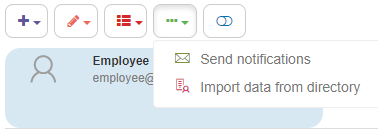
Fig. 649 Toolbar - Send notifications/Import data from directory
Send notifications: it allows you to forward the messages corresponding to the user’s active tasks to them, within a certain period.
Import data from directory: it allows you to load the user’s data with data imported from a directory (for example, Active Directory). More details in Importing a user’s data from a directory.
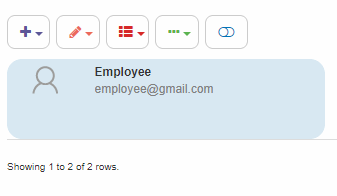
Fig. 650 Toolbar - Disable/Enable members
Disable/Enable members: this option allows you to enable or disable users and groups. Remember that each enabled user uses part of the Qflow license.
In the upper right section there is also a toolbar. Fig. 651 shows said bar’s elements and describes their purpose.

Fig. 651 Right panel toolbar
The operations mentioned in the image are described next:
Search members: it allows you to type a short text and filters the users and groups according to it, showing only those whose names contain it.
Refresh: it reloads the users and groups, making the list show modifications made in other devices after the last time it was loaded.
Rows/Columns: it allows you to modify the way in which Qflow shows users and groups in the panel.
Rows: it is the default option, as you can see in Fig. 641. It shows the groups and users as a list of large icons. Aside from each user or group’s name, it shows their e-mail.
Columns: it shows users and groups as a list of small icons. Additionally, it shows each user and group’s e-mail, description (optional) and their status (enabled or disabled).
Columns: this option allows you to choose whether you wish to show each user and group’s description in the previously detailed column type viewing or not.
Show users: it shows or hides users. If the button is activated as in Fig. 651, it shows them. Otherwise, it hides them.
Show groups: it shows or hides groups. If the button is activated as in Fig. 651, it shows them. Otherwise, it hides them.
Show disabled users and groups: if this button is activated, Qflow shows disabled users and groups in the main panel. Otherwise, it does not.
Context menus
Qflow Team allows you to perform some of the operations available in toolbars through context menus. To open a context menu, right-click the element on which you wish to perform the operation. For instance, to create a node in the tree, click the node in which you wish the new node to be contained. If you select several elements and right-click the selection, Qflow will also show the context menu, but in this case the menu will not have options that correspond to operations that cannot be performed simultaneously on many elements. Fig. 652 shows the tree’s context menu. Fig. 653 shows users’ and groups’ context menus.

Fig. 652 Node tree’s context menu

Fig. 653 Users’ context menu (left) and groups’ context menu (right)
Context menu operations that were not previously explained in the toolbar from the Organizational nodes tree section will now be described.
Member list: it shows the users and groups contained in the node that was clicked.
New organization node: it creates a new organization node inside the node that was clicked.
Rename: it allows you to change the selected node’s name without needing to open its properties form. This option is similar to the one that allows you to rename a file or directory in Windows. When you select it, the element’s name is selected and a cursor appears that allows you to modify the text.
Delete: it deletes the selected object.
Refresh: it updates the tree’s structure, from the selected node downwards.
Import node from file: it imports a node (that is, the entire branch defined by a node) that was exported in some other environment and places it inside the selected node. When elements whose identifiers coincide with existing elements are imported, the latter are updated with the imported data, but if they were in another node, they are moved to the selected node. More details in Import node from file.
Export node to file: it exports the branch defined by the selected node to a file. This file can later be used to import the exported branch in another environment in which Qflow is installed. Aside from the selected node and its content (descendant nodes, users, groups) all of the system’s security providers, calendars and roles are exported. More details in Export node to file.
Import users from directory: it allows you to import users from a directory, such as Active Directory, in a node. More details in Import users from directory.
Properties: it shows the selected node’s properties panel.
LDAP path specification
Nodes, users and groups have a property in which an LDAP path can be specified to synchronize its data with a service directory’s. The property is in the “Advanced” group of a node, group or user’s properties panel.
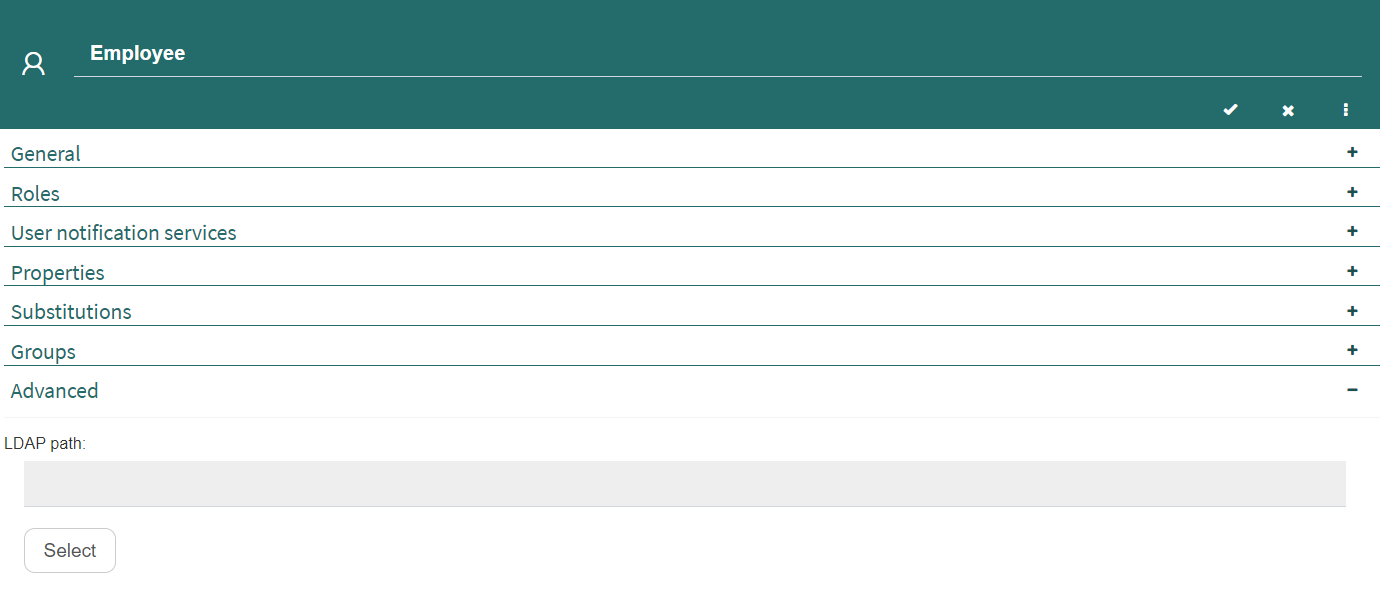
Fig. 654 “Advanced” group from a user’s properties form
To select the path:
Click “Select”. This makes Qflow show a panel like the one in Fig. 655, in which the directory element corresponding to the node, user or group can be selected.
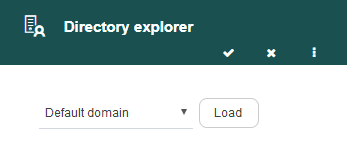
Fig. 655 LDAP path selection
Select the domain you desire in the list that appears to the left of the “Load” button and click said button. This will load the list that appears in the panel’s lower half (Fig. 656). It shows the directory’s organizational units and allows you to select some of them, or a group. To see a group, open the organizational unit to which it belongs (Fig. 657).

Fig. 656 Directory explorer with loaded nodes
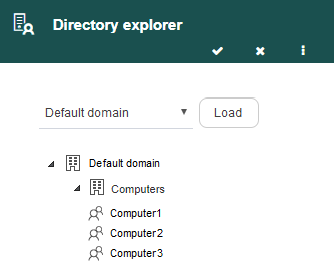
Fig. 657 Open organizational unit with all its groups
Select from the list the element that you wish to associate to the node, user or group that you are modifying and click “Save”. You can select a directory node or group.
If you are specifying an LDAP path for a user, the procedure is the same, except there is an additional table that shows all the users of the selected element (Fig. 658). If there are many users in that element, you can filter the users list by using the quick search that appears over the list. If you have created a user and import its data, the user’s name will change and become the imported name.
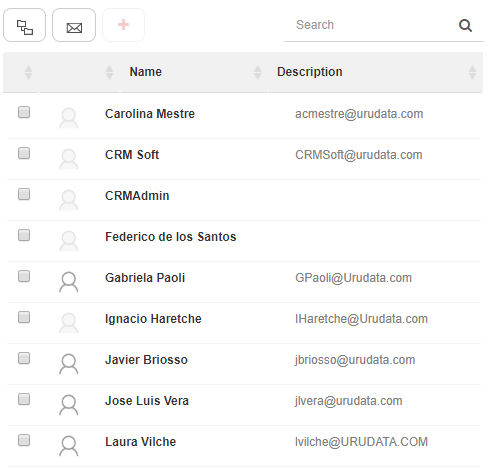
Fig. 658 Directory data importer with loaded users
Node properties
To modify a node’s properties, search for it in the organization nodes tree, right-click it and select the context menu’s “Properties” option. Qflow will show the panel that appears in Fig. 659.
The form divides a node’s properties into the following groups:
General: it shows and allows you to modify the name, description and enabled or disabled status.
Properties: it shows and allows you to modify the node’s additional properties. Additional properties are not defined in Qflow, but are properties that the organization defines to complement the ones that come with the product.
Roles: it allows you to add and remove security roles, thus associating them to the node.
Managers: it shows the list of users and groups that act as the node’s managers and allows you to modify the list.
Advanced: it shows and allows you to modify the work queue behavior and directory synchronization.
Security: it allows you to specify which users, groups and security roles have permissions for the node and what those permissions are.
The “General” group is the only one shown by default. For the groups described later on to appear, display them by clicking the “+” button.
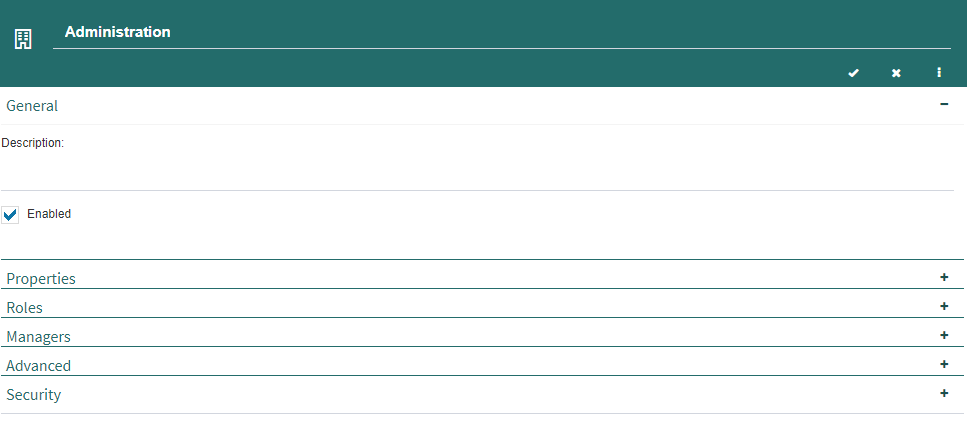
Fig. 659 Node properties
General
They are the same properties that can be modified when creating the node.
Name: it is the name that appears next to the node in the tree. In Fig. 659, the name is “Administration”.
Description: a brief description of the node.
Enabled: it allows you to enable or disable the node. If a node is not enabled, it appears gray-colored in the tree.
Properties
The “Properties” group shows the node’s additional properties. For more information on additional properties, go to the Additional properties section.
Roles
The “Roles” group (see Fig. 660) allows you to define the node’s security roles. Users and groups’ properties forms also have this group, which works in the same way as in nodes.
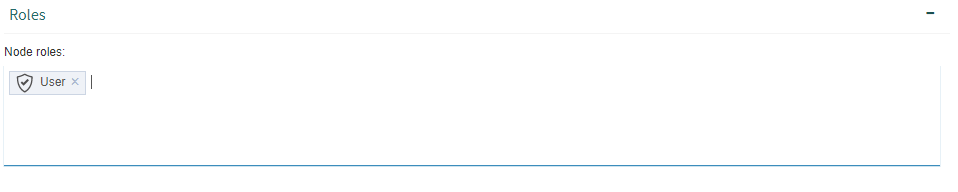
Fig. 660 “Roles” group with a node’s roles
To add a role to the node, write part of the name of the addressee who you want to add as a role where it says “Start typing…”, and when you see it in the list that Qflow shows, select it.
To delete a role from the node, simply click the “x” symbol that appears next to the role.
Note that this does not delete the role. It only removes it from the roles list of the node that is being modified.
Managers
The “Managers” group (see Fig. 661) allows you to add or remove users and groups to the node’s managers list. A group’s properties panel has a similar group, which works like this one.

Fig. 661 “Managers” group with a node’s managers
To add a manager to the node, write part of the name of the user or group that you wish to add as a manager where it says “Start typing…”, and when you see it in the list that Qflow shows, select it.
To delete a node manager, simply click the “x” symbol that appears next to the role.
Advanced
The “Advanced” group (Fig. 662) allows you to configure the node so that it behaves as a work queue, and to configure that work queue. It also allows you to specify an LDAP path for the node (see LDAP path specification).
For the node to behave as a work queue, check the “Behaves as a work queue” option. When a node behaves as a work queue, it can be selected as a process template role member and thus, be an addressee of workflow tasks. Any user that has permission to respond to the queue’s tasks will be able to take one and respond to it.
When a node is a work queue, the “Configuration” button will be enabled. That button allows you to configure the work queue’s permissions and validity. When that button is clicked, the work queue’s properties appear (Fig. 664).
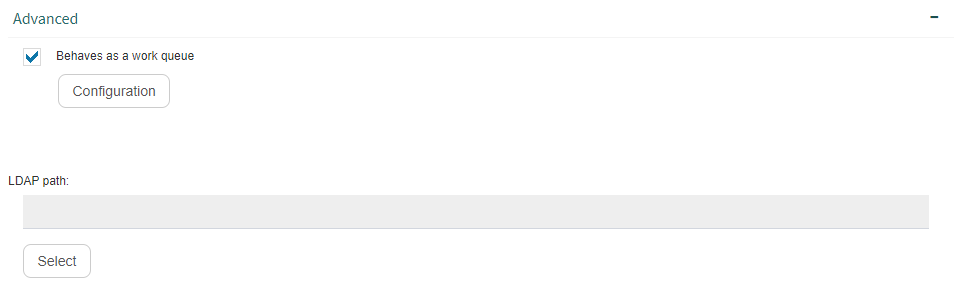
Fig. 662 A node’s “Advanced” group
Work queue configuration
Not only can you access a work queue’s configuration from a node’s properties form, but you can also do it from the nodes tree when the node is a work queue. Therefore, to access it directly, right-click the work queue and then click “Work queue properties” like Fig. 663 shows.
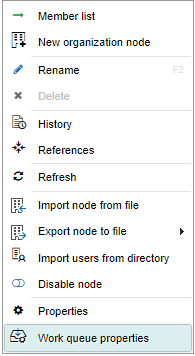
Fig. 663 Access a work queue’s properties from the nodes tree
A work queue’s properties form has the following groups:
Security
Permissions
Notifications
Advanced
The “Security” group of a work queue’s properties form allows you to define the permissions for it. The column shows the list of users, groups and roles for which permissions were defined and the list of permissions.
The “Security” group is the only one that is shown by default. For the groups described later on to appear, display them by clicking the “+” symbol.
To add a user, group or role:
Click the “Add” button. That makes a text that says “Start typing…” appear on top of the button. Write part of the desired user, group or role’s name.
When you see it in the list that Qflow shows, select it.
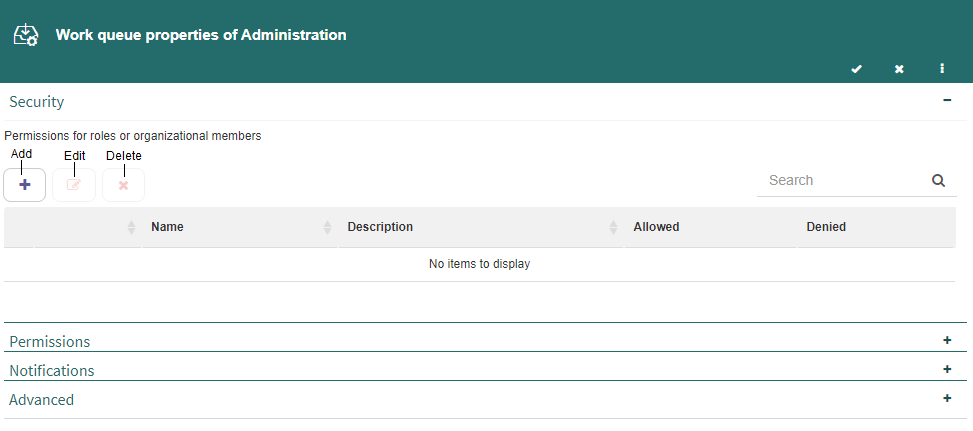
Fig. 664 Work queue properties form
Once the users, groups or roles have been added, it is possible to define which permissions each of them has. To do that, check “Allowed” or “Denied” next to each permission as shown in Fig. 665. If you check the “Inheritable” option, the permission will be applied recursively. This means that the selected user, role or group will have permission for the node that is being edited and also all of that node’s descendant nodes. For example, for a manager to have permission to “Visualize” the work queue tasks of an entire organizational branch, you can give them the “Visualize” permission for that branch’s root node and select the “Inheritable” option. The possible permissions are:
Visualize: it allows you to access the work queue’s inbox.
Actuate: it allows you to respond to a task for the work queue.
Sign: this permission is not used in Qflow but in Q-expeditive, which is built on Qflow’s base. It allows you to sign.
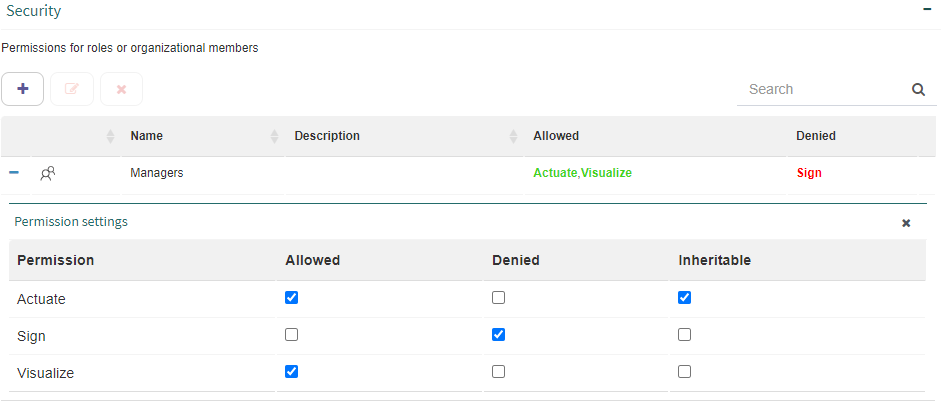
Fig. 665 Work queue “Security” group - Permissions configuration
To edit a user, group or role’s permissions:
Select the element whose permissions you wish to edit and click the “Edit” button. Qflow will again show the “Security settings” form.
Select the actions you wish to allow or deny in the new permission.
To delete a user, group or role’s permissions:
Select the element whose permissions you wish to delete and click the “Delete” button.
Qflow will show a warning message. Click the “Yes” button and all permissions for the selected element will be deleted.
The “Permissions” group of a work queue’s properties form (Fig. 666) shows a list of the users that have effective permissions for that queue. Effective permissions are all the permissions that the user has, that is, not only the ones that were directly given to them, but also the ones that were indirectly given to them through a group, node or security role. For each user, which of the three possible permissions (visualize, actuate and sign) they effectively have is shown.
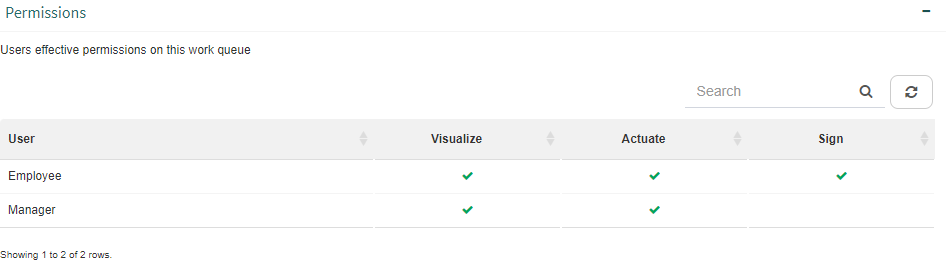
Fig. 666 Users that have effective permissions for a work queue
The “Notifications” group of a work queue’s properties form allows you to specify the sending of notifications when some event related to the queue occurs. To specify the events that must trigger notifications, check the options you wish among the following:
Notifies of new tasks: if this option is checked, Qflow will send notifications each time a new task is assigned to the queue.
Notifies of time actions: if this option is checked, Qflow will send notifications every time some time action is activated, such as a time out or a reminder.
Notifies the signing of tasks: this option is meant for when Qflow is used together with Q-expeditive, Urudata’s electronic file software, and makes Qflow send a notification when a Q-expeditive procedure actuation is signed.
Defines custom list of notification addressees: if you check this option, you must select the users that will receive the notifications. Otherwise, they will be sent to all work queue members. To add an addressee, write part of their name where it says “Start typing…”, and when you see it in the list that Qflow shows, select it (Fig. 667). To remove an addressee from the list, simply click the “x” symbol that appears next to the addressee.
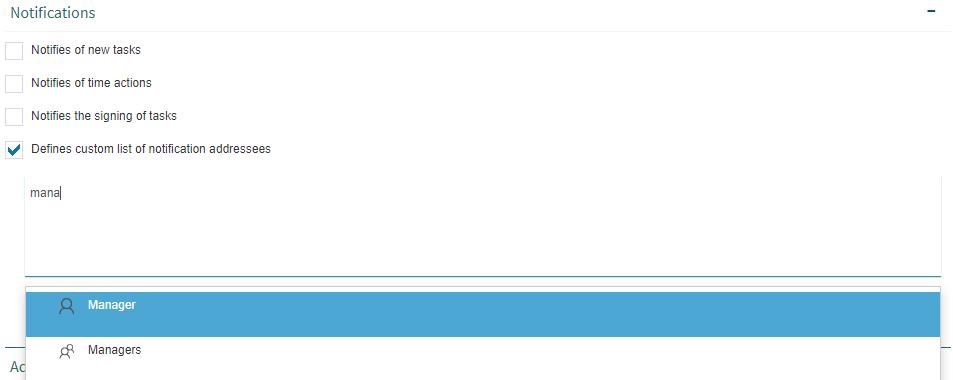
Fig. 667 Add an addressee to a custom notifications list
The “Advanced” group of a work queue’s properties form allows you to define the queue’s validity. To define a validity period, check the “Defines period of validity” option and select the period’s start date (“Valid from”) and its end date (“Valid to”). The node will only behave as a work queue during that period.
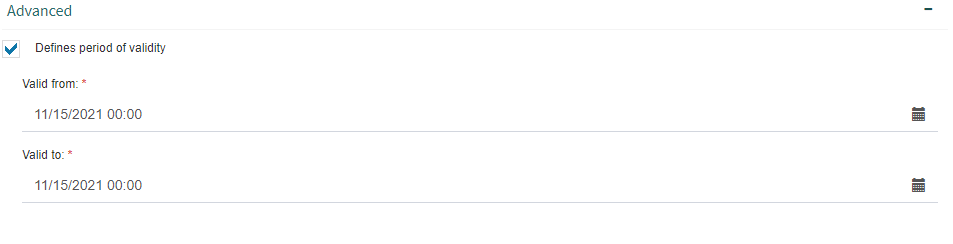
Fig. 668 Work queue properties form “Advanced” group
Security
The “Security” group (see Fig. 669) allows you to define who has permissions to perform operations on the node and what those permissions are. The entities that can be associated to node permissions are users, groups and security roles.
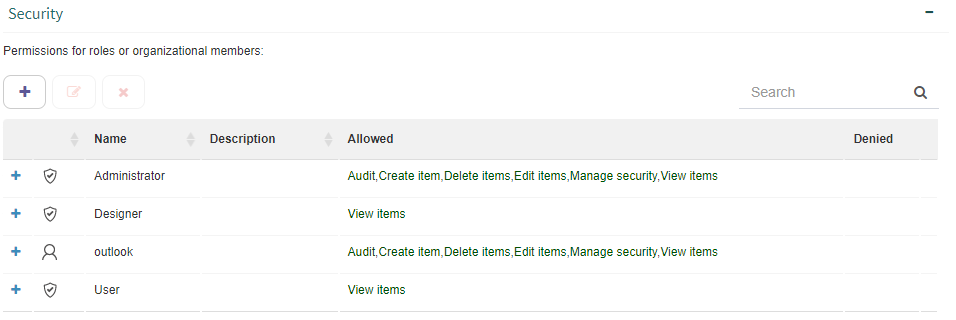
Fig. 669 Node security settings
To add a user, group or security role to the set of identities that have permissions for the node:
Click the “Add” button. That makes a text that says “Start typing…” appear on top of the button. Write part of the desired user, group or role’s name.
When you see it in the list that Qflow shows, select it.
Once the users, roles and groups have been added, it is possible to define which permissions each of them have. This is done by checking the “Allowed” or “Denied” boxes next to each permission like Fig. 670 shows. For each permission you can specify if it is inheritable or not. If a permission for a node is inheritable, the user, group or role that has it will also have it for that node’s descendant nodes. For example, the “View item” permission allows you to view the node, but if it is inheritable, it will also allow you to see its descendant nodes.
The possible permissions are:
View items: it allows you to view the node.
Edit items: it allows you to edit the node.
Create item: it allows you to create nodes inside the node.
Delete items: it allows you to delete the node.
Audit: it allows you to view the node’s audit information.
Manage security: it allows you to add and modify permissions for the node.
For a detailed explanation on how Qflow’s permissions work, check this manual’s Permissions handling in Qflow section.
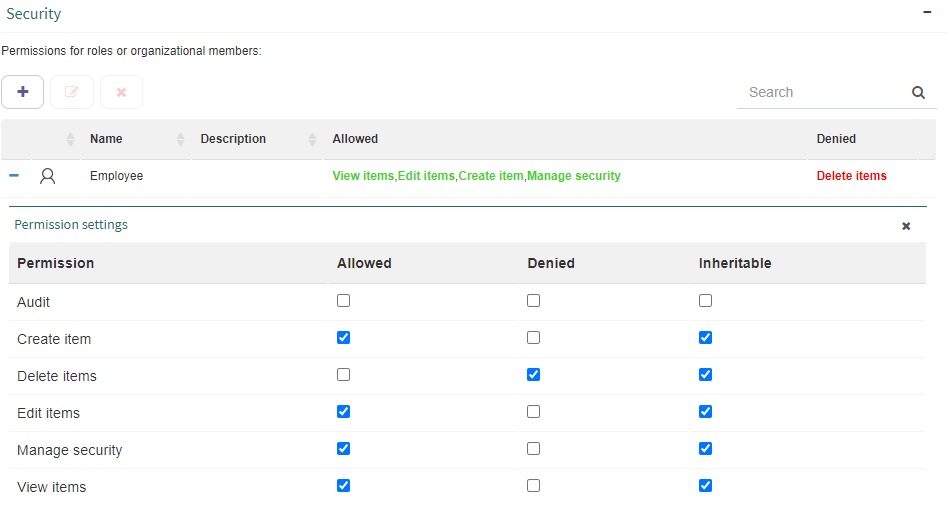
Fig. 670 “Security” group - Permission settings
To edit a user, group or role’s permissions:
Select the element whose permissions you wish to edit and click the “Edit” button, or click the “+” symbol that is next to the element.
Qflow will show the “Permission settings” form again. Select the actions that you wish to allow or deny in the new permission.
To delete a user, group or role’s permissions:
Select the element whose permissions you wish to delete and click the “Delete” button.
Qflow will show a warning message. Click the “Yes” button and all permissions for the selected element will be deleted.
Group properties
To modify a group’s properties, select it and double click it. Qflow will show the panel that appears in Fig. 671:
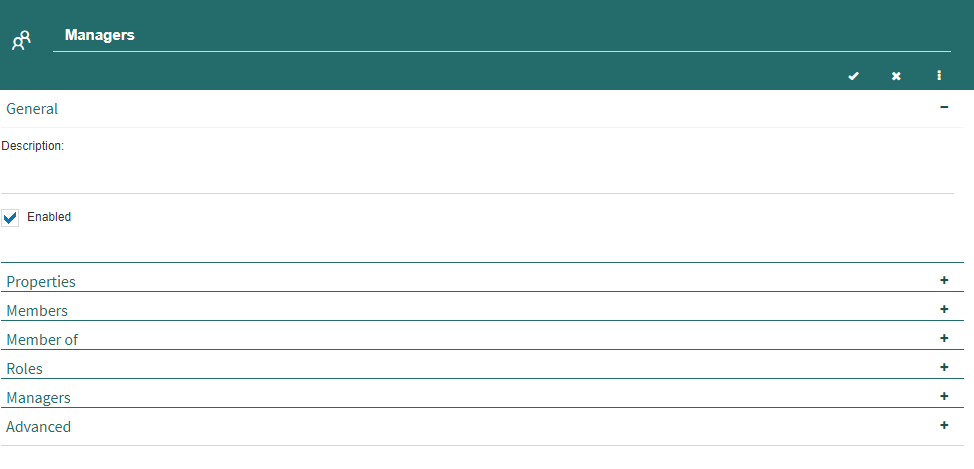
Fig. 671 A group’s properties
The form divides a group’s properties into:
General: it allows you to see and modify the properties that identify the group.
Properties: it allows you to see and modify the group’s extended properties.
Members: it allows you to add and remove users and groups.
Member of: it shows the groups to which the group being edited belongs.
Roles: it allows you to add and remove security roles, thereby associating them to the group. It works in the same way as the nodes’ “Roles” group.
Managers: it shows the list of users and groups that act as the group’s managers, and allows you to modify the list. It works in the same way as the nodes’ “Managers” group.
Advanced: it allows you to associate the group to a group of Active Directory or another directory type through an LDAP path. Qflow will use this path when you synchronize the organizational model’s data with the directory’s. The procedure to modify it is the same as the procedure to modify a node’s LDAP path, which is described higher up.
The “General” group is the only one shown by default. For the other groups described later on to appear, display them by clicking on the “+” symbol.
General
The general properties are:
Name: it is the group’s name. It appears next to each icon that represents a group.
Description: a brief description of the group.
Enabled: by checking or unchecking the box you can enable or disable a group. A disabled group is not taken into account by Qflow, but it can be enabled again. If a group is not enabled, the icon that represents it is shown in a gray color.
Properties
The “Properties” group shows the group’s additional properties. For more information on additional properties, check Additional properties.
Members
The “Members” group shows the users and groups that are members of the group and allows you to add or remove members. Fig. 672 shows the aforementioned group.

Fig. 672 “Members” group
To add a member to a group:
Where it says “Start typing…”, write part of the desired user or group’s name.
When Qflow displays the list, select the user or group that you wish to add as a member.
User properties
To modify a user’s properties, select it and double click it. Qflow will show the panel that appears in Fig. 673:.
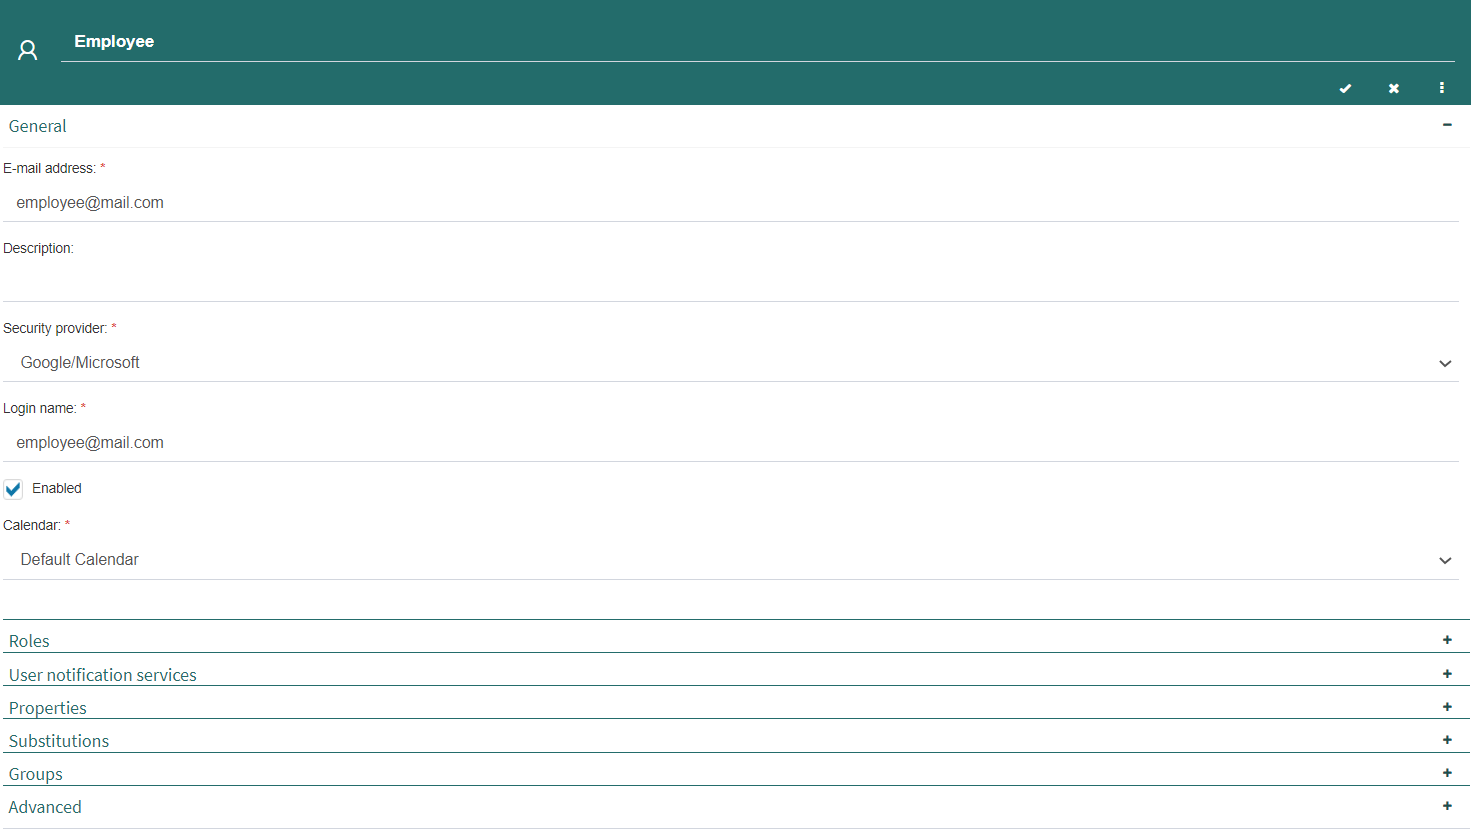
Fig. 673 A user’s properties
The form divides a user’s properties into the following groups:
General: it has the properties that identify the user and it allows you to enable and disable them.
User notification services: it contains the user’s mail options, which are used to send them notifications.
Properties: it allows you to add properties to the user.
Substitutions: it allows you to define substitutions for the user.
Member of: it shows the groups to which the user belongs.
Roles: it allows you to add and remove security roles, thereby associating them to the user. It works in the same way as the nodes’ “Roles” group.
Advanced: it allows you to associate the user to a user of Active Directory or another directory type through an LDAP path. Qflow will use this path when it synchronizes the organizational model’s data with the directory’s. The procedure to modify it is similar to the procedure that allows you to import the user’s data (see Importing a user’s data from a directory). The panels that appear are the same, and a user from the directory must be selected. The difference is that, at the end of the process, the user’s data is not imported, but its LDAP path is modified.
The “General” group is the only one shown by default. For the other groups described later on to appear, display them by clicking on the “+” symbol.
General
The general properties are:
Name: it is the user’s name.
E-mail address
Description: a brief description of the user.
Security provider: it is the security provider that authenticates the user (for example, a Windows domain).
Login: it is the user’s username. If the selected provider is OAuth, this value must be the corresponding e-mail (the tool does not validate that the entered e-mail is valid).
Instant messaging address
Enabled: by checking or unchecking the box, you can enable or disable the user. A disabled user is not taken into account by Qflow and does not use a user license, but can be enabled again. If a user is not enabled, the icon that represents them will be shown in a gray color. Enabled users do use Qflow licenses. If you enable a user without having enough licenses to do so, the tool will inform you and will not let you perform the operation.
Calendar: it is the calendar that the user uses. Different users can govern themselves through different calendars. This is useful, for example, in the case of organizations with offices in several different countries that have different working regimes and holidays.
User notification services
The “User notification services” group (Fig. 674) allows you to configure the mail options.

Fig. 674 Mail options
The mail configuration shows the available mail services and allows you to check one or more services to be used to send messages to the user (you usually check one; you can also check none of them). In Fig. 674 only one mail service is available.
For each service, you can specify how messages will be sent to the user:
HTML Frame: what is sent is not the whole message, but a message that, on being opened by certain e-mail clients (for example, Outlook Express), makes the client navigate to a page on a server. This page contains the message body.
HTML Link: an HTML-formatted message is sent, which contains a link to a page that contains the message body.
Text Link: this option is similar to the previous one, but the message can be sent without HTML formatting, as plain text with a link that can be recognized by some e-mail clients (for example, Lotus Notes).
XML: this option sends the message as an XML document that can be interpreted by some application.
Properties
The “Properties” group shows the user’s additional properties. For more information on additional properties, see Additional properties.
Substitutions
The “Substitutions” group (Fig. 675) allows you to define substitutes for a user during various periods. This way, in the case that a person is absent, a substitute can be defined for the period in which the absence occurs. Qflow will send all the messages that were originally addressed to the person to the substitute. Thus, the substitute will be able to do all the Qflow tasks of the person they are substituting.
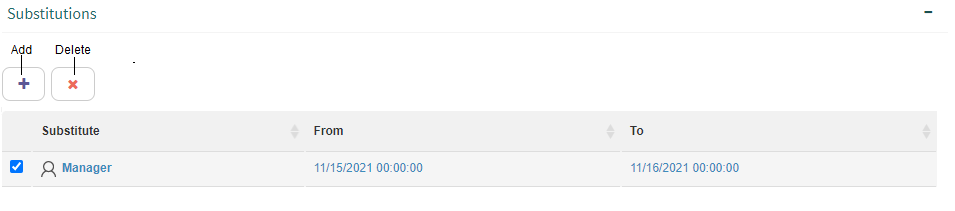
Fig. 675 “Substitutions” group
To add a substitution:
Click the “Add…” button. Qflow will add an element to the list with the default substitute “Empty” and the date of the moment in which it is created (Fig. 676).
Click on “Empty” and a text will appear that says “Start typing a user…”. Write part of the name of the user that will be the substitute, and when Qflow displays the list, select it. You can also select a group. If a group is selected, all members of the group will be able to act as substitutes.
Continue by selecting the substitution’s start date and end date.
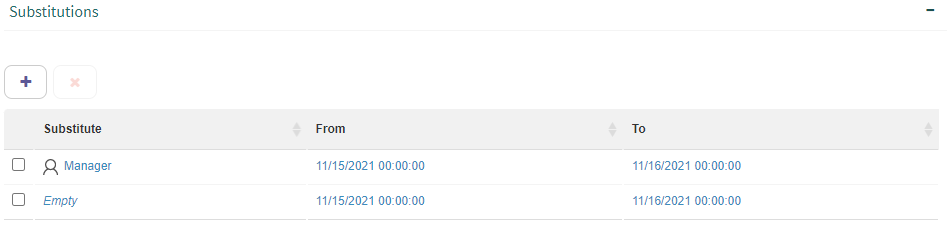
Fig. 676 Add substitution
It is possible to add several substitutions. To delete a substitution, select it and click the “Delete” button. You can also modify an already defined substitution. To do this, select any of the three fields (Substitute, From or To) of the substitution you wish to modify and click it (Fig. 677).
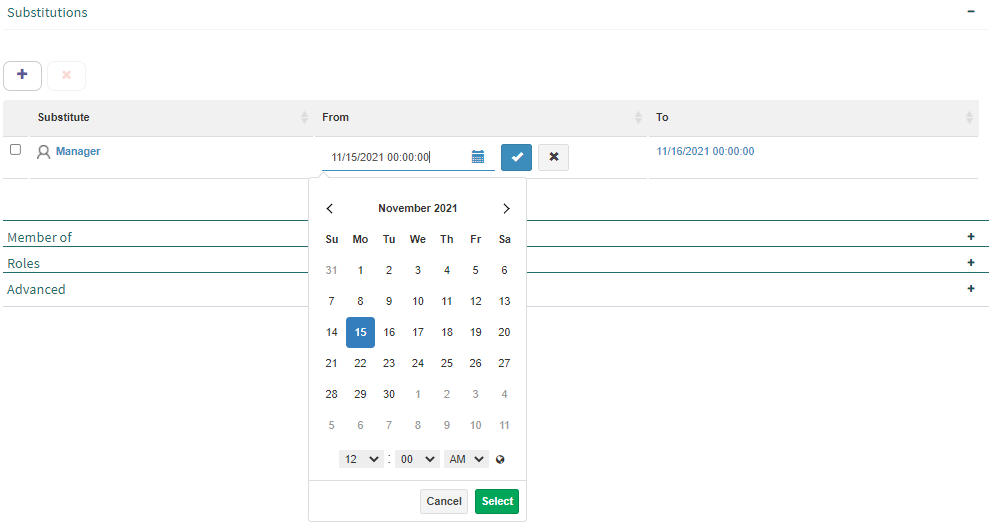
Fig. 677 Modify substitution
Import users from directory
Qflow allows you to import users from Active Directory and other directory services that are compatible with LDAP. To import users to a node, do the following:
Right-click the node where you wish to import the users and select the “Import users” option in the context menu. Qflow will display a panel like the one that appears in Fig. 678.

Fig. 678 Directory users importer
In the panel that Qflow displays, there is a list that shows the available domains. Select the domain you desire and click “Load”. This makes Qflow show that domain’s nodes (Fig. 679).
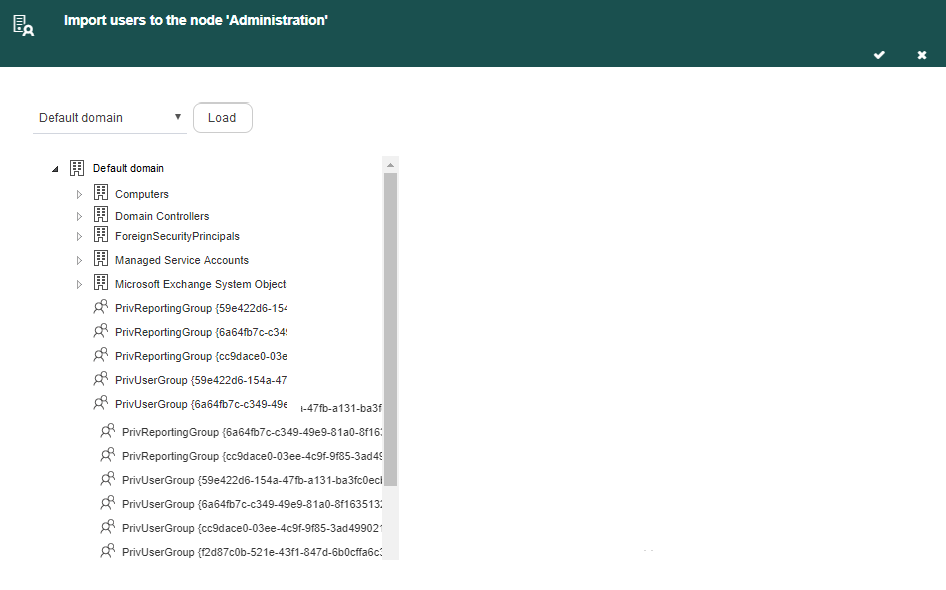
Fig. 679 Directory users importer with a loaded node
Select the node where the users you wish to import are. When you select a node with users, the users list will appear in the right panel (Fig. 680). To select the users, click the
 symbol that appears to each of their lefts. You can also search for a user, by writing part of their name in the search bar that appears in the screen’s upper section. The user search can be done only in the selected node, or it can be recursive, including all its descendants. The button that shows an envelope makes it so that only the users who have an e-mail account associated to them are shown (Fig. 681). In the panel’s lower half there is an option to check:
Update existing users: if you check this option, each of the users’ name and e-mail address are updated, even the ones that were already in Qflow. If you do not check this option, already existing users are ignored. Their data is not updated.
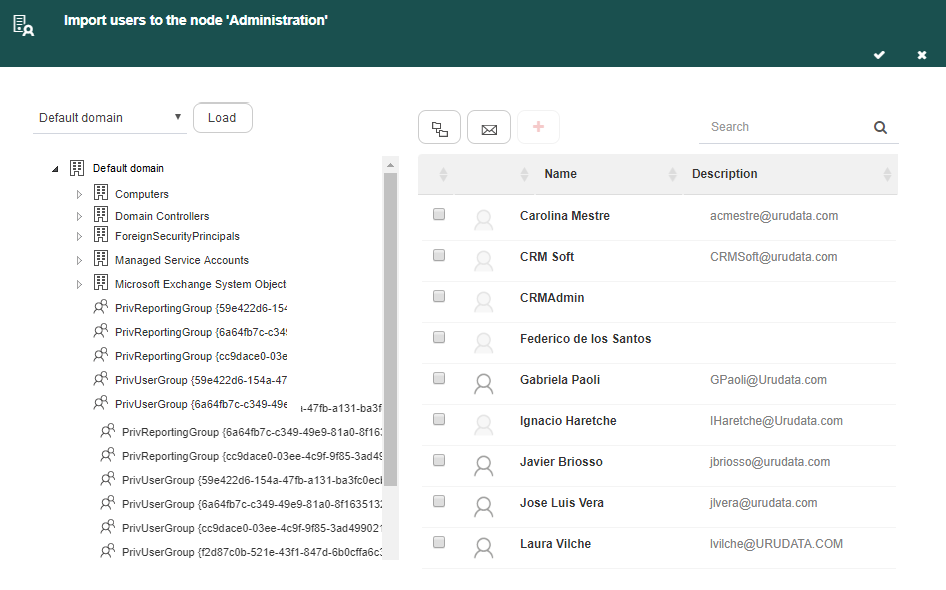
Fig. 680 Selected node users
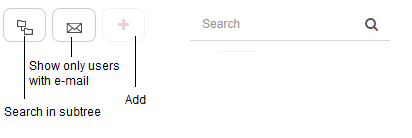
Fig. 681 Options to filter users
Click “Add”. The “Add” button does not close the panel. This way, you can continue adding users from other nodes. Select another node, add the users you require that are in it, and repeat the process until you have added all the users you wished to. The “Add” button will only be available if you select at least one user, otherwise it will be shown disabled like in Fig. 681. As you add users, they can be viewed as Fig. 682 shows. If you do not wish to import some of the added users, click “x” and they will be deleted from the list.
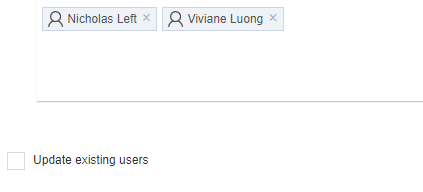
Fig. 682 Users to import
If a user with the same login already exists, they will not be imported unless you check the “Update existing users” option. Therefore, if you check this option, the user’s data will be updated.
When you are done adding users, click the ✓ button that appears in the panel’s upper right corner. This will make Qflow import the added users.
Importing a user’s data from a directory
Aside from importing users from a directory, you can import the data of a certain user that already exists in Qflow. This allows you to update that user’s data. It is also useful to, after the user is created, load their data from the directory (although in this case it is probably easier to import the user directly). To import a user’s data, do the following:
Right-click the user whose data you wish to import, and select the “Import data from directory” option from the context menu, or select the user and click the corresponding button in the toolbar (see Fig. 650). Qflow shows a panel like the one in Fig. 683.

Fig. 683 Directory data importer
In the panel displayed by Qflow there is a list that shows the available domains. Select the directory domain to which the user whose data you wish to load belongs.
Click on “Load”. This makes Qflow load that domain’s nodes tree in the panel’s left section (Fig. 684).
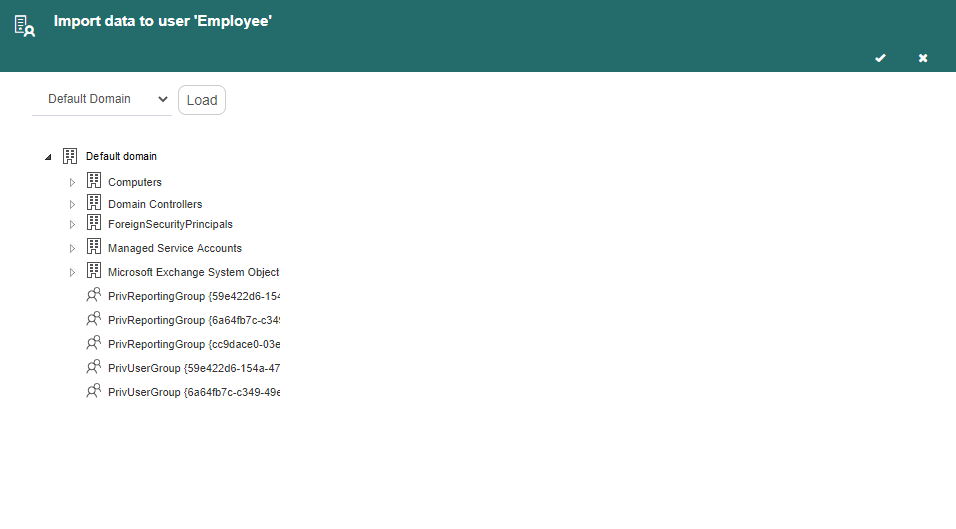
Fig. 684 Directory data importer with a selected domain
Select the node where the user whose data you wish to load is. That makes Qflow show all of that node’s users (Fig. 685). If there are many users in that node, you can filter the user list by using the options to filter users, previously described in the Import users from directory section. If you previously created a user and import their data, the user’s name will change and become the imported name.
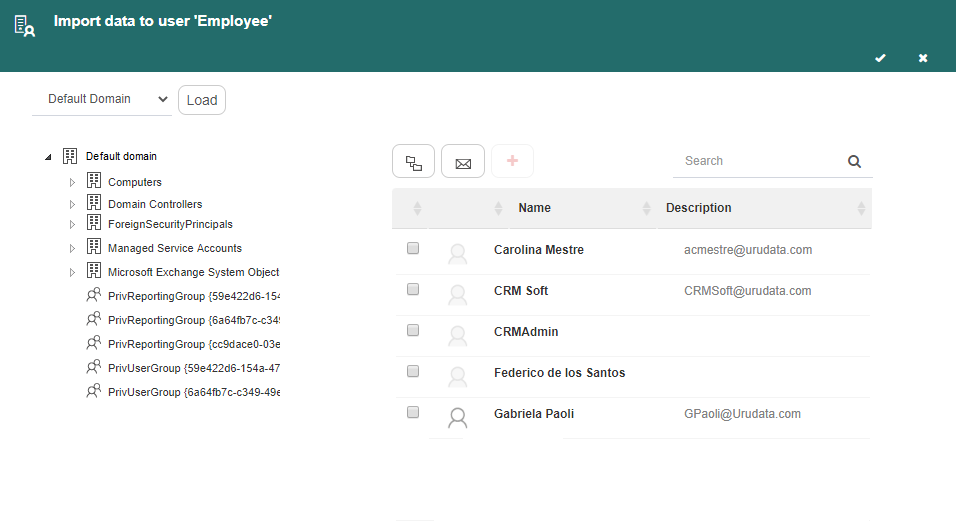
Fig. 685 Directory data importer with loaded users
File
This section describes the “Import node from file” and “Export node to file” options that are in a node’s context menu (Fig. 652).
Import node from file
This option allows you to import a node from a file. This file must be the product of exporting the node in some environment in which Qflow is installed (see Export node to file).
When a file’s content is imported in this way, the whole node structure is imported and each element will be placed inside the node indicated in the file. To import the node, you must select the file in a panel that Qflow shows (Fig. 686) and click “Ok”.
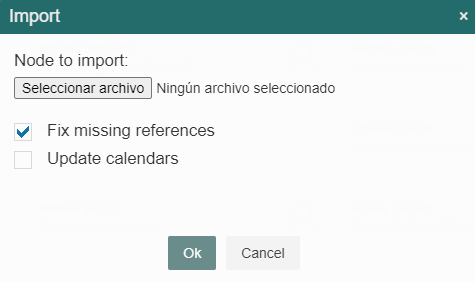
Fig. 686 Panel to import the organizational structure
The “Fix missing references” option, which is checked by default, allows you to import even when there are errors due to missing references (for example, a user has another user, who does not exist, as a substitute). If this option is left checked, Qflow will ignore the reference and continue importing, but will warn you of the errors found so that those problems can be corrected (for example, in the case of a substitute that does not exist, by assigning another substitute to the user). If this option is left unchecked, Qflow will interrupt the import as soon as it finds an error, and will leave the data in the same state it was in before the import started.
Export node to file
The “Export node to file” option allows you to export a node and all its content to a file. This file can later be imported to another environment in which Qflow is installed. To export the node, select the “Export as XML file” option or the “Export compress file” option to export it in one way or the other.
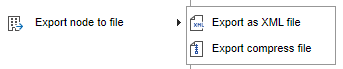
Fig. 687 Exporting the organizational model
Settings
This section describes the options that are in the “Settings” button in the web site’s main screen’s upper menu (Fig. 639).
Manage tool settings
When this option is selected, a panel like the one in Fig. 688 appears. It shows a table with all of the defined permissions. For each of them, you can see the role the permission is for, the role’s description, a list of allowed actions and a list of denied actions. The list can be filtered as usual and it can also be modified, by adding, removing and modifying elements.
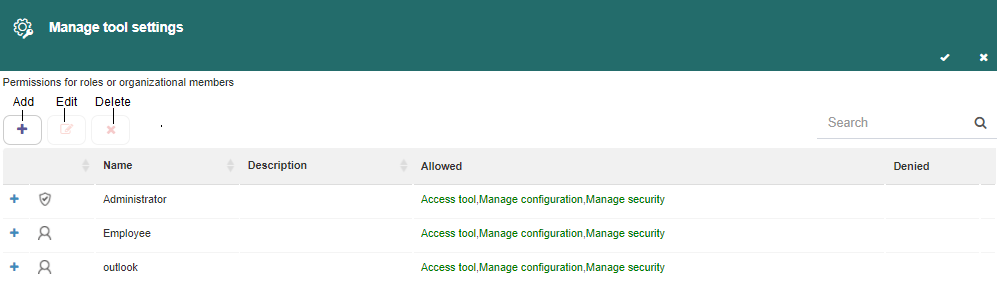
Fig. 688 Manage tool settings
Three types of defined permissions exist:
Access tool: it allows you to open Qflow Team, but does not allow you to make changes.
Manage configuration: it allows you to edit the options that are displayed in the settings bar and are not linked to a node. For example, creating a security role.
Manage security: it allows you to modify the tool’s access permissions.
To add permissions:
Click the “Add” button. That makes Qflow show a roles search bar.
Select the permission’s target. To do that, start typing part of their name in the search bar (where it says “Start typing…”) and when you see it in the list that appears, select it (Fig. 689). A permission’s target can be an element of any of these types:
Security role
Node
Group
User
Work queue
When you select a permission’s target, Qflow shows a form to select the actions that are included in the new permission (Fig. 690).
Fig. 689 Selecting a user, group, node or security role
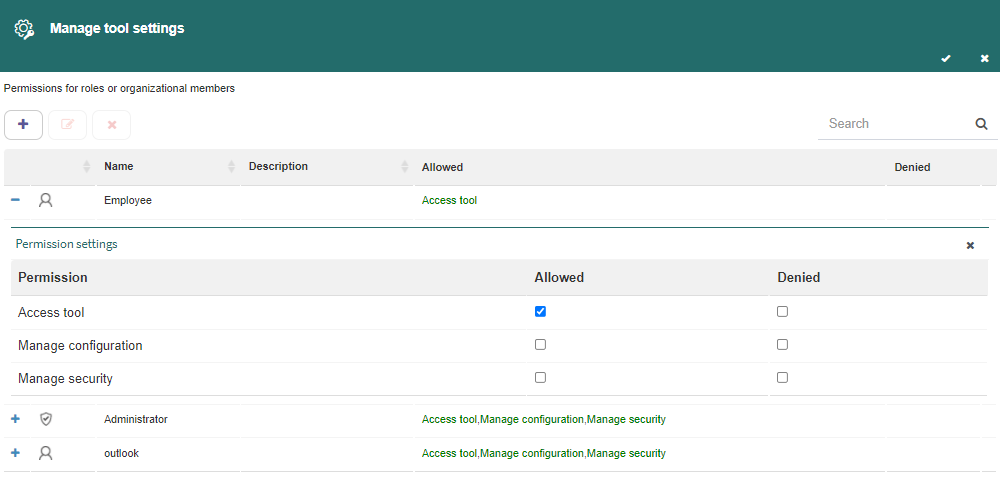
Fig. 690 Permission settings - Add permission
For each permission shown in that form, check whether it is allowed or denied.
To edit permissions:
Select the element whose permissions you wish to edit and then click the “Edit” button.
Qflow will show the “Permission settings” form again. Select the actions that you wish to allow or deny in the new permission (Fig. 691).

Fig. 691 Permission settings - Edit permission
To delete permissions:
Select the element whose permissions you wish to delete and click the “Delete” button.
Qflow will show a warning sign (Fig. 692). Click the “Ok” button and all permissions for the selected element will be deleted.
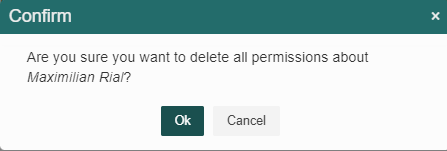
Fig. 692 Confirm permissions deletion
Calendars
The “Calendars” settings option allows you to define calendars so that different users can govern themselves through different calendars. This is useful, for example, when an organization has offices in different countries and, therefore, those offices are governed through different calendars (holidays, working regime, etc.)
When that option is selected, Qflow displays a form like the one shown in Fig. 693.
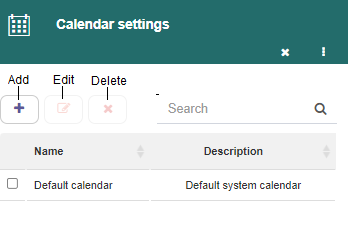
Fig. 693 Calendars form
To add a calendar:
Click the “Add” button. Qflow will show another form like the one in Fig. 694.
Create the calendar (section Calendars properties explains how).
Click the “✓” button that appears in the panel’s upper right corner.
To edit a calendar, select it from the list and click the “Edit” button.
To delete a calendar, select it from the list and click the “Delete” button. Qflow will show a warning sign. Click the “Yes” button and the calendar will be deleted.
Calendars properties
When you are adding or editing a calendar, Qflow opens a panel like the one shown in Fig. 694. This form allows you to define a calendar.
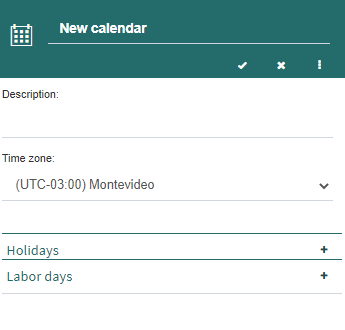
Fig. 694 Calendar definition
A calendar’s properties form has three groups:
The main group, that shows the main properties:
Name: the calendar’s descriptive name. It is the name that appears when you have to select a calendar (for example, in users’ properties).
Description: a brief description of the calendar.
Time zone: the time zone in which all the dates and times defined in the calendar will be.
The second and third groups, “Holidays” and “Labor days” respectively, which are displayed by clicking the “+” symbol.
The “Holidays” group allows you to specify holidays or other days of the year that are not working days.
To add a holiday:
Click the “Add” button. Qflow will add a default element to the list with the date of the moment in which it was added.
If you would like another date (that is not the current one), click that default date and Qflow will show a calendar that will allow you to choose a day of the year (Fig. 695).
Select a day of the year.
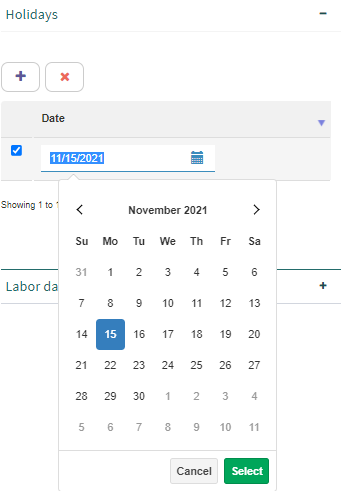
Fig. 695 Holidays definition
The third group, “Labor days” (Fig. 696), allows you to mark the days of the week in which people work and, for each day, the working time (entry time and exit time). To mark a day as a working day, select it and Qflow will extend the group with more options. Check the “Is labor day” box.
Time for fixed date notification: here the time at which notifications that are programmed with Date type data should be sent is indicated.
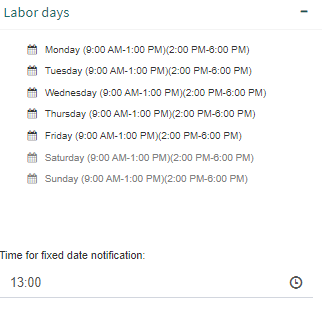
Fig. 696 Labor days
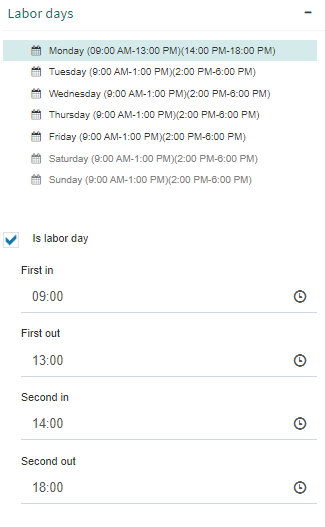
Fig. 697 Mark labor days
Security roles
The “Security roles” option allows you to define the security roles that can be associated to nodes, groups and users. When that option is selected, Qflow displays a form like the one shown in Fig. 698. The form has a list of the defined security roles, and it allows you to add new ones, delete the roles that are in the list, edit them and enable/disable them.
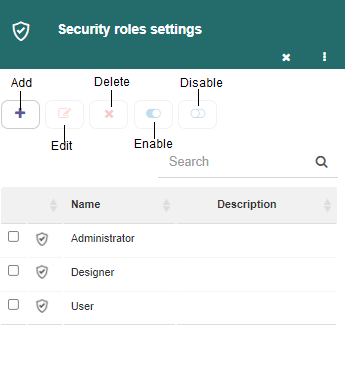
Fig. 698 Security roles settings form
To add a security role:
Click the “Add” button. Qflow will display a form like the one shown in Fig. 699.
Complete the values of the role’s properties (explained further down).
Save the role by clicking the ✓ button that appears in the subform’s upper right corner.
To delete a security role, select it from the list and click the “Delete” button. Qflow will show a warning message. Click the “Yes” button and the security role will be deleted.
To modify a security role’s properties, select it from the list and click the “Edit” button. Qflow will display a subform that will allow you to modify the role’s properties.
To disable a security role, select it from the list and click the “Disable” button. If you later wish to enable it again, do the same procedure but the other way around.
Security role properties
Fig. 699 shows the subform that Qflow displays when you are adding a security role.
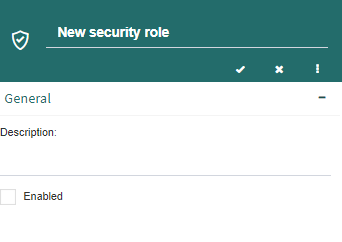
Fig. 699 A security role’s properties when it is added
Security roles have three properties:
Name: the security role’s descriptive name. It is the name that appears when a security role has to be selected.
Description: a brief description of the security role.
Enabled: this box allows you to enable or disable the security role.
Fig. 700 shows the subform that Qflow displays when you are editing a security role. It is the same subform that appears in Fig. 699, only it has two more groups, whose options are not editable but descriptive.

Fig. 700 A security role’s properties when it is being edited
The “Members” group shows the users, nodes and groups that are associated to the security role.
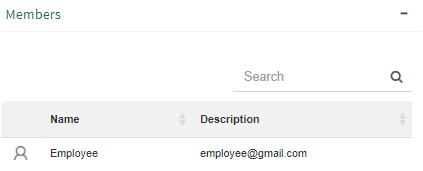
Fig. 701 Security role members
The “Permissions” group shows the permissions that were assigned to the security role. Permissions appear grouped by permission type (tools, nodes, packages). For each permission, the object it was defined for, what the permission is and the access level (“Allowed” or “Denied”) are indicated.
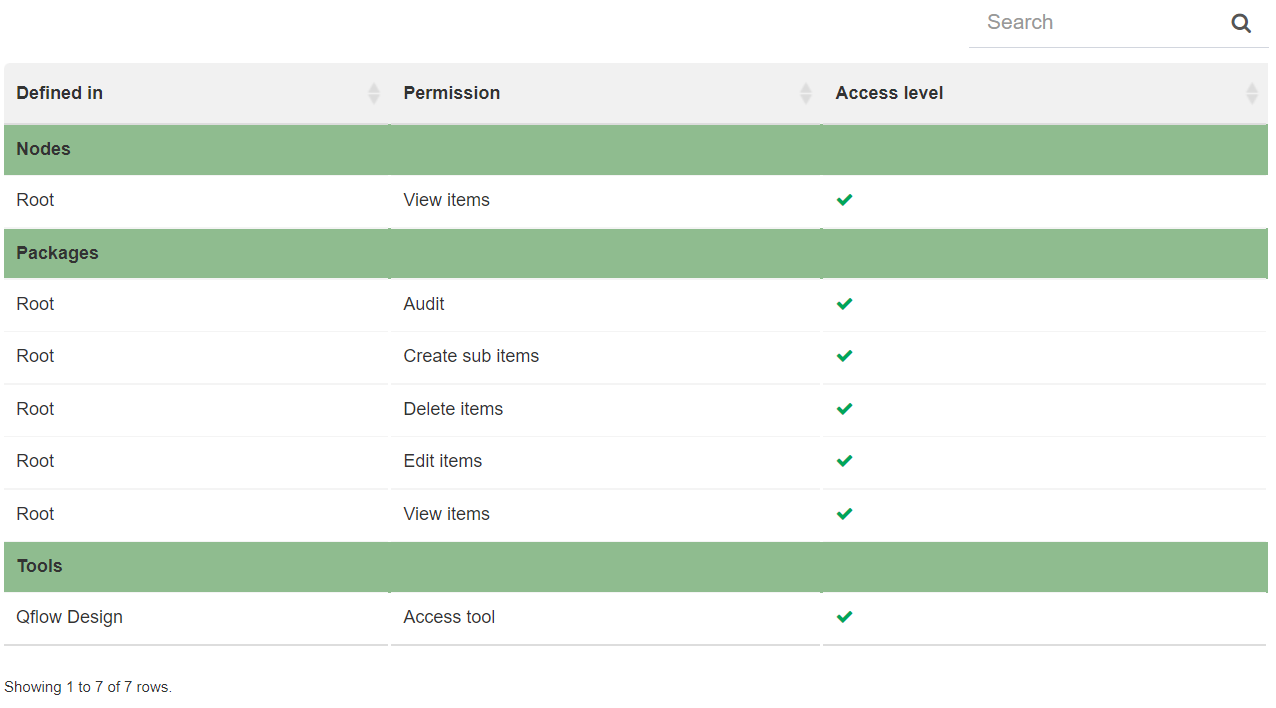
Fig. 702 Security role permissions
Security providers
The “Security providers” option allows you to define the security providers (for example, Windows domains) that are used by Qflow to authenticate its users.
When you select this option, Qflow opens a form like the one shown in Fig. 703. The form shows a list with all of the defined security providers, and it allows you to add new security providers, delete providers that appear in the list, edit their properties and enable/disable them.

Fig. 703 Security providers settings form
To add a security provider:
Click the “Add” button. Qflow will display a subform like the one shown in Fig. 704.
Complete the values of the properties (explained further down).
Save the security provider by clicking the ✓ button that appears in the subform’s upper right corner.
To delete a security provider, select it from the list and click the “Delete” button. Qflow will show a warning message. Click the “Yes” button and the security provider will be deleted.
To edit a security provider, select it from the list and click the “Edit” button. Qflow will display the security provider’s properties subform.
To disable a security provider, select it from the list and click the “Disable” button. If you later wish to enable it again, do the same procedure, but the other way around.
To set a security provider as default, select it from the list and click the “Set as default” button. This will make it appear preselected both in the login window and in the user creation panel.
Security providers properties
When you create or edit a security provider, Qflow shows a subform like the one in Fig. 704. This subform allows you to edit the provider’s properties:
Name: a descriptive name that you wish to give to the security provider. It is the name that Qflow will show when you open some form in which you have to select a security provider (for example, a user’s properties form).
Description: a brief description of the security provider. It does not matter if it is empty.
Enabled: this box allows you to enable or disable the security provider.
Directory service type: it indicates the type of directory service to which the provider belongs (NT domain, Active Directory, OAuth, LDAP or Azure active directory). Only one OAuth type security provider can exist.
Fully Qualified Domain Name: the domain’s characteristic name (FQDN). This field will not appear in the case of OAuth, NT domain and Azure active directory services.
NetBios Name: this field will not appear in the case of OAuth and Azure active directory services.
Supported account types: it indicates if it supports a single organization or multiple ones. This field will only appear for Azure active directory services.
Client id: this field will only appear for Azure active directory services.
Directory id: this field will only appear for Azure active directory services.
Advanced: this button is only enabled if the directory service type is LDAP or Active Directory. In the case of LDAP, it allows you to configure several advanced properties (it is explained further down). In the case of Active Directory (Fig. 706), it allows you to define the credentials that will be used to query the directory. You can opt to use the network credentials (default option) or specify a fixed user and password.
Test configuration: it displays a subform in which you can write a username and a password to verify that the configured security provider works correctly (Fig. 705).
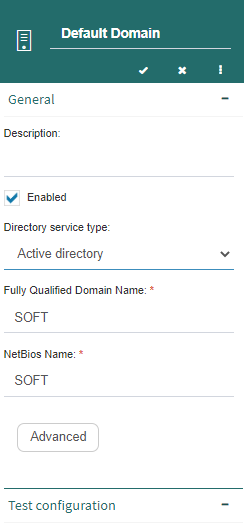
Fig. 704 Security provider properties subform
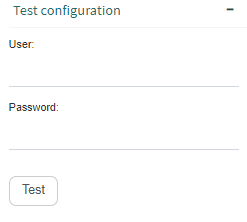
Fig. 705 Test the security provider
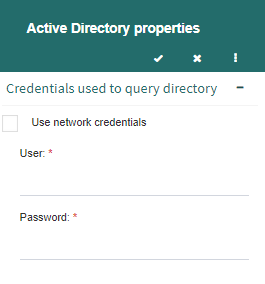
Fig. 706 Advanced properties (Active Directory)
The LDAP advanced properties form (Fig. 707) has the following properties:
General: it contains the properties that specify how Qflow connects to the directory:
Authentication type: the authentication type required by the directory service. If the directory service does not require authentication, select “Anonymous”.
Server port: the directory service port.
Base distinguished name: the location of the organizational elements inside the directory. For example, in Active Directory, for the soft.urudata.com.uy domain the organizational elements are located in dc=uy, dc=com, dc=urudata and dc=soft.
Credentials used to query the LDAP directory: in the case that you use an authentication type other than Anonymous, here you enter the credentials (user and password) that Qflow will use to query the directory.
User configuration: the user properties allow you to specify the object classes and attributes that correspond to the users handled by Qflow.
Object class: the object class that identifies the users.
Login name attribute: the attribute used to identify the users (login).
Name attribute: the attribute corresponding to the users’ name in Qflow. It is only used to import and synchronize directory data.
Description attribute: the attribute corresponding to the users’ description in Qflow. It is only used to import and synchronize directory data.
Email attribute: the attribute corresponding to the users’ e-mail address in Qflow. It is only used to import and synchronize directory data.
Enabled attribute: the attribute that indicates if a user is enabled or not. If it is entered, it is used to import and synchronize directory data.
Organizational unit configuration: organizational unit properties allow you to specify the object classes and attributes that correspond to the nodes handled by Qflow.
Object class: the object class that identifies nodes.
Name attribute: the attribute corresponding to the node’s name in Qflow. It is only used to synchronize directory data.
Group configuration: group properties allow you to specify the object classes and attributes that correspond to the groups handled by Qflow.
Object class: the object class that identifies groups.
Name attribute: the attribute corresponding to the group’s name in Qflow. It is only used to synchronize directory data.
Member: the attribute used to indicate a group’s members. It is only used to synchronize directory data.
The “General” group is the only one shown by default. For the previously described groups to appear, display them by clicking the “+” symbol.
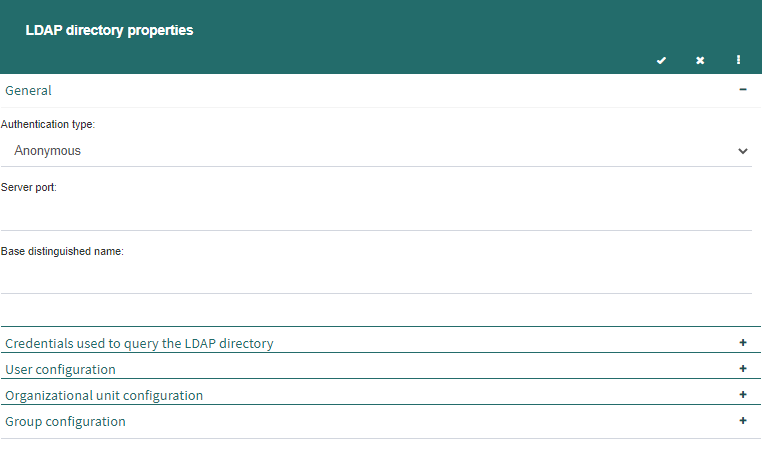
Fig. 707 LDAP directory properties
New user properties
In the new users properties panel, some data of interest will be defined that new users will have by default when they are created. This data is the initial roles and notification services.
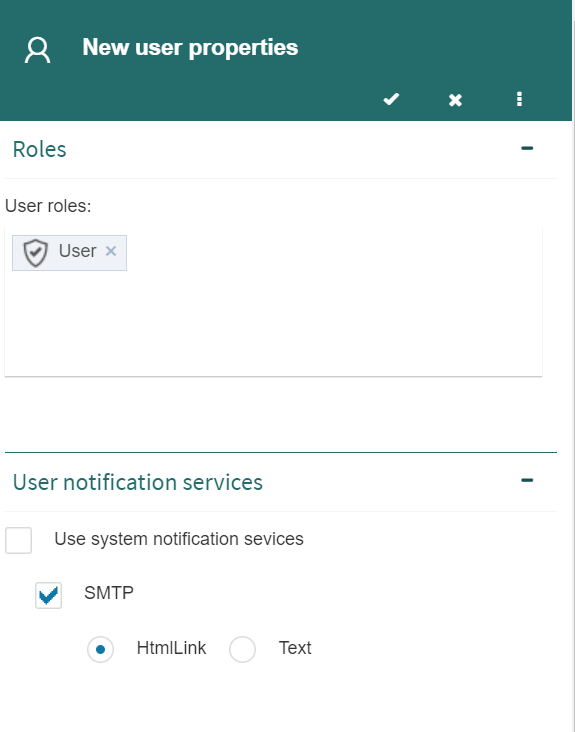
Fig. 708 New user properties
Login report
The login report shows which users have logged in to some Qflow tool during a certain time period. Logouts and failed login attempts are also shown. In the screen’s upper section you can select the period whose data you wish to see, as shown in Fig. 709. Next to each report, the time zone in which the period is is shown.
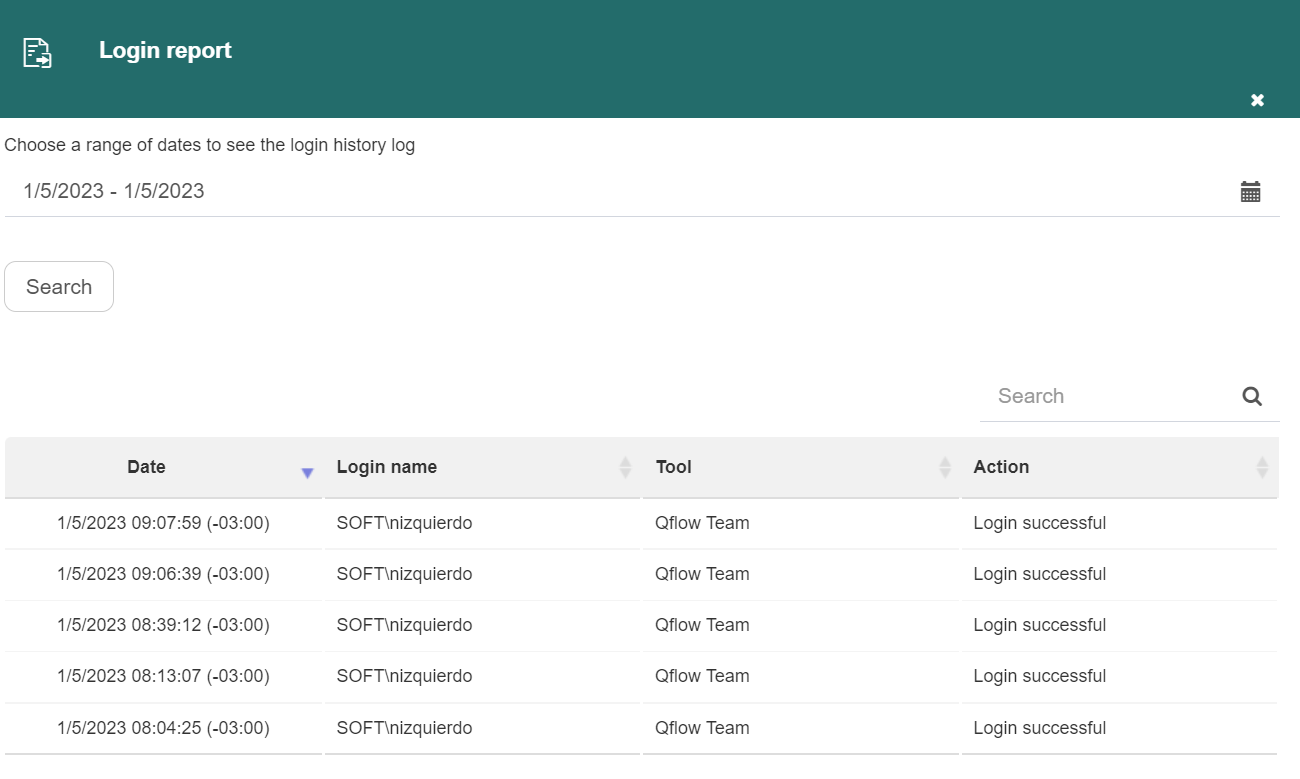
Fig. 709 Login report during a specific time period
Permission audit
The permission audit (Fig. 710) allows you to check modifications on the users’ permissions. A user can receive permissions from various sources, some of them direct, like explicitly assigning permissions to a security role, and others indirect, like assigning a new security role to a user. The audit allows you to distinguish all these cases and provides detailed information on the changes made. Only users that have audit permissions in the root node can access the permission audit. Information is divided into the following items (Fig. 711):
Manager assignments: it shows operations to assign users as node and group managers. Operations that made a user stop being a node or group manager (“deassignment”) are also shown. For each operation, who performed it (“User”), which node or group the manager was assigned to, and the manager that was assigned are shown.
Groups membership: it allows you to view the changes in users’ or groups’ belonging to other groups. Moving a user to a different node is considered a group change, and therefore also appears here. These changes can affect permissions, since the user obtains the permissions of the group to which they belong.
Roles membership: it allows you to view the changes in organizational members’ belonging to security roles.
Tools permissions: it shows the changes made in the tool permissions definition (for example, Qflow Team itself). Aside from the permissions, the tool to which they correspond is specified.
Nodes permissions: it shows the changes made to node permissions. It allows you to filter the shown changes to include only those corresponding to work queue-specific permissions.
Packages permissions: it shows the given and denied package permissions.
Substitutions: it shows the added and deleted substitutions. They are relevant because during the substitution period, the substitute obtains the permissions of the person they are substituting.
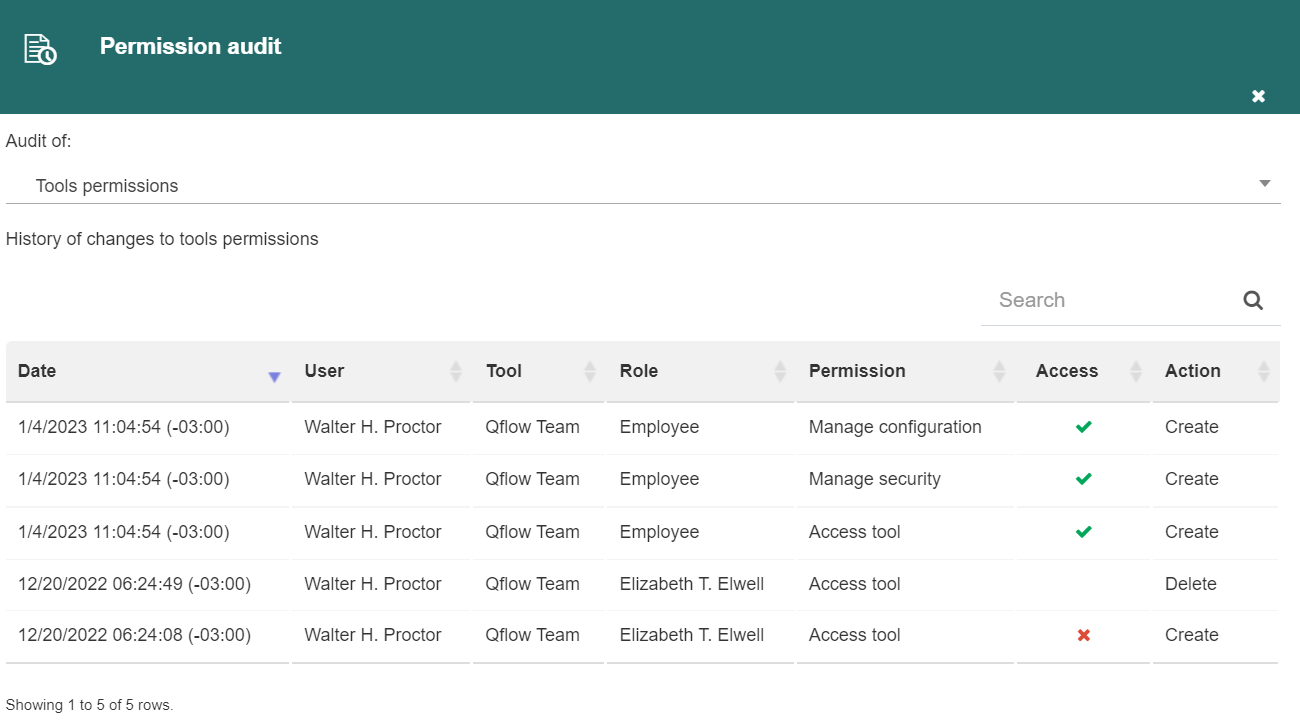
Fig. 710 Permission audit
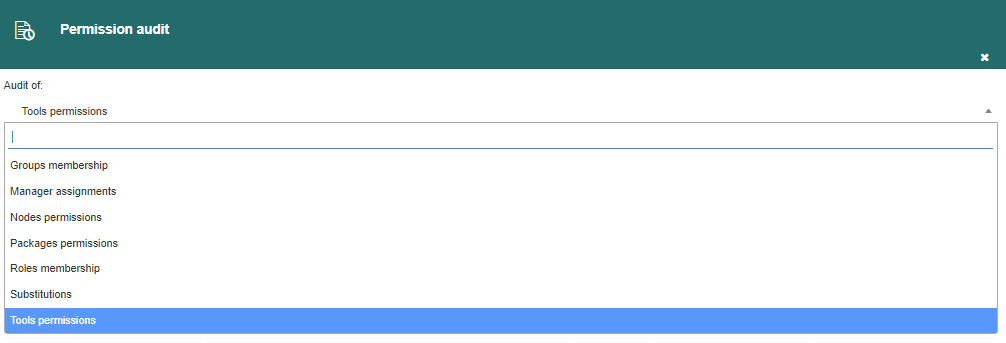
Fig. 711 Items - Permission audit
Additional properties
It can sometimes be desirable to handle properties that are not defined in Qflow. For example, Qflow does not have a “Phone number” property for a user. For these cases, additional properties exist.
Properties box
An element’s additional properties are shown in the “Properties” group of that element’s form. By default, that group shows a box that has two columns: Name and Value (Fig. 712).

Fig. 712 Additional properties
To add a property:
Click the “Add…” button. Qflow will add an element to the box with the default Name and Value “Name 1”.
Click “Name 1” in the Name column, write the new property’s name and press the “Enter” key. In the same way, click “Name 1” in the Value column, write the new property’s value and press the “Enter” key again.
Fig. 713 shows three added properties.

Fig. 713 Added additional properties
To delete a property:
Select the property or properties that you wish to delete by clicking the
symbol that appears to each of their lefts.Click the “Delete” button.
There is another way to define properties, which implies configuring Qflow so that they will be defined for all elements of a certain type (for example, for all users) and that the “Properties” group, instead of a box, will show a custom set of controls (Fig. 714). The advantages of doing it this way are that each property’s type can be specified (if it is a number, a text, an organizational member or a date, for example), and each property is shown in a way that is adequate for its type, which lets you avoid errors when assigning values to them. For example, if a property is of “Yes”/“No” type, it will be shown with a control that only allows you to select those two values.
Para definir las propiedades adicionales de esa forma se utiliza Qflow Admin (para más información ver el manual de de QflowAdmin). El hecho de definir propiedades de esa forma no implica que no se pueda seguir usando el cuadro. El cuadro seguirá disponible en la parte inferior del grupo, como se visualiza en la Fig. 714.
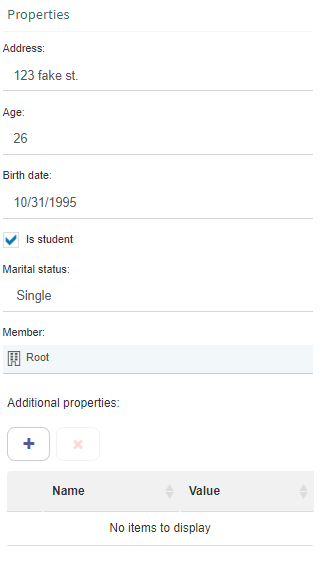
Fig. 714 Additional properties defined through configuration
Licenses
Qflow Team lets you control the use of Qflow licenses, through the main screen’s “Enabled users indicator” (see Fig. 637). Additionally, when someone creates or enables a user in Qflow Team, the operation is controlled to ensure it does not make you exceed the number of available licenses. If this happens, the tool will warn you and the operation will be suspended.