Qflow Admin
Introduction
This manual describes the web tool that allows you to manage and monitor different aspects of the system, such as sites and services, extended properties, licenses, notification services, workspaces and system parameters.
General user interface description
Fig. 854 shows the system administrator’s main screen. The interface’s main elements are:
Main screen: where shortcuts and a quick view of every license can be found.
Upper menu: gives access to the configuration screen, auditing the tool’s elements, changing the preferred time zone and logging out.
Sidebar: it allows you to navigate to the home page and displayservices, system parameters, license usage, user, group and node extended properties, licenses, notification services and workspaces. Each one of these options is described in detail in their corresponding sections.
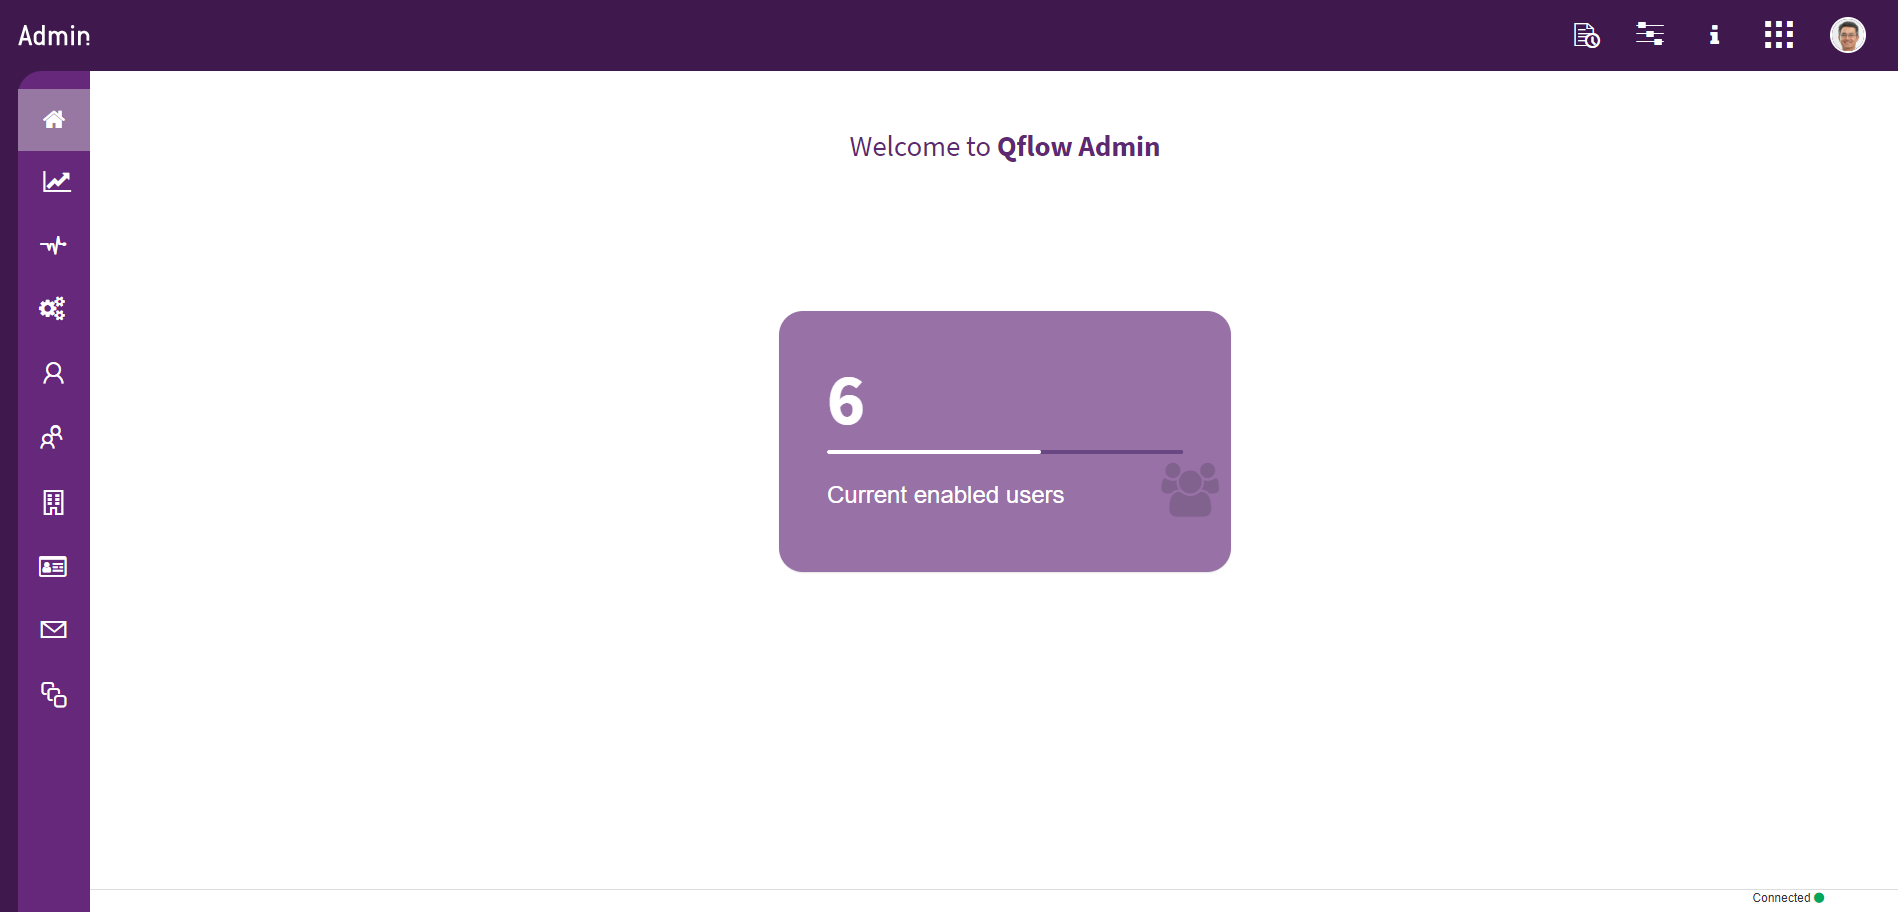
Fig. 854 Qflow Admin’s main screen
License viewer
The licenses viewer can always be seen in the main screen and shows the usage of the current license and indicates the number of users that are currently enabled in the organization.
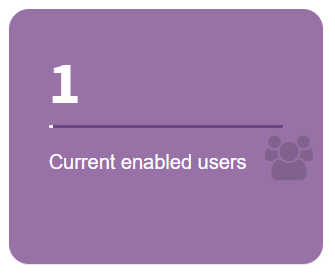
Fig. 855 License viewer
Upper menu
Fig. 856 shows the upper menu. Each of the functions available through it are explained next.
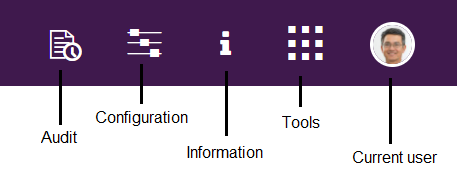
Fig. 856 Upper menu
When the audits option is opened, the system displays an options menu as shown in Fig. 857. More details can be found in the Audit section.

Fig. 857 Audit options
When the configuration option is opened, the system displays an options menu as shown in Fig. 858. More details can be found in the Manage permissions section.
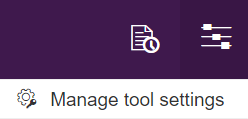
Fig. 858 Configuration options
When the information button is clicked, the product’s current version is shown, in addition to links for the version’s news and the product’s manual. These options can be seen on Fig. 859.
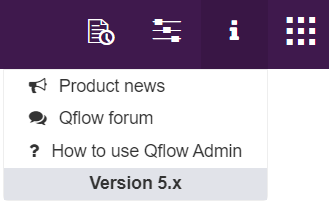
Fig. 859 Information
By pressing the tools button, the system displays the links to all the tools to which the user has permissions. Clicking on one of them will have them open in a new tab.
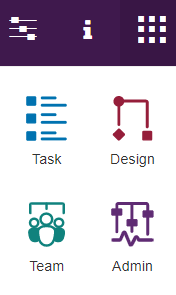
Fig. 860 Tools
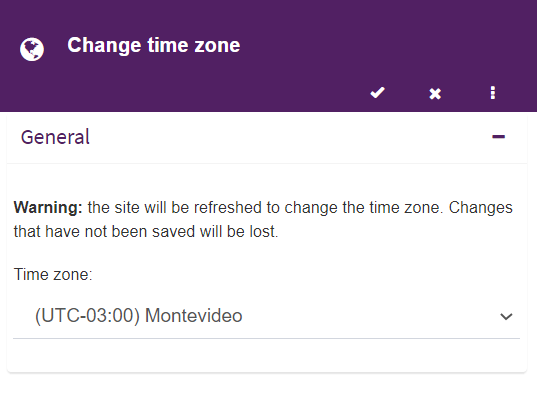
When the “Current user” option is opened, the system displays the user’s preferred time zone. This time zone is the one used in all of Qflow’s dates and times for the current user. This preference is shared by all the product tools. Thus, modifying it in one of them will affect the others.
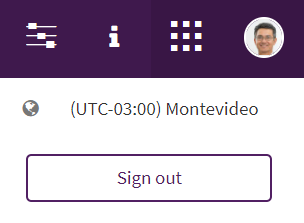
In order to edit the prefered time zone, you must select the “Current user” option from the menu. This will open a right panel with a list of available time zones. After selecting a time zone and saving the panel, the page will automatically be refreshed so that the changes take effect. If additional windows with any of Qflow’s tools are open, they should be refreshed manually in order for the change to take effect.
Side bar
Fig. 861 shows the side bar, and the options it contains. With the exception of the start page, each option corresponds to every tool’s functionality, and these are explained in the following sections.
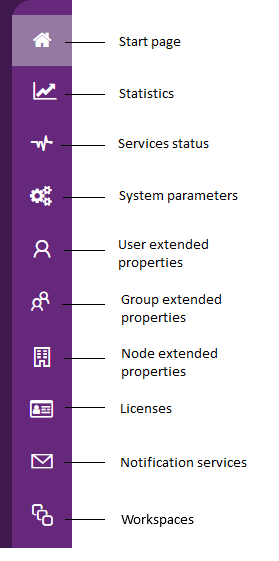
Fig. 861 Side bar
Statistics
Qflow has a functionality that indicates the usage of the current workspace’s license. It consists of a historical report of the tasks answered and processes started. In the main workspace you have the option to see all the reports of the secondary workspaces. This is achieved by choosing the workspace in the selector at the top right.

Fig. 862 Responded tasks and started flows statistics
The first two graphs have filters, and among them is the option of grouping data by month or by day (by default they are grouped by day), as well as the option to establish a custom time period (by default it is the current month).

Fig. 863 Filters
Services status
The system is composed of various services and sites that interact with each other. As such, it is of interest to know if they are working normally. For this purpose, a list which sends a query to each one of the services that comprise the system is provided.
To access said list, select the corresponding option in the sidebar (see Fig. 861). A list will be displayed showing every service and site that is installed in Qflow. The service’s name can be seen, as well as the URI where it is located (namely, where the query will be sent). To get the status of one or several services, select them by clicking on the icon to the left of the service’s name ( ), and then click the “Refresh” button indicated in Fig. 864. Keep in mind that the service’s response will take a few seconds; during this time, the “State” column will show the corresponding icon (
 )
)
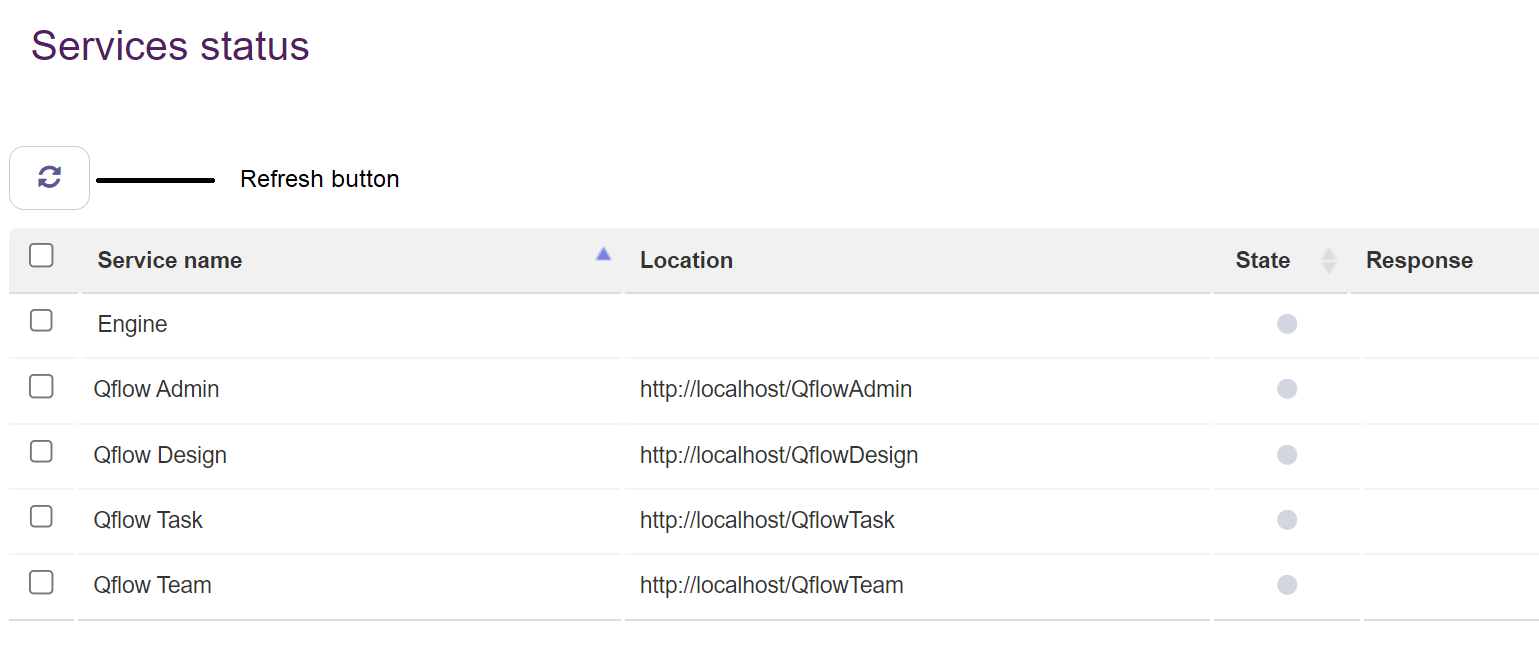
Fig. 864 Service status listing
Once the response is received, the status will be updated and a circle will be shown. Its color indicates if the result was correct (green) or if there was an error (red). The possible answers are:
Ok: the service responded to the query correctly, which means it is working normally.
Error: the service did not respond correctly. It may have not responded, or it might have sent an error message. To get more information, an icon will appear in the column to the right of the response
 . Hover the mouse over the icon and a pop-up will be shown with the specific error message that the server returned.
Not found: the service was not found in the specified location (said location can be seen in the “Location” column).
Unauthorized: the service was found, but the current user (with which you logged in to the site) does not have permission to make the request.
Time-out: the service did not answer within the expected time period. This time limit can be configured within this tool (see the System parameters section).
Unavailable service: the service exists, but it is not available to respond to the query.
In every case, by following the response you will see a number that indicates the time in milliseconds that it took to get that response.
If at any time you wish to consult the status of a service again, you can refresh it in the previously indicated manner.
System parameters
System parameters are predefined parameters that control various aspects of the product’s functionality. They can be of numeric type, true/false (boolean), text or image. They have a value, and a default value, which is what is used when they have no set value. To see the full list, see the System parameter listing section.
Parameters can be defined in a file (“System.config”) or in a database. The tool will first check the parameters from the database, and will take from there the parameters with the values that are found. Then, in the previously mentioned file, it will look for parameters that were not defined in the database. In the case that a parameter exists both in the database and in the file, the value from the database will be taken.
To access the list of system parameters, select the corresponding option in the sidebar (see Fig. 861). When selecting said option, a list with all of the system parameters will be displayed.
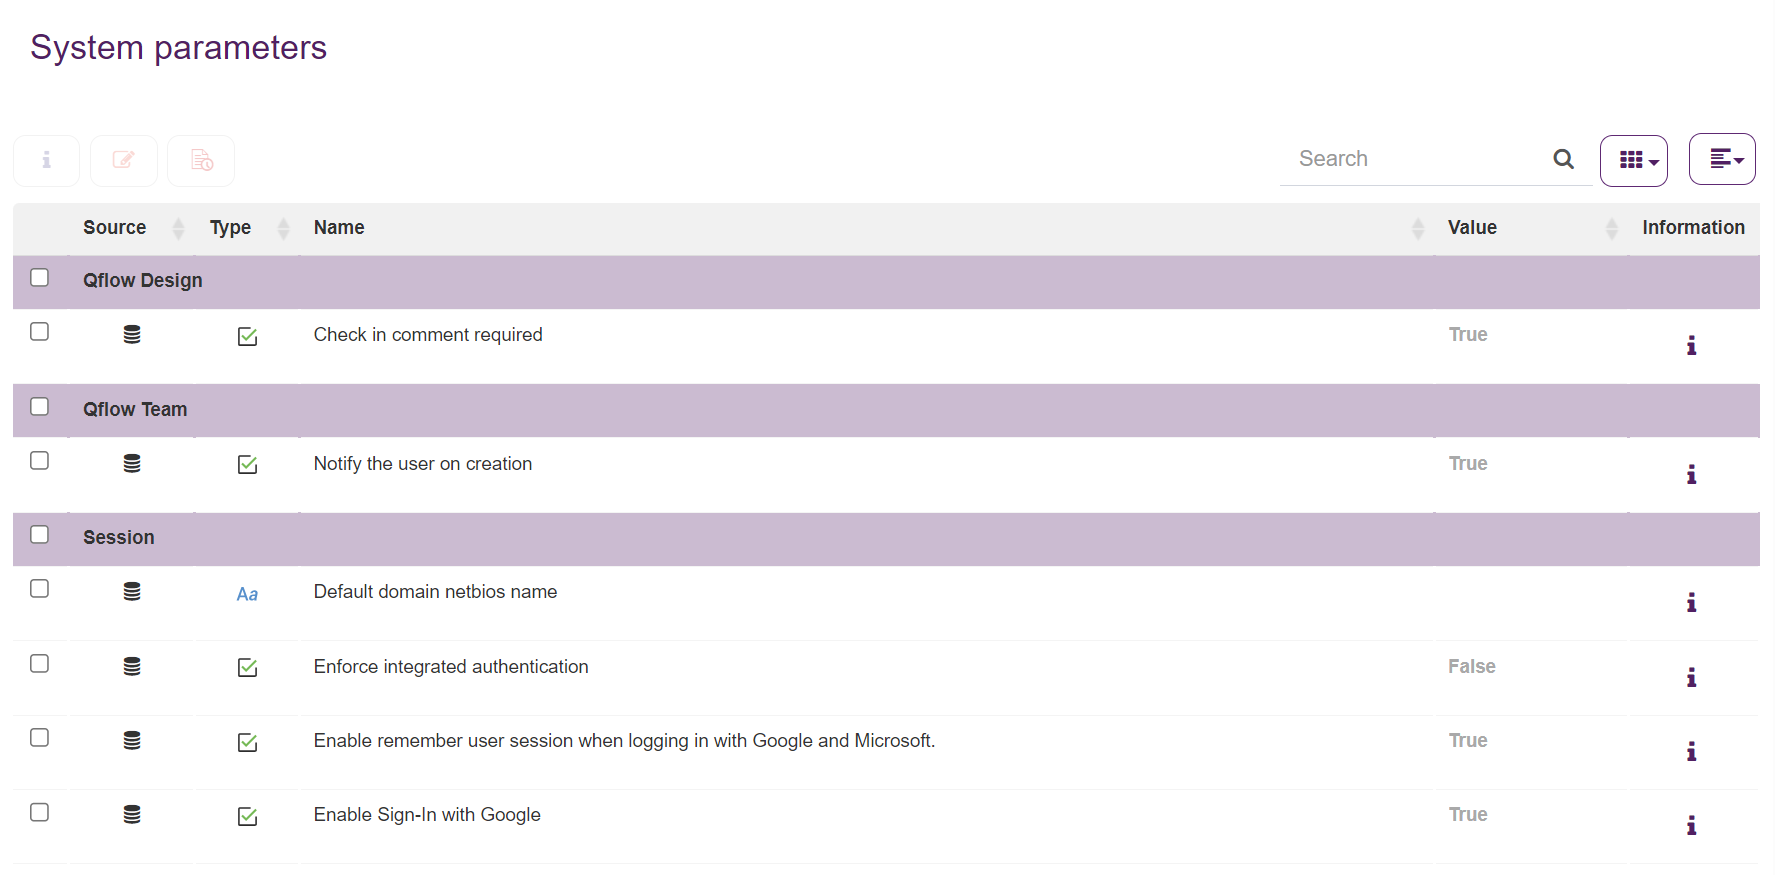
Fig. 865 System parameter listing
Through the buttons found above the table, a system parameter can be edited, as well as have its history viewed.
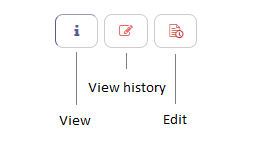
Fig. 866 System parameters buttons
Some clarifications about the listing:
The “Source” column references whether the parameter was taken from a database (
 ) or a file (
 ).
).If the row with the parameter’s information is in grey color, it means that the parameter is read-only and cannot be edited.
If the value is displayed in bold and gray color, it means it is the default value.
When clicking on the information icon (
 ), a description of the parameter’s goal will be displayed. Click anywhere on the listing to close it.
To edit any parameter that allows it, click on it and then on the edit button. A panel will open as shown in Fig. 867. If you click the View button, the same panel will open, but in read-only mode.
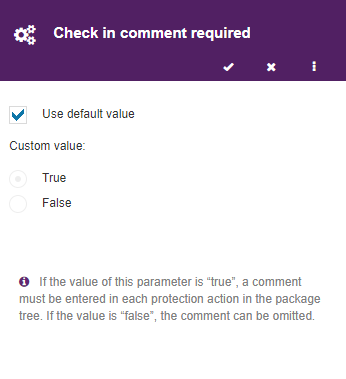
Fig. 867 System parameter edit panel
You can select “Use the default value”, or enter a custom value. This value can be empty. When you modify a parameter, it is necessary to reset the service in order to see the change.
When you click on the “View history” button, a right panel will open with the changes history for the selected system parameter. This panel shows the name of the action, the new value selected for the system parameter, the user that made the action and the time of said action.
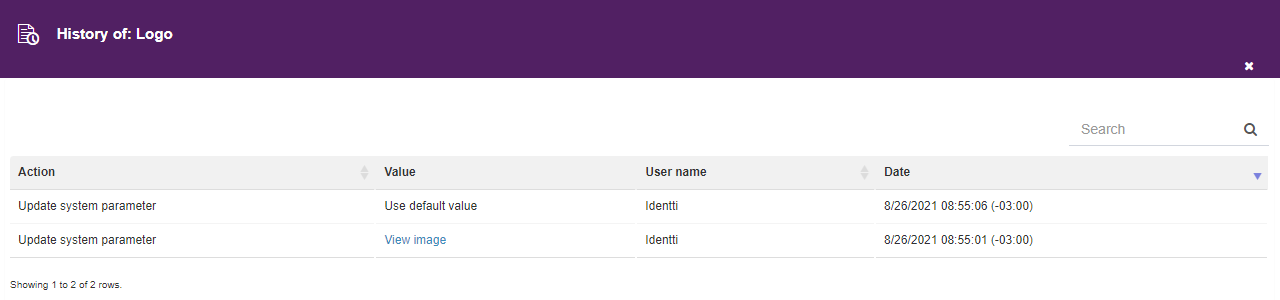
Fig. 868 History of a system parameter
Extended properties
Extended properties are defined by the organization and are shown in the properties panel of each member of the organizational model (user, group and node), in the administrator of said model. To see their use, see the Qflow Team manual.
An extended property has a key and a text value. It can also have one of the following types: text, number, date, true/false (boolean), member, or item list. This last value is comprised of a list of elements which have a key and value, both of type text.
User extended properties
You can add, view, edit and delete a user’s extended properties from the corresponding option in the sidebar (see Fig. 861). When you select said option, a list will be displayed with the defined extended properties.
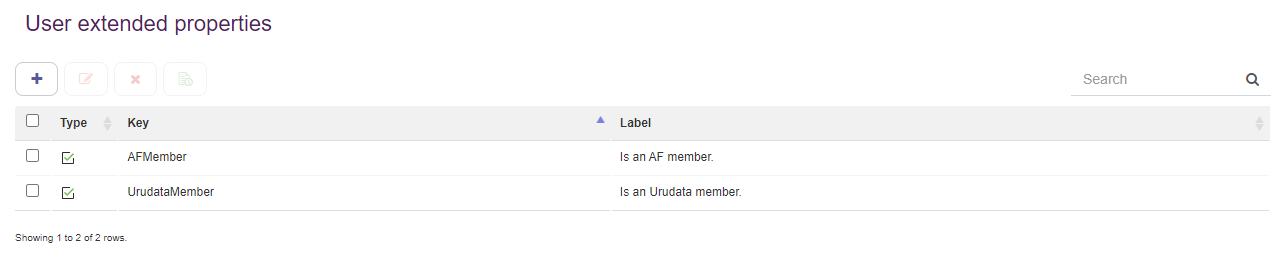
Fig. 869 User extended properties listing
Properties can be added, edited or removed through the buttons located above the table.
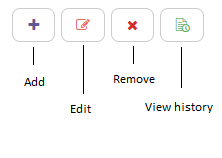
Fig. 870 Extended property buttons
If you click on the add button, a panel will open to create the new property.
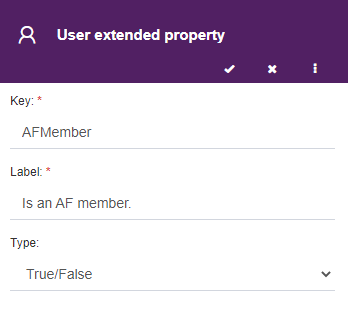
Fig. 871 Add user extended property
You must enter a key and text value. Keep in mind that once an extended property has been created, its key cannot be changed. If you wish for the property to have a type other than text, clicking on the arrow button in the Type field will display a list of the types mentioned in the Extended properties section. In the case that Item list is selected, a table like the one shown in Fig. 872 will be shown. You can add or remove items, move them and edit the text’s or key’s value.
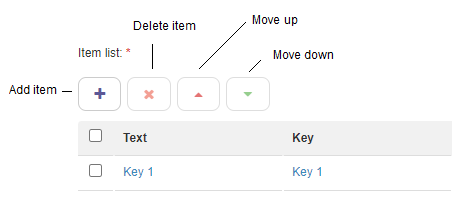
Fig. 872 Item list
It is mandatory that at least one item exists in the list. Also, there cannot be any repeated keys, nor any empty values (key or text).
When you click on the save button (tick icon on the upper right corner), the panel will be closed and the new property will appear in the listing.

Fig. 873 New property in the listing
If the property is selected, and you click on the Edit button, the edit panel will open.
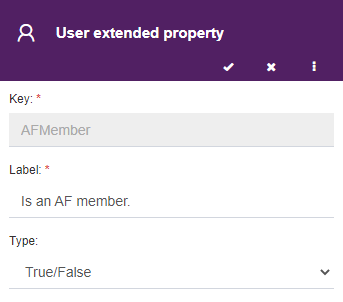
Fig. 874 User extended property edit panel
Note that the key is disabled for editing, and only the other fields can be changed.
In order to delete them, you can also select as many properties as you wish from the listing. If you click on the Delete button, a warning sign will be displayed.
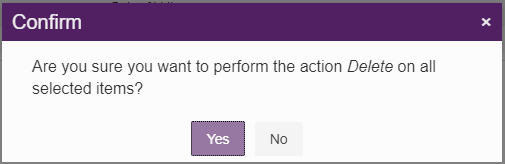
Fig. 875 Confirming extended properties deletion
Select Yes to confirm.
When you click on the “View history” button, a right panel will open with the changes’ history in the selected extended property. This panel shows the action name, the user that did the action and the time of said action. If you click on the “+” button, it will display details about the extended property such as type and tag. It will also show information about the IP and MAC address of the user that made the changes.
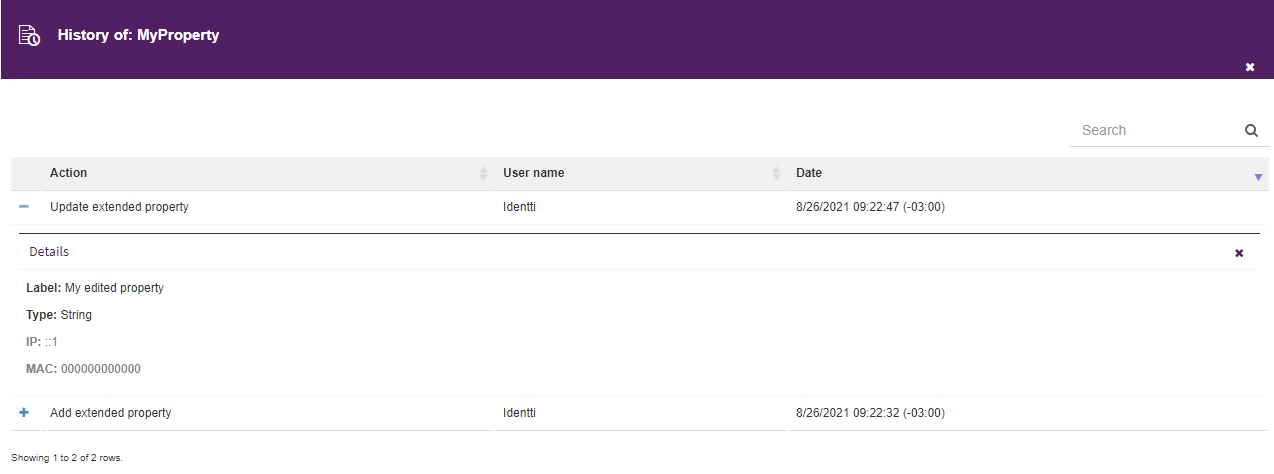
Fig. 876 Extended property history
Group extended properties
You can add, edit, and delete the extended properties of a group from the corresponding option in the sidebar (see Fig. 861). When you select said option, a list will be displayed with the defined extended properties.
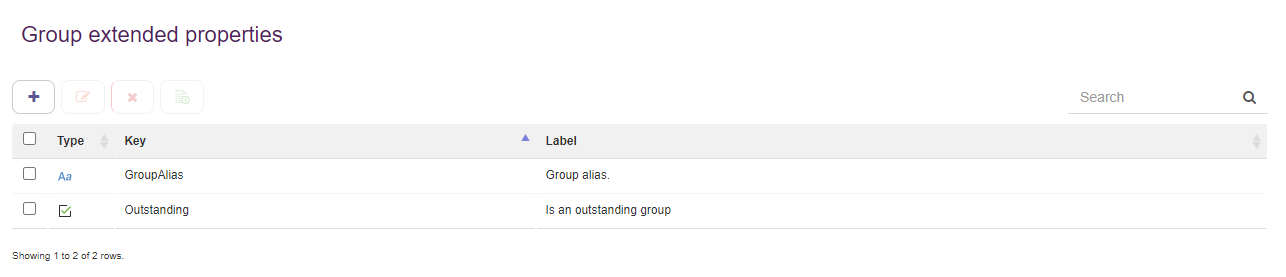
Fig. 877 Group extended properties listing
The operations on the elements of this listing are analogous to the ones explained in the User extended properties section.
Node extended properties
If you are unfamiliar with the concept of a node, refer to the Qflow Team manual.
You can add, edit and remove a node extended property from the corresponding option in the side menu (see Fig. 861). When you select said option, a list will be displayed with the defined extended properties.
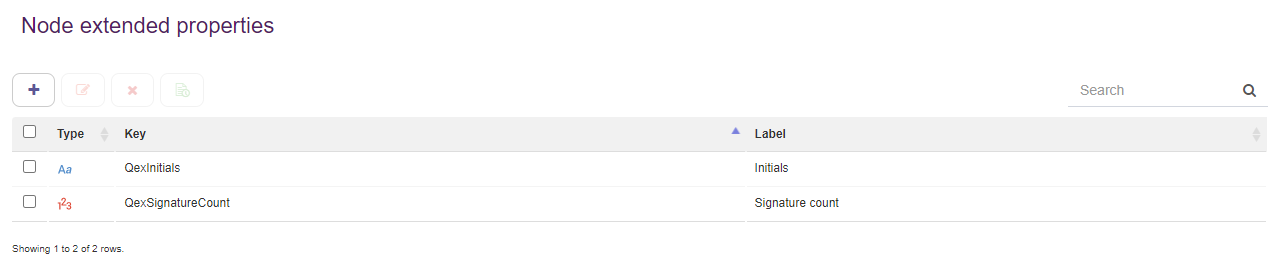
Fig. 878 Node extended properties listing
The operations on the elements of this listing are analogous to the ones explained in the User extended properties section.
Licenses
In this section we can see all the licenses that exist in the system. To access the listing select the corresponding option in the sidebar (see Fig. 861).
A list will be displayed showing all the licenses that are loaded in the system. Also, above the listing, it shows the product for which the licenses are being viewed, as well as the current organization.
The license listing will contain different fields depending on the version that is being used (OnPremise or Cloud). The common fields between the two versions are detailed below:
Type: it indicates the type of license.
Organization name: it indicates the organization for which that license was issued. If it does not match with the organization name that was configured, it will not be considered valid.
Number of users: it indicates the number of users that are enabled with that license.
Expiration date
Status: it shows an icon that indicates whether the license is valid or if there is any problem. The possible status are:
 The license is valid
 The license has expired
 The license does not apply to the organization
In any case, when you hover the mouse over the icon, a pop-up will appear with the status description.
A new license can be loaded, by clicking on the “+” button above the listing. A new dialogue box will open for you to select the license file stored in your computer. Supported file types are xml and qlic. Once loaded, the license will show up on the listing.
License model
A license enables a certain number of users to use different Qflow components. Each license is issued for a certain organization, valid time, a specific workspace and a specific server or group of servers.
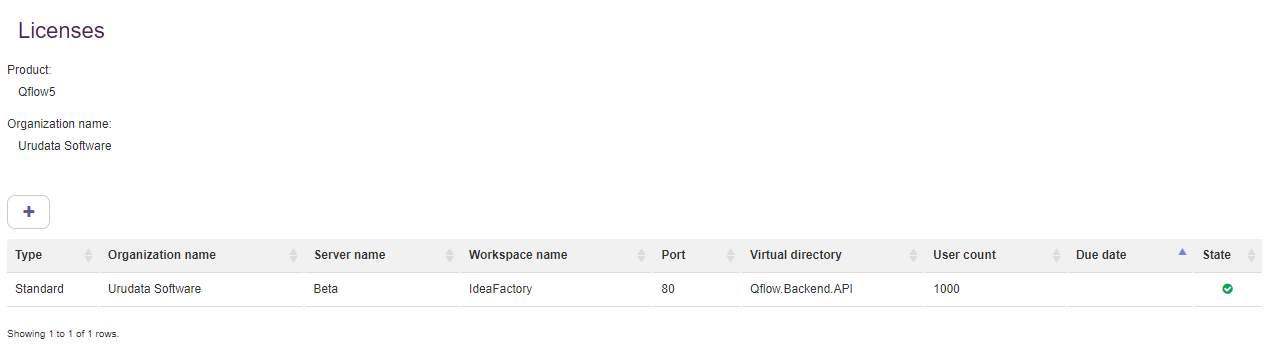
Fig. 879 OnPremise licenses listing
The information that can be seen is the following:
Server name: it indicates the servers that are allowed to execute Qflow’s services.
Workspace name: it indicates the workspace name to which the license corresponds.
Port: it indicates the backend port that corresponds to the license.
Virtual directory: it indicates the name of the virtual directory in which the backend corresponding to the license is located.
Workspaces
Starting from Qflow 5.0, support for installations with multiple workspaces or multi-tenancy was added. This adds a new level of organization in the system, in which the same server and the same database can store different environments, with their own data, only sharing global configurations.
In this new system, there is a main workspace and a number of secondary workspaces. The biggest difference between the main workspace and the rest is that the main workspace is the only one that can create secondary workspaces and it also manages the global configurations.
The configurations that the main workspace manages are:
Global system parameters: some system parameters are only editable by the main workspace, thus they will not be visible from the secondary workspaces. For more details about which these system parameters are, see the System parameter listing section.
Services status: the status of the services is only visible from the main workspace.
Default notification services: the particularities of the notification services will be explained in the Notification services in multiple workspaces section.
It is also possible to add, view, edit and delete workspaces from the corresponding option in the sidebar (see Fig. 861). When said option is selected, a list will be displayed with the defined workspaces.

Fig. 880 Workspace list
Using the buttons located above the table, you can add, view, edit, delete, enable and disable a workspace.

Fig. 881 Workspace list buttons
When you press the add button a right panel is displayed (as shown in Fig. 882) in which the following data must be entered:
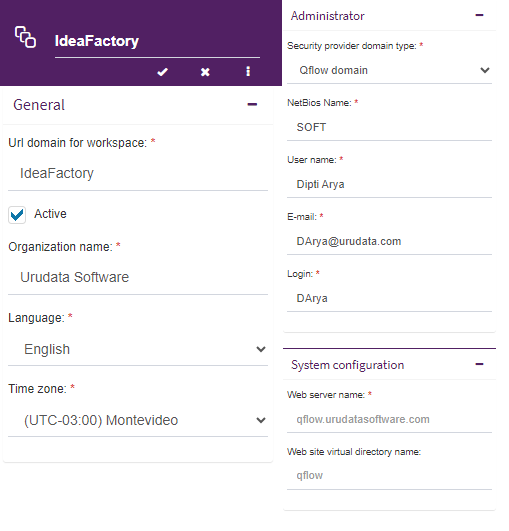
Fig. 882 Creating a new workspace
Name: name of the new workspace
URL domain: URL by which the new workspace can be accessed
Organization name
Language: language in which to create the packages, roles, views, etc.
Time zone: the default calendar’s time zone.
Administrator user name: administrator’s user name created by default.
Administrator user login: administrator user’s login created by default.
Security provider: provider by default via which the administrator user will be authenticated, it can be an NT domain, Google/Microsoft or OAuth. In the case of NT domain a NetBios name will be required.
Web server: name of the web server in which the sites are hosted.
Virtual directory: virtual directory in which Qflow’s website is hosted.
If the changes are accepted, the new workspace is created within the database, which can take a few seconds. Once the creation is finished, the new workspace is available to be used.
Once the new workspace is created, it can be deleted or edited. In the latter case, only the name, URL and whether it is active or not (Fig. 883) can be changed. A non active workspace, meaning a disabled workspace, will not allow its users to authenticate nor execute their active flows.
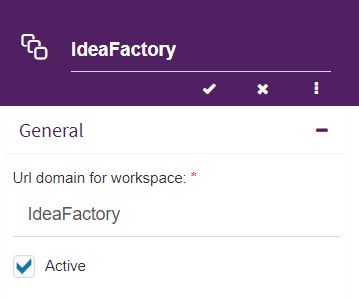
Fig. 883 Workspace editing
Notification services
Notification services are Qflow’s email services and push notifications. In order to view them, select the corresponding option in the sidebar (see Fig. 861). When you select said option, a list of the notification services will be displayed.
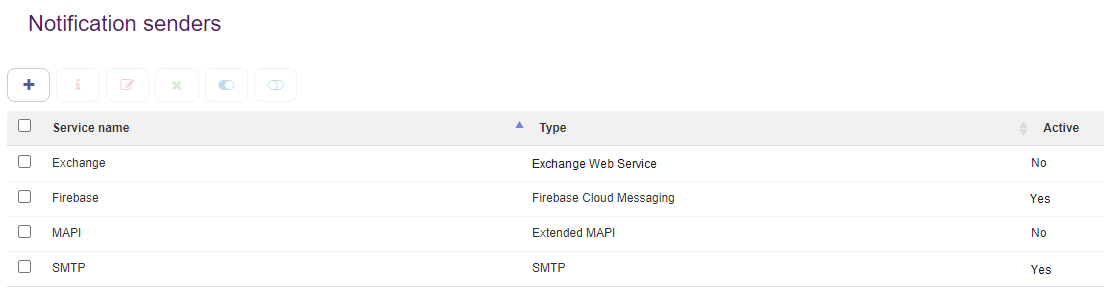
Fig. 884 Notification services listing
Using the buttons located above the table, you can add, edit, view, delete, enable and disable a service.
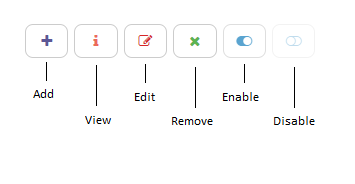
Fig. 885 Notification services listing options
Notification service creation
If you click on the add button, a panel will open to create a new notification service. In this panel, you will be able to enter information such as the name, type, and email formats, as well as specify whether it can be used to notify individuals external to the organization. Also, you can configure the server’s location, the protocol to be used, its port and an expiration in seconds to connect.
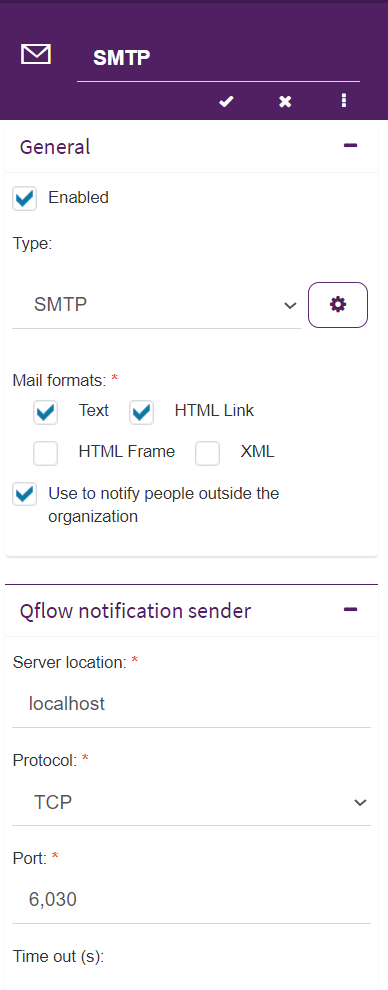
Fig. 886 Notification service creation
Notification services in multiple workspaces
The creation of new notification services is limited only to the main workspace. The services created and activated in it will appear in the listings of the secondary workspaces. From these listings you can disable, enable and configure them. These options only apply to the current workspace.
The “Configure” option opens a new panel in which you can decide to use the configuration from the main workspace or to customize it. If a custom configuration is used, the changes will only impact the current workspace, the different secondary workspaces will keep using their own configurations.
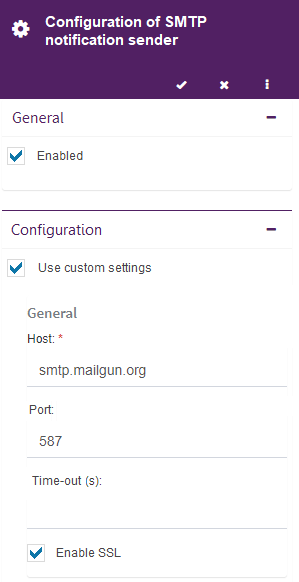
Fig. 887 Configure a notification service
Notification service configuration
There are 4 types of notification services: SMTP, Extended MAPI, Exchange web service, and Firebase cloud messaging. The necessary configuration for the correct functioning of the services is detailed below.
SMTP
SMTP type services have the following properties:
Host: SMTP server name
Port (Optional): if the server does not use the default port, this property allows you to specify another one.
Time out (Optional): it allows you to specify a time out value in seconds.
SMTP User: it allows you to specify a user for the service.
SSL: it allows you to enable or disable SSL (secure connection). If the option is not checked, SSL remains disabled.
Sender user: system user’s name. It is the name that will appear as sender in the messages sent by Qflow.
System email: system email address. It is the address from which the messages from Qflow are sent.
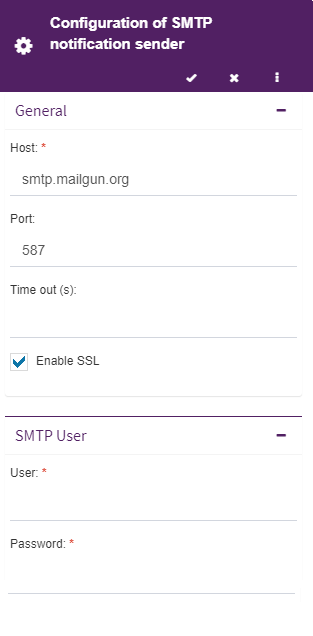
Fig. 888 SMTP notification service
Extended MAPI
Extended MAPI type services have the following properties:
Service: Exchange server name.
Mailbox: mail box to be used by Qflow.
Message class: message class. By default, IPM.Note.Qflow.
Profile (Optional): name of the profile to be used by Qflow.
Password (Optional): profile password.
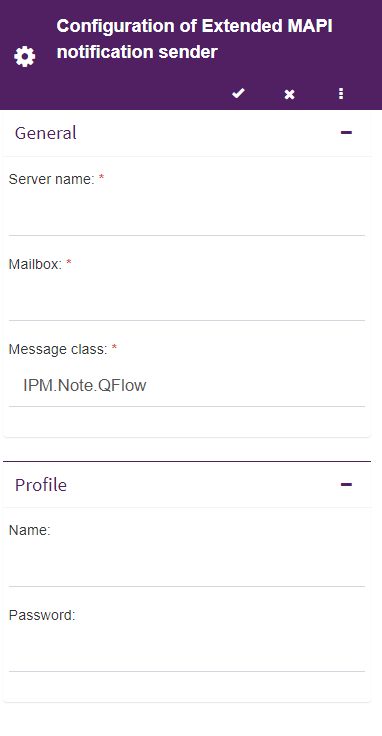
Fig. 889 Extended MAPI notification service
Exchange web service
Exchange type services have the following properties:
Url: Url of the Exchange web services.
Exchange version: Exchange version installed in the server that will be used.
Message class: message class. By default, IPM.Note.Qflow.
User (Optional): user account that must be used.
Password (Optional): password for the user account indicated in the User property.
System email: system email box.
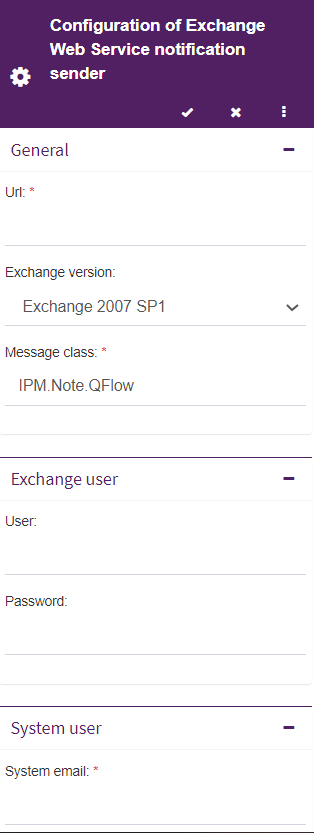
Fig. 890 Exchange web service configuration
Firebase Cloud Messaging
Firebase type services, unlike those described previously, are about push notifications. As such, it is not necessary to configure mail formats. To configure the Firebase service, you must access the following console and create a project: https://console.firebase.google.com/
Within the Firebase project configuration, you can take all the necessary data to configure the notification service in Qflow Admin.
Fig. 891 shows the general configuration of the project from where the project’s ID and Web API key can be taken. In the case that you do not see the web API key, you must enable the Firebase authentication service from the project’s console.
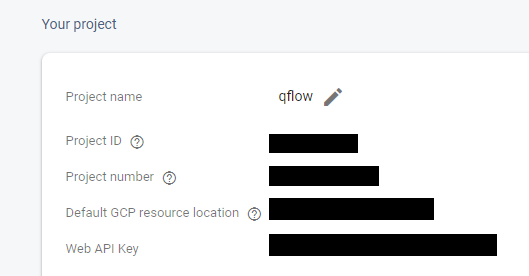
Fig. 891 Firebase general configuration
The remaining data corresponds to the web application you want to use, the data can be extracted from the “Your applications” section by selecting the configuration option as shown in Fig. 892. For more information about how to create an application, go to the following guide: https://firebase.google.com/docs/web/setup#register-app.
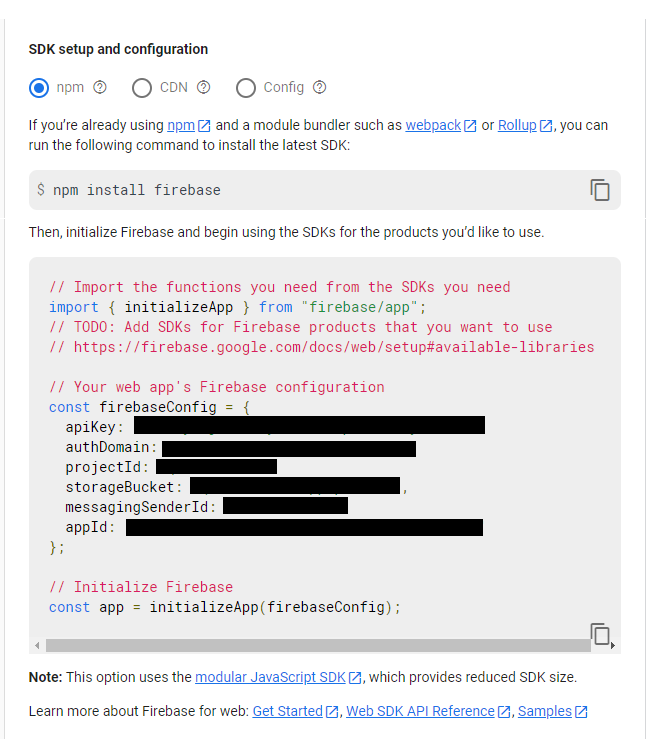
Fig. 892 Firebase application configuration
Finally, the “Server configuration” field must have a JSON that corresponds to the Firebase Admin SDK, which can be obtained by following the next guide: https://firebase.google.com/docs/admin/setup#initialize-sdk.
In Fig. 893 you can see the Firebase configuration panel, for more details about the configuration of a Firebase server, refer to this manual: https://firebase.google.com/docs/web/setup
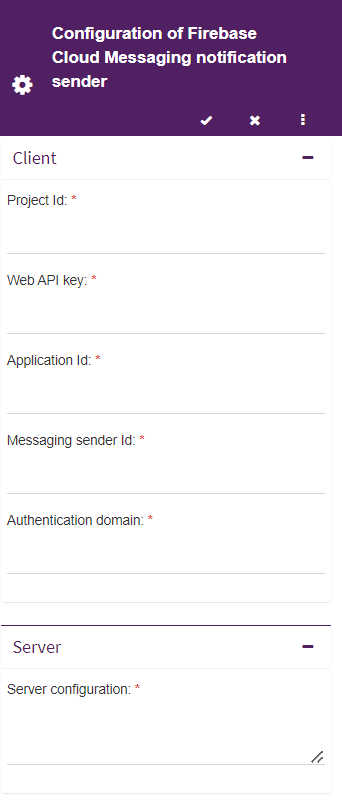
Fig. 893 Firebase notification service
Manage permissions
When you select the “Manage tool settings” option in the configuration menu, a panel will open as shown in Fig. 894.
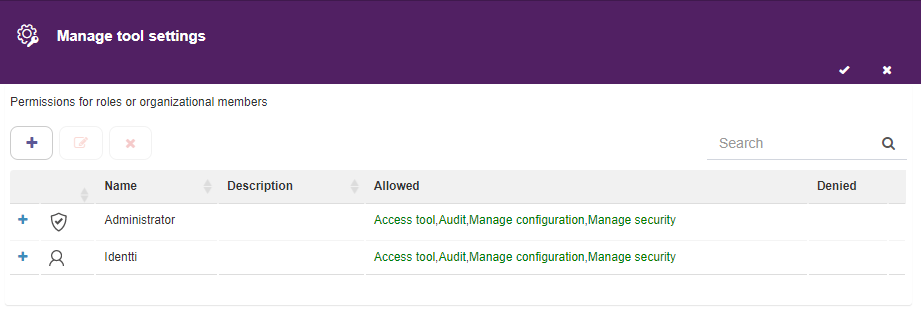
Fig. 894 Manage Qflow Admin permissions
To add a user, group or security role to the set of entities that have permissions on the node:
Click on the “Add” button. This will cause a text to appear above said button, that reads “Start typing…”. Type part of the name of the desired user, group or role.
When the drop down list is displayed, select it.
Once the users, roles and groups are added, it is possible to define which permissions each of them have. This is done by marking the checkboxes “Allowed” or “Denied” next to each permission, as shown in Fig. 895.
The possible permissions are:
Manage security: it allows you to add and modify the permissions of the tool.
Access tool: it allows access to Qflow Admin.
Manage configuration: it allows to edit those elements of the tool that are editable (system parameters and extended properties).
Audit: it allows access to the audits of the different elements of Qflow Admin.
For a detailed explanation about how Qflow permissions work, refer to the “Permissions handling in Qlow” section in the Qflow Team manual.
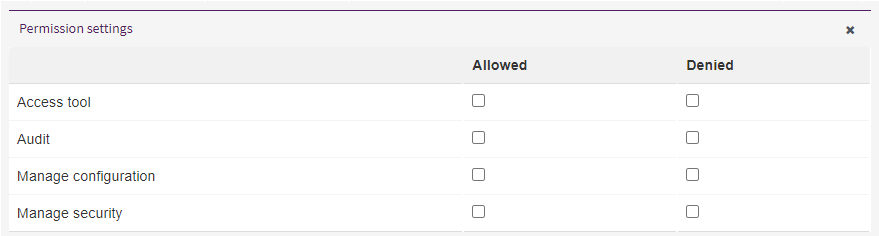
Fig. 895 Select permissions
To edit permissions of a user, group or role:
Select the item for which you want to edit the permissions and click on the “Edit” button, or click on the “+” symbol found next to the item.
The “Permissions configuration” form will display again. Select the actions that you wish to allow or deny in the new permission.
To remove permissions from a user, group or role:
Select the item from which you want to remove permissions, and then click on the “Delete” button.
A warning message will be shown. Click on the “Yes” button and all the permissions for the selected element will be deleted.
Audit
If audit permissions are enabled in Qflow Admin, you can see in the upper right menu the audit option. If you click it, it will display a list of options. This functionality allows you to verify changes in extended properties, licenses and system parameters, indicating their new values, the user that made the change, and the date and time.
System parameter history
This audit indicates the changes made on all of the system parameters. If you wish to know the changes made on one system parameter in particular, you must use the search bar or access the “View history” option on the system parameter listing.
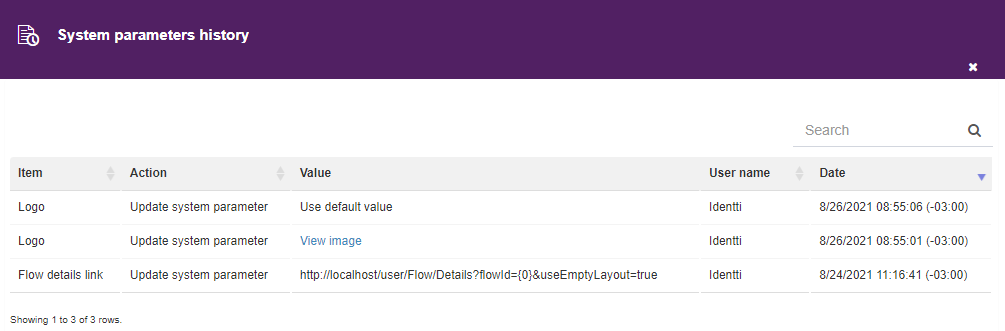
Fig. 896 System parameter history
Licenses history
This audit keeps a record of all added licenses. The listing shows the license’s identifier and the user that added it, along with the corresponding date and time.
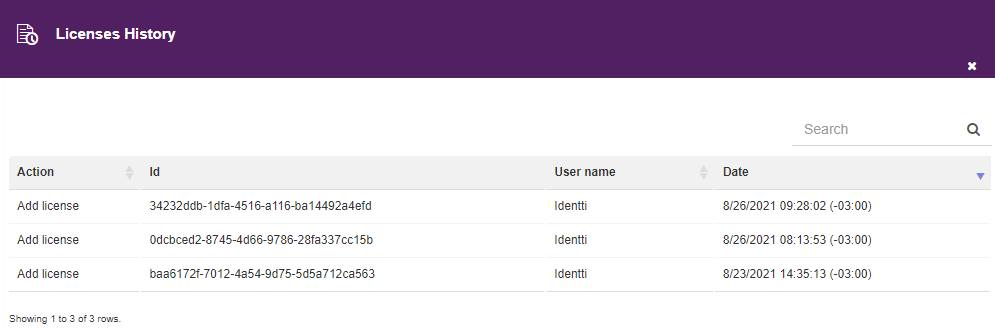
Fig. 897 Licenses history
Extended properties history
This audit lists all the changes made in all extended properties, no matter their type. Each table entry contains a logo that corresponds to the given type of property, and it can be expanded to show additional details about its modifications. If you want to filter by a particular property, you can use the search function or go to the extended properties listing and access one in particular.
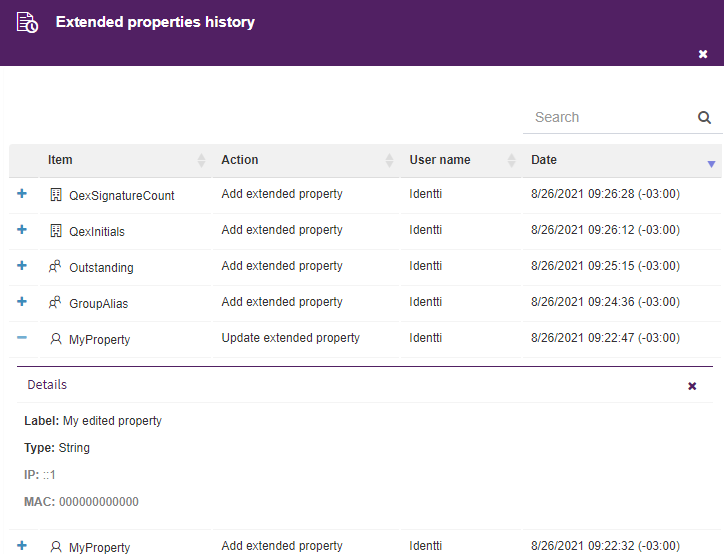
Fig. 898 Extended properties history
System parameter listing
Main workspace parameters
Up next, the system parameters that can only be configured by the default workspace and which affect all existing workspaces are listed.
Technical name |
Name |
Description |
|---|---|---|
AttachmentStorageType |
Attachment storage type |
This parameter’s value defines whether Qflow attachments will be stored in the default database, in Azure Blob Storage or in an external database. |
CodeExecutionTimeout |
Code execution time out |
It specifies the maximum wait time in seconds for the execution of event handlers code, code steps, evaluation by code and integration. The default value is 600. |
CompileCodeInDebug |
Compile code in debug mode. |
If this parameter’s value is “true”, the code generated by the user to be compiled by the application, will be compiled in debug mode. |
EngineNewsDBPeekPeriod |
Engine waiting period for the processing of new events. |
It indicates the engine’s maximum waiting period in seconds for the processing of new events. |
IdentifyTenants
ByBasePathUrl
|
Identify workspaces by base path URL |
If it is set to true, Qflow will identify workspaces by the base path URL. In the case of it being false, an option that allows you to switch between existing workspaces will be displayed in the sites’ login screen. |
LicenseCacheExpiration |
License cache expiration |
It indicates the number of seconds during which licenses are stored in cache. |
MaxConcurrentRequests |
Maximum number of concurrent requests |
It indicates the maximum number of parallel requests that can be processed by the engine. |
MaxDataSource ItemsPerQuery |
Maximum number of items per data sources query |
It limits the amount of items that are displayed in a domain of type item selector. |
MaxLoopCount |
Maximum number of loops in processes |
A process will enter its error status if it goes through a step for a greater amount of times than this specified number. |
PendingNotifications DBPeekPeriod |
Engine waiting period for sending notifications |
It indicates the waiting period in seconds for the sending of notifications processing |
ProductName |
Product name |
Product name |
QflowBPMWebLink |
Qflow Design link |
This is the URL used to access Qflow Design. If workspaces are identified by the base URL, ‘{tenantName}’ is replaced by the workspace base URL, otherwise ‘{tenantId}’ is replaced by the workspace identifier |
QflowOMMLink |
Qflow Team link |
This is the URL used to access Qflow Team. If workspaces are identified by the base URL, ‘{tenantName}’ is replaced by the workspace base URL, otherwise ‘{tenantId}’ is replaced by the workspace identifier |
QflowSAMWebLink |
Qflow Admin link |
This is the URL used to access Qflow Admin. If workspaces are identified by the base URL, ‘{tenantName}’ is replaced by the workspace base URL, otherwise ‘{tenantId}’ is replaced by the workspace identifier |
QflowWebSiteLink |
Qflow Task link |
This is the URL used to access Qflow Task. If workspaces are identified by the base URL, ‘{tenantName}’ is replaced by the workspace base URL, otherwise ‘{tenantId}’ is replaced by the workspace identifier |
TenantBasePathTemplate |
Workspace base path template |
This is the base URL’s template when indicating a workspace’s name. The “{0}” will be replaced by the name of the workspace. |
UserWelcomeLink |
User welcome link |
It’s the URL that new users receive via email, which accepts the parameters {tenantId} and {tenantName} to specify the identification and name of the corresponding workspace. |
WebStatusRequestTimeout |
Timeout for requesting sites’ status |
It indicates the time in seconds that the server waits for the different services and sites to respond to the status request. |
Secondary workspaces’ parameters
Up next, the system parameters that can also be edited by the secondary workspaces will be listed.
Technical name |
Name |
Description |
|---|---|---|
ActionLink |
Action link |
It is the URL that links to actions used in the messages sent by email. |
DefaultDomainNetbiosName |
Default domain netbios name |
It specifies a default domain name when logging in to applications or to the websites. |
EnableAIAssistant [*] |
Enable AI assistant |
If the value of this parameter is “true”, access to the AI assistant will be enabled. Administrators may restrict access in the event of malicious use being detected. If you think there has been an error, please contact technical support. |
EncryptAttachments |
Encrypt attachment |
If the value of this parameter is “true”, Qflow will encrypt the attached files’ content so that the only way to access it is by means of Qflow permissions. If this parameter is activated, it will not be possible to do full-text searches using the attached files’ content. |
EnforceIntegratedLogon |
Enforce integrated authentication |
If this parameter’s value is “true”, users can only enter the application through integrated authentication. |
FlowDetailsLink |
Flow details link |
It is the url sent by email, which redirects to the details of a flow. |
FlowEditFormLink |
Flow edit form link |
It is the url sent by email, which redirects to the flow edit panel. |
GuestResponseLink |
Guest response link |
This URL is used in notification emails, allowing access to response forms as a guest. |
HtmlLinkTemplate |
HTML link type email template |
It indicates the file path corresponding to the html email template. |
IsCheckInCommentRequired |
Check in comment required |
If this parameter’s value is “true”, a comment must be entered in each protection action in the package tree. If the value is “false”, the comment can be omitted. |
IsGoogleAndMicrosoft
RememberSessionEnabled
|
Enable remember user session when logging in with Google and Microsoft |
If this parameter’s value is “true”, sessions created with Google or Microsoft will remain logged in between browser sessions. If it is “false”, the session will end once the browser is closed. Make sure you have configured your browser to remember cookies, otherwise this will not work. |
IsGoogleSignInEnabled |
Enable Sign-In with Google |
If this parameter’s value is “true”, Qflow will allow users to authenticate with their Google account in the different sites. Otherwise, this option will not be displayed. |
IsMicrosoftSignInEnabled |
Enable Sign-In with Microsoft |
If this parameter’s value is “true”, Qflow will allow users to authenticate with their Microsoft account in the different sites. Otherwise, this option will not be displayed. |
LicenseExpiration
AlertThreshold
|
License expiration alert |
It is an integer that indicates how many days before the expiration of the licenses, users will be notified that they are about to expire. By default, it has a value of 7, that is, it warns the users a week before expiration. |
Logo |
Logo |
It’s the image of the logo that will be used in the different login views. The aspect ratio has to be 4:1 for the image to show up properly. |
LogoLightVersion |
Light version logo |
Light version of the Qflow logo. The aspect ratio has to be 4:1 for the image display properly. |
MailLogo |
Mail logo |
It is the url of the logo image that will be displayed in the different emails sent by Qflow. The image must be in png, jpg or jpeg format for it to be displayed correctly. |
MiniLogo |
Mini logo |
Image for the website’s collapsed sidebar logo. The aspect ratio has to be 1:1 for the image to be displayed properly. |
NotifyUserOnCreation |
Notify the user on creation |
If this parameter’s value is “true”, a notification will be sent to each user that is added to the workspace |
OrganizationName |
Organization name |
It indicates the organization’s name. This name is used by Qflow to control product licenses. |
RenewSessionAutomatically |
Renew session automatically |
It indicates whether Qflow tools, both desktop and website versions, must automatically renew the user’s session when it expires. |
ResponseLink |
Response link |
It is the URL used in response forms’ links of each message sent by email. |
SessionLeaseTime |
Session lease time |
The duration in minutes of a Qflow user’s session. If there is no activity during this time, the session expires, and the user must authenticate again. |
StageLink |
Stage link |
It is the url used in the monitoring of stages’ links in the messages sent by email. |
StartFlowAsGuestLink |
Guest response link |
It is the URL used to start a flow as a guest. If workspaces are identified by base URL, ‘{tenantName}’ is replaced by the workspace base URL, otherwise ‘{tenantId}’ is replaced by the workspace identifier |
StrongWindowsSinchronization |
Strict Windows user synchronization |
If this parameter’s value is “true”, removing a user from Active Directory will change the Qflow login to allow another user to use the original login. |
TaskLogo |
Task logo |
Task site logo image. The aspect ratio has to be 4:1 for the image display properly. |
TaskMiniLogo |
Task mini logo |
Image for the Task logo used in the site’s collapsed sidebar. The aspect ratio has to be 1:1 for the image to display properly. |
Theme |
Theme |
It indicates which theme to use in Qflow Task. |
UndoChangesOnStepBack |
Reverse changes on step back |
It indicates whether, by reversing a thread in a process, changes made to application data, roles and attachments must be undone in the steps whose execution is being undone. |
UseGravatarForProfilePicture |
Use gravatar for profile picture |
If this parameter’s value is “true”, the gravatar service will be used to obtain the profile picture of the users. Otherwise, an image with the user’s initials will be displayed as a profile picture. |
Configuration file parameters
Finally, the system parameters found in the configuration file (System.config) are listed:
Technical name |
Description |
|---|---|
NonQueryCommandTimeout |
It indicates the time in seconds after which a query to the database, that does not return values, is considered to be non responsive. The default value is 60. |
QueryCommandTimeout |
It indicates the time in seconds after which a query to the database, that returns values, is considered to be non responsive. The default value is 60. |
MaxDBConnectionRetries |
Limit of attempts to reconnect to the database before returning an error. |
CacheType |
Cache type used to store system parameters, it can be Redis or Default. |
FilterMultivalued |
If this parameter’s value is “true”, the searches for application data on Qflow Task take into account all the values of the multivalued data. If the value is “false” or not defined, the searches for application data will only take into account the first value of each of the data’s multiple values. |