Custom Form Design
Introduction
The purpose of this manual is to explain how to design custom forms to replace the standard forms that Qflow Task provides. The concept of a custom form is explained in the Qflow Design manual. It also explains how, once a custom form is ready, you must proceed to associate it with a template or a step in a template. This manual is only concerned with explaining how to build a custom form.
Readers of this manual should be familiar with the most important aspects of Qflow and the processes’ design. In addition, they should have ASP.NET MVC programming knowledge, which is the technology with which Qflow Task is built.
There are two ways to build custom forms for Qflow:
Custom view: it is the simplest way, and it consists of designing an HTML page to replace the standard form, thus providing a different appearance.
Custom area: an area that will contain the controller and the views of a flow or a set of related flows will be defined. The area contains views for all forms in these flows. Since the controller is programmed, this option involves more work, but also more customization and flexibility.
Custom view
Building a custom view consists of defining a view that uses a model that is provided by Qflow components. Which model is used depends on the type of form being built. For flow, flow edit and flow start forms, the Qflow.Web.Mvc.Models.FlowModel model is used, which represents a flow. For answer forms (tasks, questions) the Qflow.Web.Mvc.Models.TaskModel model is used, which represents a task.
These models contain the application data, roles, attachments, comments and flow data (name, description, template, etc).
Form type |
Model |
|---|---|
Start form |
Qflow.Web.Mvc.Models.FlowModel |
Answer form (task, question) |
Qflow.Web.Mvc.Models.TaskModel |
Flow form |
Qflow.Web.Mvc.Models.FlowModel |
Flow edit form |
Qflow.Web.Mvc.ModelsFlowModel |
Qflow also provides three layouts to use in custom views. These layouts include the JavaScript code necessary for the forms to function properly. It is recommended not to modify them. The available layouts, which can be found on Qflow Task, are:
~/Views/Shared/_CustomFormsLayout.cshtml: it includes the lateral menu and the header of Qflow Task.
~/Views/Shared/_CustomFormsEmptyLayout.cshtml: it does not include the lateral menu nor the header of Qflow Task.
~/Views/Shared/_CustomFormsGuestLayout.cshtml: layout required for the correct functioning of external/anonymous forms.
Custom form design
The custom form is a cshtml file, as is usual for ASP.NET MVC views. To include application data, roles, and system data such as the name of the flow in the form, a set of helpers available through Qflow is used. These helpers extend the functionality of the ASP.NET MVC library. The form must contain an element of type form with the id ‘submitForm’. Within this element, the form must be defined, using the helpers. A reference of these helpers can be found in this manual, at Helpers references. Outside this element, the helpers that allow the flow attachments to be included in the form must be placed.
Access to elements of the client-side flow
Qflow also provides a set of JavaScript functions to access data from the client-side flow. These functions are available through the Host object, which is accessible from JavaScript code. See JavaScript library reference for details on the available functions.
Publishing the custom form
Once the form is ready, it must be copied to the web server that hosts Qflow Task. Inside the folder that contains the site, there is a folder called Areas\CustomForm\Views\Flow.
For example, if the site is hosted in C:\inetpub\wwwroot\Qflow\, the form file must be copied into C:\inetpub\wwwroot\Qflow\Areas\CustomForms\Views\Flow.
Do not forget that if the form uses other files, you should also copy them where appropriate.
You must also specify the form in Qflow Design, and associate it with the element to which it corresponds (the step to which it corresponds, if it is a response form). This is described in Associate the forms with the template.
Custom area
In the case of a custom area, in addition to the views, the controller must be programmed. For this it is recommended to create an ASP.NET MVC project in Visual Studio.
The steps to create an area are as follows (details below)
Create an ASP.NET MVC project in Visual Studio. The project name must contain the text “Custom”, for example SampleCustomForms.
Add references to the Qflow components necessary to build the forms (see References).
Register the area (see Register the area).
Program one or more controllers, with the required actions (see Controllers).
Create a view per custom form. Views are built in the same way as a common custom view (see Custom form design)
Modify _ViewStart.cshtml to consider the two types of layout (see Modify _ViewStart.cshtml).
Compile the project and publish the files on Qflow Task (see Build the files and publish them on Qflow Task).
Associate the area with the version of the template for which it was built.
References
After the project is created, add the following references:
Qflow.Web.Mvc.Site.dll
Qflow.Web.Mvc.dll
Qframework.Web.Mvc.dll
Qframework.Common.dll
These files can be found on Qflow Task. In general, it is recommended to have Qflow Task installed on the server where the forms are developed, to facilitate testing.
Register the area
To register the area, a class must be built. For example, if you are creating the forms for the “Customer Request” template, you can create the class “CustomerRequestAreaRegistration”. This must be a class derived from the CustomFormsAreaRegistration class. When specifying custom forms in Qflow Design, you must specify the name of the area, which is the one defined in this class, in the AreaName property.
using System.Web.Mvc;
using Qflow.Web.Mvc.Site.Areas.CustomForms;

namespace SampleCustomForm
{
   public class SampleCustomFormAreaRegistration : CustomFormsAreaRegistration
   {
      public override string AreaName
      {
            get { return "SampleCustomForm"; }
      }
      public override void RegisterArea(AreaRegistrationContext context)
      {
            RegisterRoutes(context);
      }
      private void RegisterRoutes(AreaRegistrationContext context)
      {
            context.MapRoute(
               "SampleCustomForm",
               "SampleCustomForm/{controller}/{action}/{id}",
               new { action = "Index", id = UrlParameter.Optional }
            );
      }
   }
}
Controllers
The actions that must be present in the controllers depend on which forms you want to customize. All forms must inherit from FlowBaseController, which can be found in Qflow.Web.Mvc.Site. There are four possible types of forms:
Start flow form
Flow form
Flow edit form
Response form (task, question)
In general, each form that you want to customize requires at least one action to be implemented: the one returned by the view that represents the form. The forms from which data can be modified in Qflow also require an additional action, which is the one that is executed when the user clicks on the button that triggers the modification of the data (for example, when they click on the button that starts a flow or when they click the button that responds to a task). The start form also has an additional action for the view that is displayed when clicking on the start step of a flow that has already been started. All the actions corresponding to the same form have the same name: their signatures should only differ in their parameters.
Note
The same controller must be used to handle actions from registered users as well as actions from anonymous/external users, which are used in the start and response forms of this type. To achieve this, we must have methods defined with the same names, with the difference that those used in anonymous/external forms will have the suffix “AsGuest”, as seen in the examples below.
The following sections explain, for each type of form, what actions should be added to the controllers, and an example of each action is given.
Start flow form
A start custom form requires three actions. Note that they all have the same name, but different parameters.
Show start form: It is executed when a user clicks on a template to start a flow.
[HttpGet]
[RequireRequestValue("templateId")]
public async Task<ActionResult> StartTutorial(Guid templateId, Guid? versionId)
{
   FlowModel model = await GetNewFlow(templateId, versionId);
   return View(model);
}
Start flow: It is executed when a user clicks the button that starts the flow.
[HttpPost]
[ValidateInput(false)] // Needed for rich text box
public async Task<ActionResult> StartTutorial(Guid templateId, [ModelBinder(typeof(FlowModelBinder))] FlowModel flow)
{
   try
   {
      var simpleFlowModel = await StartFlowAndGetSimpleData(flow);
      TempData["TypeMsg"] = "success";
      TempData["Msg"] = "Flow iniciado correctamente";
      return Redirect(Url.Action("Display", new { area = "", flowId = simpleFlowModel.FlowId }));
   }
   catch (Exception ex)
   {
      TempData["TypeMsg"] = "error";
      TempData["Msg"] = ex.Message; //TODO: correct message and view
      return View(flow);
   }
}
Show the start step form: It is executed when, with the flow already started, a user clicks on the start step to see the data for it.
[HttpGet]
[RequireRequestValue("flowId")]
public async Task<ActionResult> StartTutorial(Guid flowId)
{
   FlowModel model = await GetStartedFlow(flowId);

   return View(model);
}
For the form to contemplate external/anonymous flow start, its configuration is similar to the previous case but with some differences. For this case, we will need to define two actions. Note that they also have the same name (with the suffix “AsGuest”), but different parameters. Notice the use of the GuestPolicy attribute, which is required for its functioning.
Show the external/anonymous flow start form: It is executed when the user enters the anonymous/extrernal form through a link.
[HttpGet]
[GuestPolicy(GuestUserPolicy.Require)]
public async Task<ActionResult> StartTutorialAsGuest(Guid templateId, Guid? versionId)
{
   GuestFlowModel model = await GetNewGuestFlow(templateId, versionId);
   return View("StartTutorial", model);
}
Start flow as external/anonymous: it is executed when a user clicks the button that starts the flow in an external/anonymous flow start form.
[HttpPost]
[GuestPolicy(GuestUserPolicy.Require)]
public virtual async Task<ActionResult> StartTutorialAsGuest([ModelBinder(typeof(GuestFlowModelBinder))] GuestFlowModel flow, bool useEmptyLayout = false)
{
   var simpleFlowModel = await StartFlowAndGetSimpleData(flow);
   return RedirectToAction(nameof(GuestResult), new { area = "CustomForms", view = "GuestResult", tenantId = SessionManager.ResolveTenantId(), useEmptyLayout });
}
Flow form
A flow form requires only one action, which returns the view that contains the form with a model that contains the flow data.
[HttpGet]
public async Task<ActionResult> DisplayTutorialInfo(Guid flowId)
{
   FlowModel model = await GetFlow(flowId); /*Get only details*/
   return View(model);
}
Flow edit form
A flow edit form requires two actions:
Show flow edit form: It is executed when a user clicks on Qflow Task to view the flow’s edit form. It returns the view corresponding to that form.
[HttpGet]
public async Task<ActionResult> EditTutorialInfo(Guid flowId)
{
   FlowModel model = await GetEditFlow(flowId);
   return View(model);
}
Save changes: It is executed when the user clicks on the button that lets them save the changes made in the flow edit form.
[HttpPost]
[ValidateInput(false)] //Needed for rich text box
public async Task<ActionResult> EditTutorialInfo([ModelBinder(typeof(FlowModelBinder))] FlowModel flow)
{
   try
   {
      await EditFlow(flow);
      TempData["TypeMsg"] = "success";
      TempData["Msg"] = "Flow editado correctamente";
      return Redirect(Url.Action("Display", new { area = "", flowId = flow.FlowId }));
   }
   catch (Exception ex)
   {
      TempData["TypeMsg"] = "error";
      TempData["Msg"] = ex.Message; //TODO: correct message and view
      return View(flow);
   }
}
Response form (task, question)
A response form requires two actions:
Show the response form: It is executed when the user enters the task to respond to it. It returns the view corresponding to that form.
[HttpGet]
public async Task<ActionResult> DisplayTutorialTask(Guid flowId, Guid taskId, Guid taskToId)
{
   TaskModel model = await GetTask(flowId, taskId, taskToId);
   return View(model);
}
Respond: It is executed when the user clicks the button that responds to the task.
[HttpPost]
[ValidateInput(false)] //Needed for rich text box
public async Task<ActionResult> DisplayTutorialTask([ModelBinder(typeof(TaskModelBinder))] TaskModel task)
{
   try
   {
      await RespondTask(task);
      TempData["TypeMsg"] = "success";
      TempData["Msg"] = "Task answered successfully";
      return Redirect(Url.Action("Display", new { area = "", flowId = task.FlowId }));
   }
   catch (Exception ex)
   {
      TempData["TypeMsg"] = "error";
      TempData["Msg"] = ex.Message; //TODO: correct message and view
      return View(task);
   }
}
For the form to contemplate external task responses, its configuration is similar to the previous case but with some differences. For this case, we will need to define two actions. Note that they also have the same name (with the suffix “AsGuest”), but different parameters. Notice the use of the GuestPolicy attribute, which is required for its functioning.
Show the external response form: It is executed when the user enters the extarnal task form is accessed through a link.
[HttpGet]
[GuestPolicy(GuestUserPolicy.Require)]
[RequireRequestValue("token")]
public virtual async Task<ActionResult> DisplayTutorialTaskAsGuest(string token)
{
   try
   {
      var model = await FlowActions.GetGuestTaskRenderInfoAsync(token);
      return View("DisplayTutorialTask", model);
   }
   catch (Exception ex)
   {
      TempData["ErrorMessage"] = ex.Message;
      return RedirectToAction(nameof(GuestErrorResult), new { area = "CustomForms", view = "GuestErrorResult", tenantId = SessionManager.ResolveTenantId() });
   }
}
Respond task by externals: It is executed when the user clicks the button that responds to the task on the external response form.
[HttpPost]
[GuestPolicy(GuestUserPolicy.Require)]
public virtual async Task<ActionResult> DisplayTutorialTaskAsGuest(GuestTaskModel task)
{
   try
   {
      var respondedTaskModel = await RespondTask(task);
      TempData["ConfirmationMessage"] = "Tarea respondida correctamente";
      return RedirectToAction(nameof(GuestResult), new { area = "CustomForms", view = "GuestResult", tenantId = SessionManager.ResolveTenantId() });
   }
   catch (Exception ex)
   {
      TempData["TypeMsg"] = "error";
      TempData["Msg"] = ex.Message;
      return View("DisplayTutorialTask", task);
   }
}
Modify _ViewStart.cshtml
As mentioned earlier, Qflow provides three layouts for use in forms. The first one, CustomFormsLayout, displays the Qflow Task menu and header. The second one, CustomFormsEmptyLayout, does not display them. This is particularly useful when users access Qflow Task from the email messages they receive from Qflow (for example, when Qflow notifies them that they are expected to respond to a task). The third one, CustomFormsGuestLayout, should be used if we want to use custom forms for external/start response, possible from version 5.5 of Qflow.
{
   if (Qframework.Web.Mvc.SessionManagement.SessionManagerHelper.GetSessionManager<Qflow.Web.Mvc.SessionManagement.QflowSessionManager>().IsGuest)
   {
      Layout = "~/Views/Shared/_CustomFormsGuestLayout.cshtml";
   }
   else if (Request.QueryString["useEmptyLayout"] == null || Request.QueryString["useEmptyLayout"] !="True")
   {
      Layout = "~/Views/Shared/_CustomFormsLayout.cshtml";
   }
   else
   {
      Layout = "~/Views/Shared/_CustomFormsEmptyLayout.cshtml";
   }
}
Build the files and publish them on Qflow Task
After the code for your custom forms is ready, build your project. Then copy the generated component (for example, SampleCustomForm.dll) in the Areas folder, inside Qflow Task. Copy the views and other files whose content is compiled into a subfolder of Areas that has the same name as the component and the area (SampleCustomForm, for example).
For the area to be considered in Qflow Task, it is necessary to restart the site in IIS.
Associate the forms with the template
Finally, you must associate the forms with the template in Qflow Design. In this tool, custom forms are an element that can be added in a package, template or version, in the same way that application data, roles, integrations, etc. can be added (see the Qflow Design manual).
Add custom forms
To add a custom form
Open Qflow Design.
Find, in the solution explorer, the template of the process to which you want to associate the forms. Right-click on the package, template or version to which you want to add it, and select the “Items” option from the context menu, and then the “Custom forms” sub-option. Remember that the elements of a package are available to all descendants of that package, that is, to all templates in that package and all versions of that template. The same thing happens with the elements of a template with respect to their versions. So if you want the form to be available to multiple templates in a package, add it to the package. If the form is specific to a template, but is the same for all versions, add it to the template. The only case in which you should add it to a version is if it is specific to that version.
Qflow shows the list of defined custom forms. To add a new one, click the + button. This will open a form that will allow you to configure the custom form (Fig. 1267). For configuration details, see the Custom form configuration section.
Repeat the procedure for all the forms you wish to add.
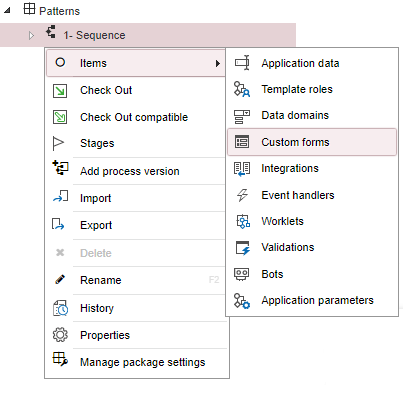
Fig. 1267 Access to custom form list
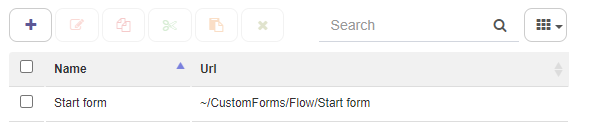
Fig. 1268 Custom form list
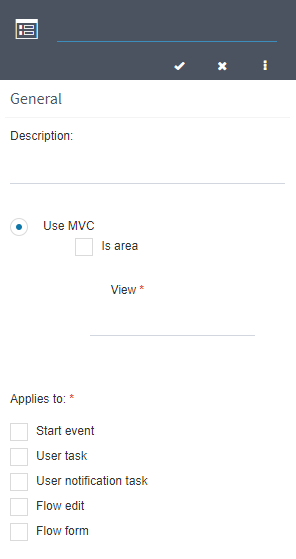
Fig. 1269 Custom form configuration panel
Custom form configuration
The configuration panel of a custom form is shown in Fig. 1269. In the panel you must indicate the cshtml file that contains the form (if it is a custom view) or the area, controller and action that correspond to it (if the forms were built using a custom area).
To configure a custom form:
Leave the “Use MVC“ option checked. The “Use WebForms“ option will only be displayed when the system parameter option “ShowWebFormsProperties“ has the value “true“ and it will be accessible when expanding the form using the button
 . This option is for forms made for the alternative Qflow site, which is maintained for compatibility with forms made in previous versions and which are different from those described in this manual.
Fill the form data.
If the form is a custom view, leave the “Is area“ option unchecked, and enter, in the “View“ field, the name of the view in which the form is located.
If the form belongs to an area, check the option “Is area”. The screen will change to show other properties, which you need to fill out as follows:
Area: enter the name of the area. This is the name returned by the AreaName property of the class that registers the area. In the example that appears in the Register the area section of this manual, the name of the area is “SampleCustomForm”.
Controller: Enter the name of the class that contains the controller, but without the “Controller” suffix. For example, if the class is “FlowController“, type “Flow“.
Action: type the name of the action corresponding to the form. In the example that appears in the Start flow form section of this manual, all the actions of the start form are called “StartTutorial”. Note that even though there are three actions for a start form, they all have the same name and you only need to define one custom form in Qflow Design.
In the “Applies to” section, you must check the types of steps in which you want to use the form. This means that in these steps, when associating the custom form (see the Associate the forms to the corresponding elements section), only those applicable to the step appear.
Click “Save” (
 ) to save the changes.
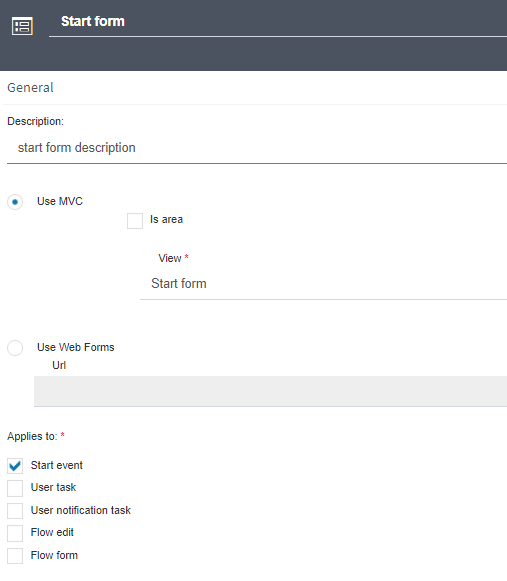
Fig. 1270 Expanded properties of a custom form
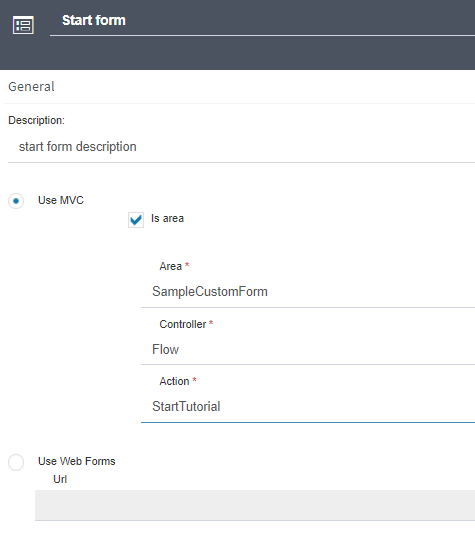
Fig. 1271 Configuring a custom form that is in an area
Associate the forms to the corresponding elements
Finally, the forms must be associated to the elements to which they correspond. For example, a response form is associated to an interactive step, such as a question or task step. Which element the form is associated to depends on the type of the form:
Start form: it is associated to the version start step.
Flow form: it is associated to the version.
Flow edit form: it is associated to the version.
Response form: it is associated to the corresponding task or question step.
Start and response custom form
The custom start form will be associated with the start step of the version in which you want to use it. A response form is associated with the task or question step for which it was designed.
To associate one of these forms:
If the version in which you want to use the form is not checked out, check it out (right-click on the version and from the context menu select “Check Out”).
Double-click on the version in the solution explorer of Qflow Design to open the process design.
Once the design is open, double-click the step to which you want to associate the form. Expand the form and then expand the “Custom form” section.
Select the form you want to associate to the step (Fig. 1272).
Check in the version. Remember that for the form to appear on Qflow Task when starting a process, the version must be the production version and it must have been checked in after making the change.
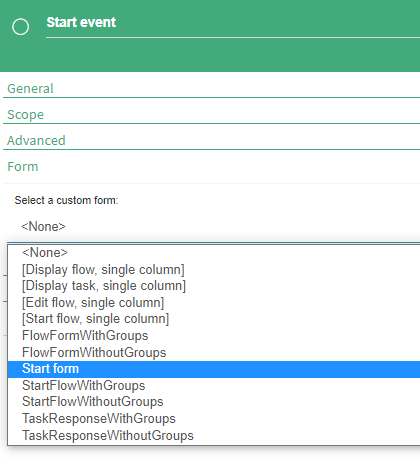
Fig. 1272 Custom form selection
Flow form and flow edit form
Both the flow form and the flow edit form are associated to a version. To associate one of these forms:
If the version in which you want to use the form is not checked out, check it out (right-click on the version and in the context menu, select “Check Out”).
Right-click on the version in which you want to use the form, and in the context menu select “Flow forms” and the “Flow form” or “Flow edit form” options, depending on which form you wish to associate. Qflow opens a form that allows you to configure its properties, expand the “Custom form” section and then select the form (Fig. 1273).
Select the form and click “Save”.

Fig. 1273 Custom form panel
Remember to check in the version to be able to view the changes on Qflow Task.
Helpers references
Described below are each of the helpers that Qflow makes available to developers to generate the HTML code of various elements that can appear in custom forms.
QAttachmentTable: it allows you to add the table that shows the flow’s attachments to the form.
QAttachmentUpload: it allows you to add file attachment options to the form. Keep in mind that these options will not work correctly if there are no permissions to attach files on the form. A generic form should verify that these permissions are available before adding these controls. The code for this helper must be outside the “form” element, unlike QAttachmentTable, which must be inside.
if (Model.AttachmentsModel.Scope.AddAllowed)
{
   @Html.QAttachmentUpload(Model.AttachmentsModel, new QSimplePanelOptions())
}
QControl: it allows you to add the control that is used to display an application datum and to modify its value (a text box, a drop-down list, etc) to the form. The application data label (the one that tells the user what data it is) is added separately, using the QLabel helper.
@Html.QControl(Model.Data["Client name"]);
QComments: it allows you to see the comments log in the form. In the log you can see the previous comments and add comments according to the scope defined in the FlowCommentsModel parameter.
QCustomValidations: it allows you to add to the form the validations that were defined for the flow in Qflow Design.
QEditFlowButton: it is used in flow edit forms. It allows you to easily add the button that saves the changes made in the form.
QFlowInfo: it allows you to add a section with the flow data to the form.
QGroup: it lets the application data of a specific group be added to the form. If the group name is omitted, it adds the application data that is not in any group.
@Html.QGroup("", new QGroupPanelOptions() { GroupOptions = new QSimplePanelOptions() { StyleClass = "box box-danger", AddParentDiv = true, ParentDivClass = "col-lg-12" } })
QGroups: it allows you to list all the groups available in the form. You can list them in an orderly way or not, depending on the parameters that are indicated. By default the list is ordered.
QLabel: it allows you to add the label of an application datum (or, in case it does not have a label, its name) to the form. It is necessary whenever you want to show the name of the datum. It is used in the same way as QControl.
QLine: it allows you to add a block of lines to the form. Line blocks are displayed as tables and are suitable for small screens.
QPageScrollMenu: it allows you to add a control to the form to navigate between the different sections of the form.

Fig. 1274 The control for navigating between the sections of the form, which can be added using the QPageScrollMenu helper
QRespondTaskButton: it is used in response forms. It allows you to easily add the button that responds to the task.
QRole: it works in an analogous way to QControl, but for a role.
QRoles: it allows you to add the available roles to the form. If the scope of a role for that form determines that it is editable, the role is displayed as editable.
QStartFlowButton: it is used in start forms. It allows you to easily add the button that starts the flow.
QTaskInfo: it allows you to add a section with the task data to the form.
QTemplateInfo: it allows you to add a section with the template data to the form.
QValue: it allows you to add a label to the form that shows the value of an application datum (it does not allow you to modify the application datum).
QGuest: It is necessary to include it in external task response forms. Internally, it adds a token to the form that is required for the functioning of external task response.
To see the JavaScript library reference, see this document.