Consuming REST services from Q-flow domains
Introduction
The objective of this document is to give an introduction of how to consume REST services from Q-flow’s domains.
Application Data
Inside the items of the package select the “Data domains” option and add a new domain.
In the General section:
The control type must be a “Combo Box”, “Check Box List”, “Item Selector”, “Radio Button” or “Text Box Autocomplete” in order to require a Data Source.
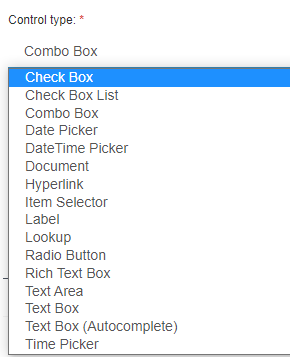
The Web Service REST option of the Data source must be selected, then with a click in the configuration button, the REST web service data source properties window will open.
The “Item selector” and “Combo box” option behave in the same way and the “Check Box List”, “Radio Button” and “Text Box Autocomplete” in another. They differ in their properties, the first two have more data in their “parameter type”, such as its name, parameter type, value and test value, and they also have “output parameters”. The other two only have the option for a parameter name and value, and no “output parameters”.

An example of a Combo Box control type
Inside the REST web service data source properties window:
1) Select the REST web service connection
Using application parameter
It is useful when the same URL will be used in different domains, then the source configuration is already defined.
The parameter must be defined in the application parameters window, which must be defined in the same level as the package or in higher levels.
A new parameter is created with the “+” button. In the properties, the parameter type must be a Web service connection and in the configuration the API URL is defined. The Network credentials must be accepted and with the arrow the URL can be tested.
Defining in data source configuration
With a click in the configuration button, the Web service connection configuration window will open.
Inside this window, the API URL is defined. The Network credentials must be accepted and with the arrow the URL can be tested

2) Web method
Action: of the URL
HTTP Method: select the GET, POST or PUT method of the URL

3) Parameters:
These are useful for the APIs that require parameters in their URL in order to return an array of objects that will be used.
Different parameters may be added with a name, parameter type and its value.
Parameter type may be:
“none”: without any type.
“custom”: the value for each API URL is different, therefore, a variable value is defined. It will be completed by the user.
“system”: this parameter type is made especially for certain Q-flow methods to make queries more efficient. The efficiency is a result of passing the beginning of the query and the API returning the data that matches that beginning. It works only for the “Item Selector” control type.

4) HTTP Headers
If it is necessary values may be added in the HTTP headers with the “+” button.

5) Input object:
Different properties or properties with value may be added, with the “+v” button, and with the “+>” button, sub properties or sub properties with value may be added.
In order to associate a parameter with a value, a property with value will be added, this parameter has to have the same name as the parameter of the URL and the value will be set with the corresponding value defined previously.

6) Column mapping
There are different ways to search for the data, some are found by the id and others by its value.
Generally, the data id is found by its value:
The first two rows are the ones that are going to be seen by the user. The data of the second row is the one that the user will be able to select in the process and the first one will be seen in the process details.
The order of the rows may be changed with the arrows and the mapping may be cleaned.
The Column name can be changed.

Data found by the id:
An example may be when there are more than two columns, when you choose a value, other values may be seen.
7) Output parameters
Testing the query is needed to configure the output parameters.
These parameters are the same as the ones that appear in the column mapping that are not empty.
Using this data:
In the application data a new datum must be added with the name of the output parameter that you wish to use.
Then, in a datum whose domain is the one that has been created, in the dependencies section, the output parameters that have been defined will appear. In order to choose those, the application data must be set to the data that has been created previously.
Finally, in order for it to appear, the data must be defined as editable in the scope of the process.
Example
An example of all that was explained above will be defined. Given an id of a course, the students enrolled will be returned in a combo box. Then, when you select one, their age will be loaded in a text field.
The URL to make the request to:
https://domains.free.beeceptor.com/courses?idCourse=1234
First, create a data domain with combo box control type and REST web service data source.
Inside the web service connection configuration, configure the URL, https://domain.free.beeceptor.com
The web method action will be “courses” and the Http method “GET”.
This URL needs the id of a course in order to return the information, therefore, a new parameter must be created, and an input object with that data.


The query must be tested in order to define the output parameters


Then, in the application data, different data must be created with its respective domains.
Create a new datum in order for the user to define the course id as an input parameter.
Create a datum where the age of the selected student will appear as an output parameter.
Create a datum where the data of the student’s names will appear in a combo box (with the “course” domain previously defined)and define the input and output parameters with the data.

Finally, in the template process, the scope of the data must be defined as editable.
When a “Course” flow is started, the form will be the following:

When the the user enters the course number, a list of all the students will appear and when one of them is selected their age will appear in the age text field.