Create your first process
Purpose
The purpose of this document is to introduce the user to the use of Qflow through a practical example that explains step by step how to design and execute a simple process in Qflow.
To follow this tutorial, it is necessary to have Qflow installed. If you do not have it installed on your computer, install it using the installer. The Installation and Configuration manual explains how to do this.
For more detailed explanations about the topics presented here and other topics, you can consult the Qflow manuals.
Process description
The process that we will implement with Qflow is an expense authorization process. The actors in the process are the following:
Applicant: they are the one who requests the authorization of expenses and therefore the initiator of the business process.
Purchasing agent: they are the first person in charge of approving or rejecting the expense requested by the applicant and the only one in cases in which the amount is less than $500.
Purchasing manager: they are the second person in charge of approving or rejecting the requested expense in cases in which the amount is greater than or equal to $500.
Director: they are, together with the purchasing manager, in charge of approving or rejecting the requested expense in which the amount is greater than or equal to $1000.
The process is initiated by the applicant, who enters the expense authorization request. In the request submission, the applicant specifies the reason for the purchase, the products and the expense amount that they intend to incur for each of them. Additionally, they can attach an image for each product.
The expense request must be approved by different people depending on the amount of the expense. If the total amount is not more than $500, only the agent’s approval is required. In the case that the total amount exceeds $500, the purchasing manager’s approval is also required and if the amount is greater than $1,000, it must also be approved by the director.
In any case, if the response time is greater than 24 hours, the request is considered to have been rejected.
In any case, the applicant must be notified by e-mail about the result of their application.
Process design
To design the process we will Qflow Design.
Entering Qflow Design
To enter Qflow Design for the first time go to QflowAccess (http://{server}/QflowAccess - if you are accessing it from the computer where the tool was installed, {server} will be ‘localhost’), a window appears like the one that can be seen in Fig. 75. This window allows you to start your session in the Qflow server:
Username: This should be the username that your organization assigned you.
Password: Here you must enter your private password to log in to Qflow.
Once these fields are entered, click enter to log into Qflow.
It also allows you to authenticate with Microsoft and Google accounts (only in the case that the user exists in the Qflow system)
Depending on your configuration, the workspace accessed can be identified by a unique name that is part of the URL of the tool (Fig. 75), or via a selectable option in the login (Fig. 76). If you want to change this configuration, see the Qflow Admin manual.
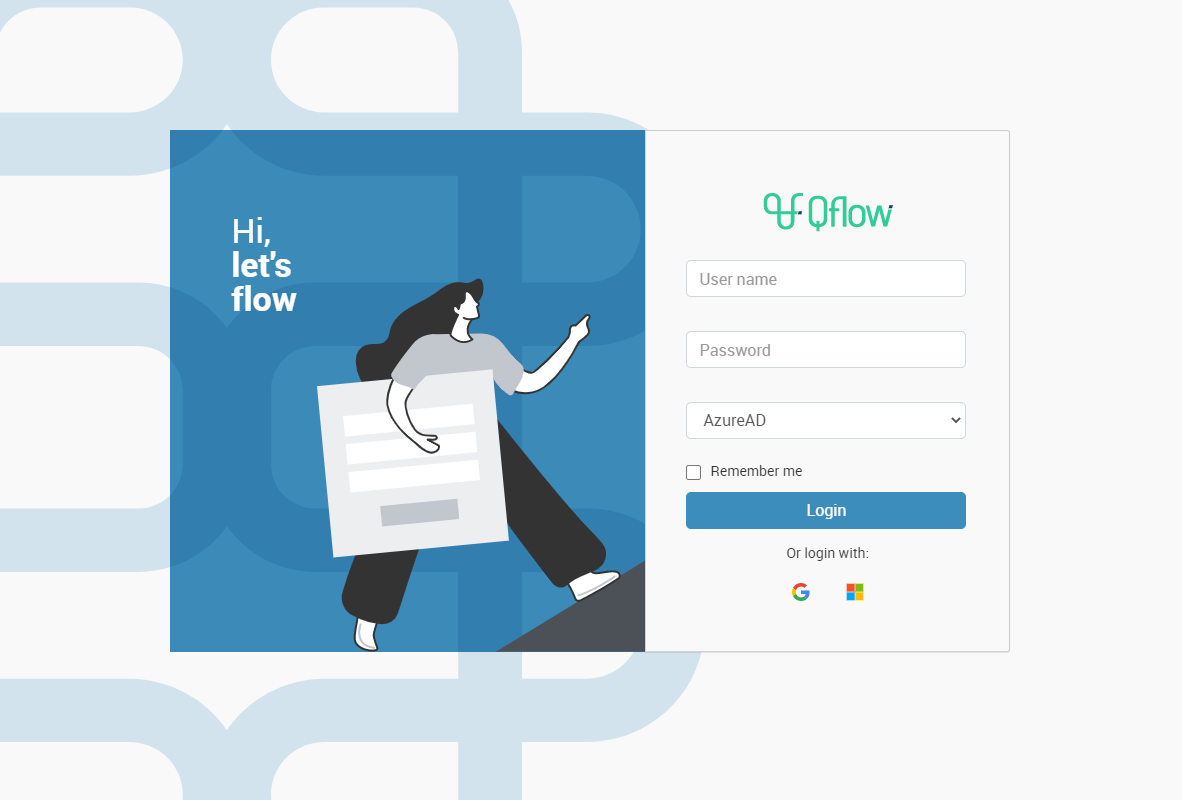
Fig. 75 Login
To change your worskpace, you must click on the “Change” button (Fig. 76).
Fig. 76 Request for credentials and workspace selection
If the options to log in with Microsoft or Google do not appear, you can see the Installation and Configuration manual to configure them.
Once you’re logged in, you’ll see a view like the one in Fig. 77
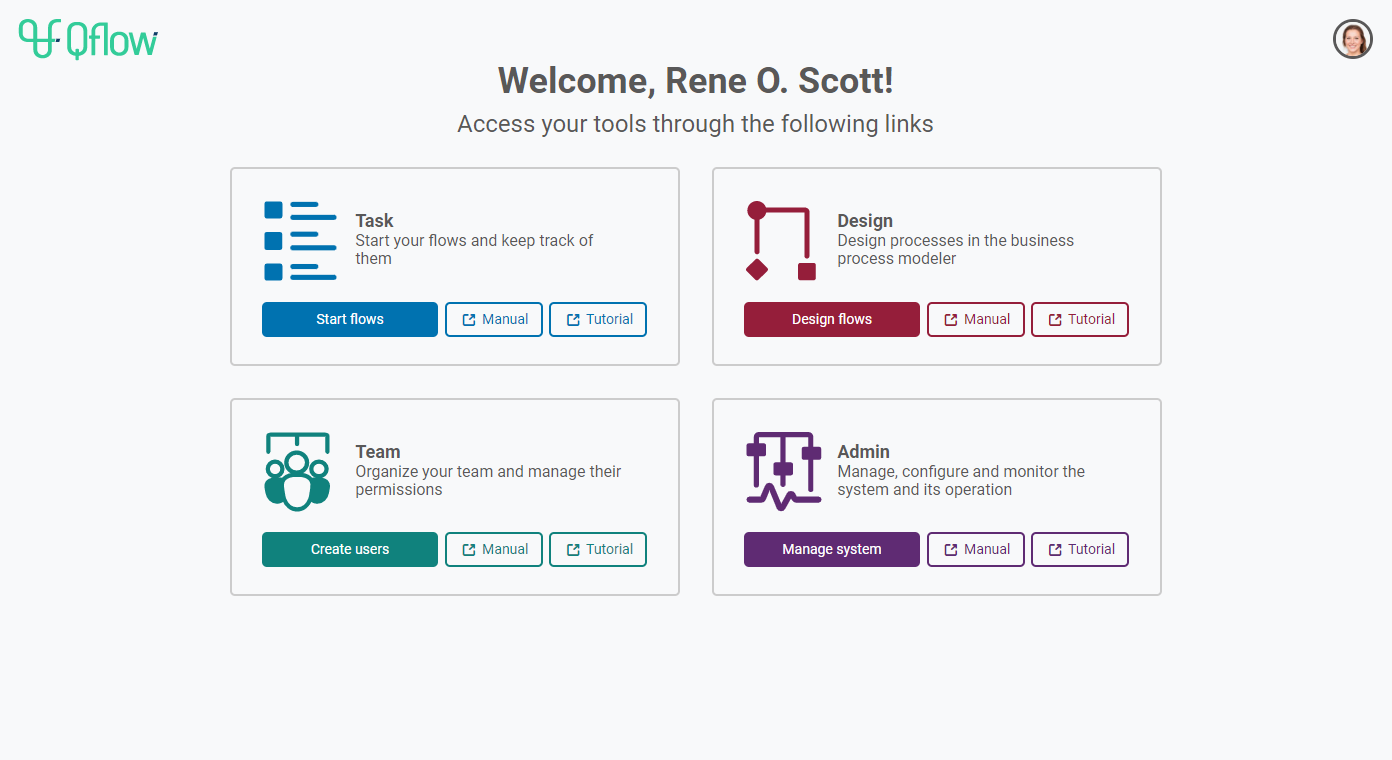
Fig. 77 Qflow Access
You will need to click on the Qflow Design option to access the tool.
When you log in for the first time, a sign will appear at the bottom informing about the use of cookies (Fig. 78). You can see the information of the cookies used by clicking on “cookie policy”. If the user continues browsing the site, it will be assumed that they accept cookies. To close the message and not show it again, the user must press the “OK” button.
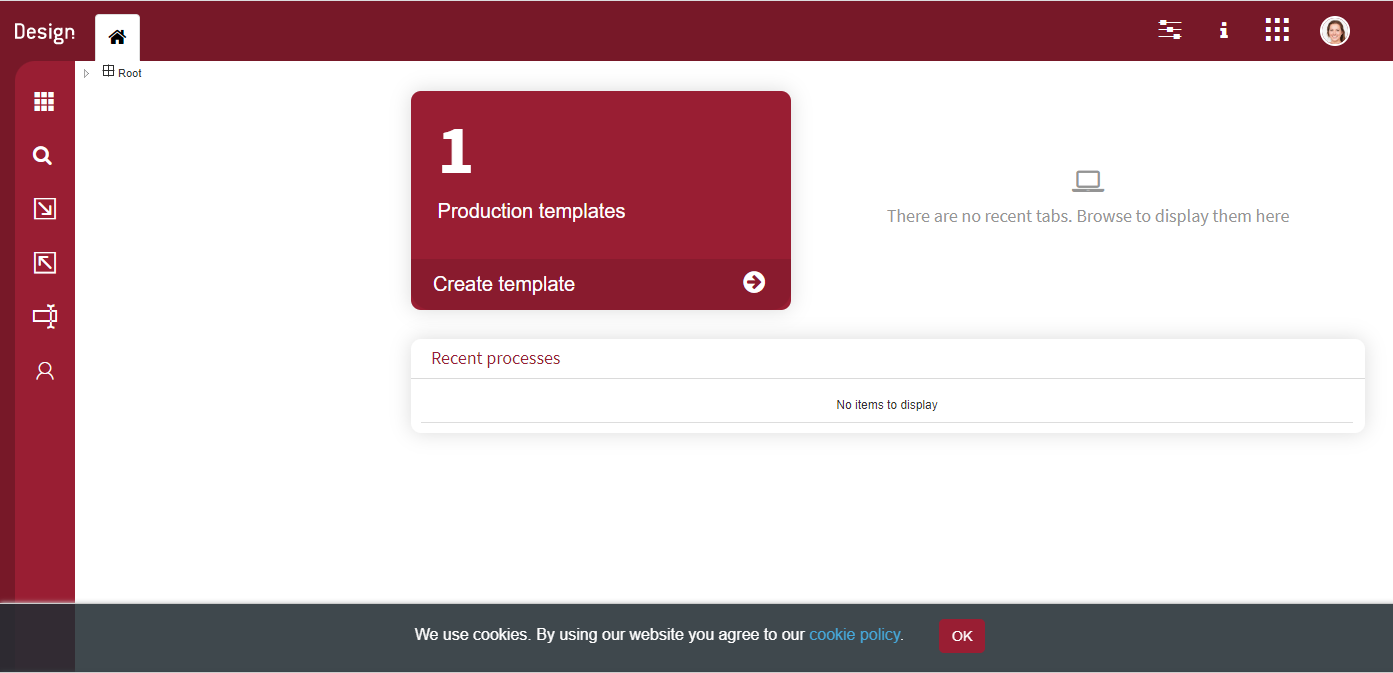
Fig. 78 Qflow Design home
Optionally, you can also access through the Qflow Design url (http://{server}/QflowDesign - if you access from the computer where the tool is installed , {server} must be ‘localhost’).
Process template creation
To create a process template:
Right-click on a package in the solution explorer, located on the left side of the screen. The solution explorer is initially hidden, you can open it by clicking the
 icon. If you are just starting to work with Qflow, the only available package is the Root package.
In the context menu, select the “Add process template” option (Fig. 79).
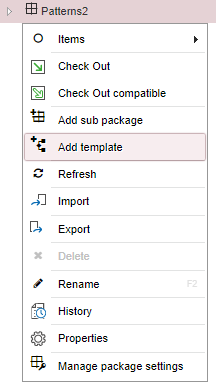
Fig. 79 Solution explorer and menu to add a new process template
A form like the one in the Fig. 80 will be shown.
Select “Empty BPMN template”
Enter the name (for this example we will use “Tutorial”).
We will leave the option create process container subpackage selected,
it will make that, when the template is created, a container package will also be created with its same name.
If you want, add a short description as well.
Click on the tick at the right top of the panel.
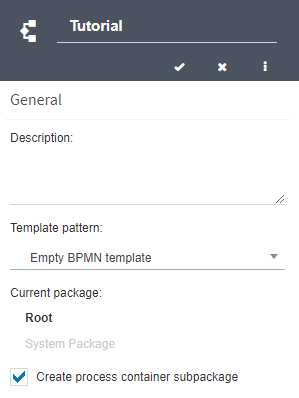
Fig. 80 Create a new process template
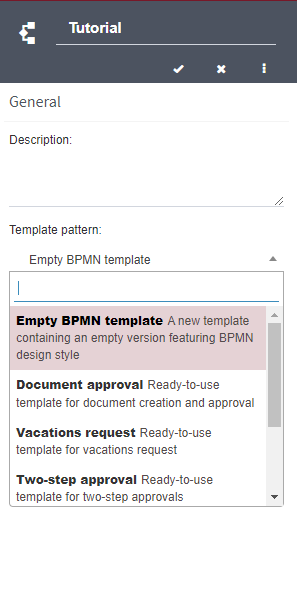
Fig. 81 Select “Empty BPMN template”
After doing this, we will see that a process template with the name we entered has appeared in the solution explorer. It is displayed below the package with the same name. Below this process template there is also a template version called “1.0”, which was created automatically with the process template. Fig. 82 displays the solution explorer after the process template has been created.
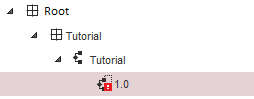
Fig. 82 New process template created
Process steps
Our goal, now that we have created a process template with its respective version, is to edit it to create the process that we defined in the Process description section.
To edit a template version you must first check it out. By checking it out, the user ensures that they are the one who is making modifications to it. The template version called “1.0” is created already checked out.
The process design is the diagram that represents the business process. It is composed of steps and connections between these steps, which determine the order in which they should occur in a process.
A document will then open with the name of the process template and version. This document already contains two steps: a start step and an end step (Fig. 83).

Fig. 83 New process template diagram
To add steps to the process design document we have a toolbar (Fig. 84). It is in the left area of the designer and for it to be fully displayed, you must be working on a checked out version of the template.
A step can be added to the document by dragging it from the toolbar to the diagram.

Fig. 84 Toolbar
There are many types of steps, but to implement the process we want, we will only need a few of them, which are described below.
Start event
A step that is indispensable in any process is the “Start” event. This step is the entry point of the process and there can only be one. It represents the moment when the user who starts the process completes the necessary data to start the process in the web form and starts the new flow. When a new process template is created, the new version that is created automatically includes a start event.
End event
Another step that is essential is the “End” event, which marks the end of the process. It is possible to have more than one end event in the process and use each one to mark different ends of the process. For example, in our process we have an “Approved End” in which the expense request is approved and a “Rejected End”, in which the request is rejected. When a new process template is created, it already comes with an end event, since every process must have at least one.
Exclusive gateway
An exclusive gateway is used to evaluate process conditions and continue along one of the different possible paths, depending on the result of the evaluation. In particular, in our process it can be used to evaluate the amount of the requested expense. In the case that the expense is less than 500, it must be approved by the purchasing agent. If the expense is between 500 and 1000, additional approval from the general manager will be required. Finally, if the expense is greater than 1000, additional approval must be given by the general manager and the director. We will also use it to evaluate the responses of the various participants in the process, who decide whether or not to approve the expense.
User task
A user task allows you to interact with users by submitting a question that must be answered. The question and the possible answers to it are defined in the process design. In our process, we will use steps like this to ask the purchasing agent, purchasing manager, and director if they approve of the applicant’s expense.
When a user task defines an expiration, it is necessary to include an edge timer event, from which the flow when the expiration is fulfilled and you wish to follow an alternative course is defined.
User notification task
A user notification task sends a Qflow notification and, if correctly configured, an email message to users. In the process we are implementing we can use these steps to notify the applicant of the result of their application.
Formula task
A formula step allows you to assign values to application data and process roles, depending on one or more conditions defined within the same step. In our process we will use steps of this type to calculate the total amount of all the lines that the applicant has entered and select which people should approve or reject the expense depending on the expense.
Process drawing
To draw the process, you start by dragging the steps to be used from the toolbar to the process design document and connecting these steps. This leads us to implement the process “left-right” or left-to-right: first we build the skeleton of the process, leaving the details for later.
The process template that was created already includes a start event, so there is no need to add one. But we can change the name to “Request expense”, by double clicking on the name. It is also possible to change it in the properties window (Fig. 85). This window opens when you double-click the start event. To save the changes in this window, we must click on the tick icon.

Fig. 85 Properties window
Next, we drag an activity from the toolbar to the diagram. If it is placed on the arrow that connects the start event with the end event, the task will be the first to run once the flow starts. Fig. 86 shows how the diagram looks after the startup steps and the task are connected.
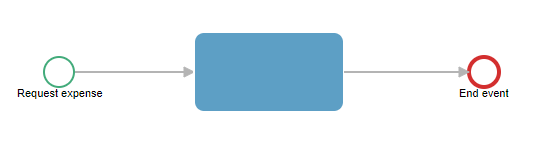
Fig. 86 New activity between start and end events
We can rename the task when we add it to the diagram or by double clicking on it, in our case we will call it “Calculate total amount” to be able to identify it more easily when we add more steps to the flow (Fig. 87). The name that is assigned in the task is preserved after the type is changed.
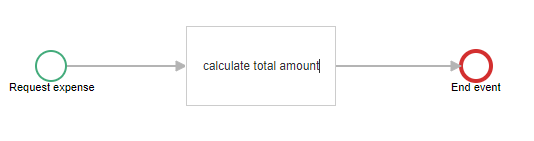
Fig. 87 Rename activity
Next, the activity will be changed to a formula task, which will be in charge of calculating the total amount of all the products that the applicant has entered. To do this, the task must be selected by clicking. This action opens a small toolbar with 4 icons to the right of the task (Fig. 88). When you select the first option, a menu will be displayed with the different activities available in Qflow (Fig. 89). When you select “Formula task”, you will see that the activity icon appears and the name is updated.
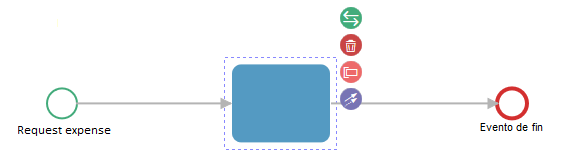
Fig. 88 Activity toolbar
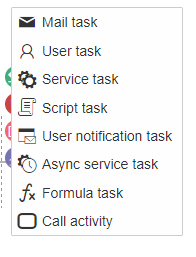
Fig. 89 Available activity types
Then, we will place a new activity after the formula task, which will represent the approval by the purchasing manager and we will name it as “Purchasing agent approves?”. For this, we will change the type of activity for a user task, in the same way that we did with the previous formula step, resulting in a diagram similar to the one in Fig. 90.

Fig. 90 Diagram with the user task
The purchasing agent’s approval process can have two outcomes: either the request is approved and the process continues, or the request is rejected and the applicant must be notified and the process completed. The different paths that the process can take after the step will be evaluated based on the user task response. For this, it is necessary to create an exclusive gateway.
At this time, we may not have more room to continue adding steps. The web process designer allows moving one or more items at a time within the diagram in several ways, in this case, we will select the end step and drag it to the right to generate more space and thus be able to add new steps. Qflow helps you keep the items aligned through an orange line, but you can decide if you want to keep them this way or move them to any position in the drawing area. If you want to select more than one step, you can do so by holding down the control key while clicking through the different steps. Another way to move more than one step at a time is with the create / delete space tool.
Next, we will create the exclusive gate. This step allows you to evaluate various conditions and decide which way the flow execution should continue, depending on their results. For this, the exclusive gateway icon must be dragged from the toolbar to the diagram. We will name this gateway “Approves?” and we will do it in the same way that we named the start event, by double clicking on the name that appears below the step in the diagram. Your diagram should look similar to Fig. 91.
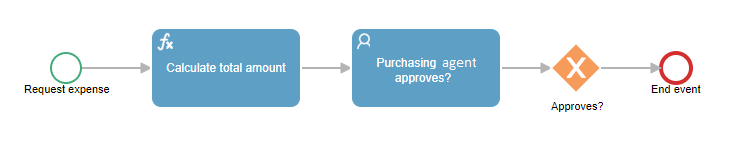
Fig. 91 Diagram after adding exclusive gateway
Later, we will see how to specify the answer that leads to each path. For now, we will limit ourselves to drawing the paths. We will first draw the rejection path. This path should lead to a user notification task, which sends a message to the applicant, indicating that their request was rejected. To create it, we must repeat the same process as the previous activities, adding an activity from the toolbar, renaming it to “user notification” and changing the task type to a notification one. We must also have an end event that ends the process. As we already have the end event that is automatically created when the process is created, we will use that one, although we will rename it to “Reject purchase” to indicate that it corresponds to the completion of a process that ended in a rejection. In Fig. 92 we can see how our process looks so far.

Fig. 92 Process up to the user notification of rejection task
Next, we must draw the path of the process for the case in which the purchasing agent approves of the expense. In that case, the the purchasing manager and director’s approval may be required, but that depends on the expense amount. It is then necessary to evaluate, using a new exclusive gateway, if the amount is between $500 and $1000 and include another user task, which represents the approval of the purchasing manager, in the corresponding branch; or if the amount is greater than or equal to $1000, create a new branch in which both the purchasing manager and the director respond.
To create a new outbound branch in the exclusive gateway, you can select the gateway and click on the exclusive gateway option, this will create a new exclusive gateway that will be attached to the first gateway (Fig. 93).
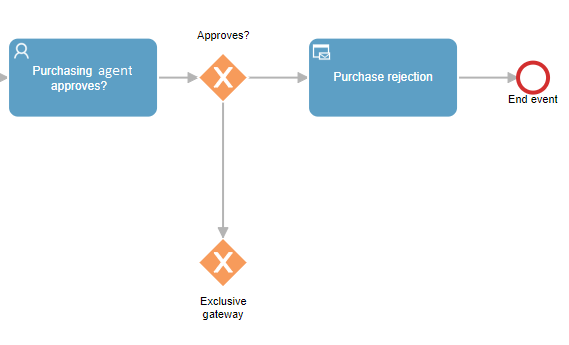
Fig. 93 Process with a new branch exiting the exclusive gateway
We then add two new branches to the design document. Each one has a formula step, in which we will then assign the recipients who must approve or reject the expense depending on the amount. To do this, we can select the exclusive gateway and choose the “Add task” option from the step’s context menu. We will call these tasks “Purchasing Manager Must Approve” and “Purchasing Manager and Director Must Approve”. It is also possible to name the connections between steps by double clicking the arrows. We will name the latter two “Amount between 500 and 1000” and “Amount > 1000” respectively. The process should be similar to Fig. 94.
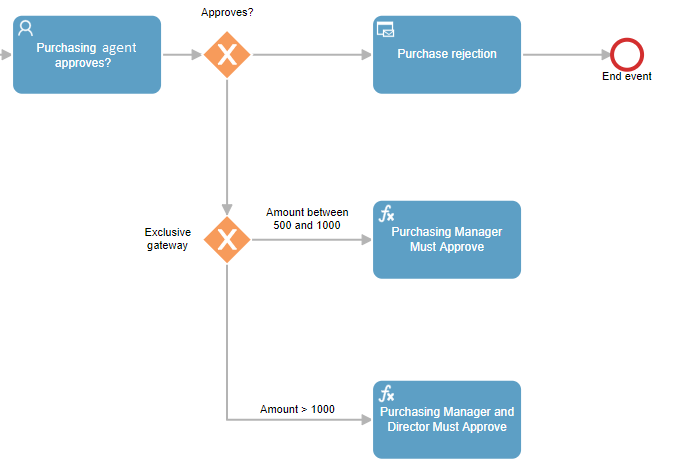
Fig. 94 Process with names in the connections and 2 new formula tasks
At this point in the process, you may want to save your changes so that you do not lose what you have done so far in case of any eventuality. We can achieve this by clicking on the save icon, located to the right of the diagram (Fig. 95). Additionally, below the save button is the button to export the diagram, both as an image or as a file in BPMN notation.

Fig. 95 Export diagram and save buttons
After this, we will proceed to create a new user task that we will call “Management approval”, in which both the purchasing manager and the director must respond, in case they need to intervene in the flow. For this, either of the two formula tasks can be selected. Select the new task tool, rename it to the mentioned name and change the type to user task. To make the second formula task continue to the new user task, simply select that formula task and select the “Connect using connection or association” tool and click on the new user task. The tasks should be connected in a similar way to Fig. 96.
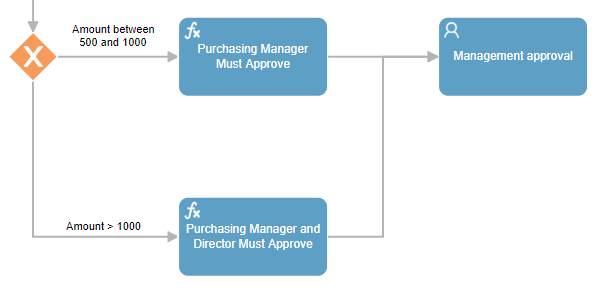
Fig. 96 The 2 formula tasks connected to the same user task
Once again, we must evaluate the responses given by the users, so we must create a new exclusive gateway that will send the flow through the correct path, depending on the previous task’s responses.
If the general manager rejects the expense, the applicant is notified in the same way as the agent’s rejection. For that, we connect the new exclusive gateway to the notification that we created previously. The flow should look similar to Fig. 97.
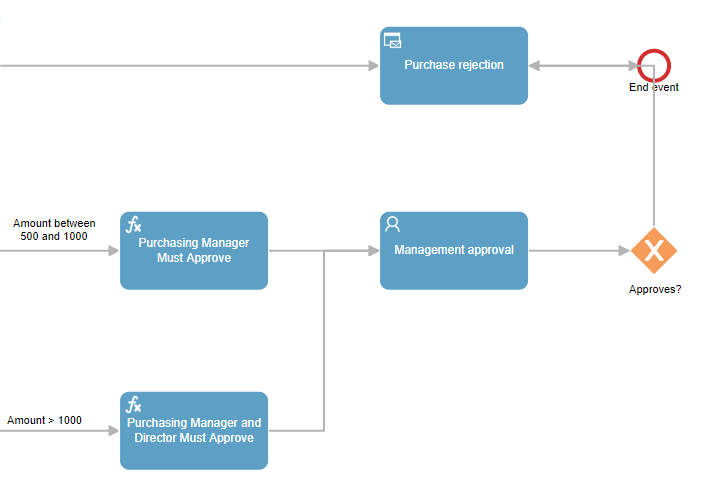
Fig. 97 Process with management rejection
As you can see, the connection between the exclusive gateway and the rejection notification steps over the end step. The Qflow business process web designer allows you to modify the path that all the connections traverse in a simple way, for this, click and hold on the point you want to modify, this will create a new breaking point. We can modify the path of the connections as many times as necessary. Fig. 98 shows the step by step process to create break points in the connection between two steps.

Fig. 98 Connection between approval and modified notification
We still have to define the “successful” path of the process, that is, the path in which the expense request is approved. In that case, it is necessary to notify the applicant that his application was approved and finalize the process.
To do this, we drag a notification task that we will call “Notify of approval” and an end event that we will call “Approved purchase” from the toolbar. The request is approved if it passes management approval, so an outbound connection must be created from the management approval step, to the new notification step. This is done in the same way as we did previously, by clicking on the exclusive manager approval gateway and selecting the “Connect using connection or association” tool. The result should be similar to Fig. 99.
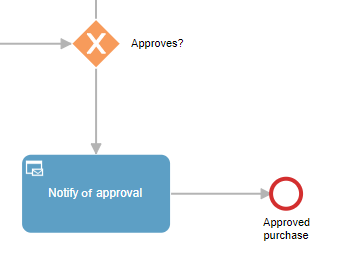
Fig. 99 Exclusive gateway with connection to purchase approval
In addition to this, if at the time of evaluating the amount, it is not greater than $500, the request will be approved, since in that case the only approver necessary would be the purchasing agent. Therefore, from the exclusive gateway that evaluates whether the management approval should be requested and who should participate in it, a connection must be drawn up to the new notification step to which we will add the label “Amount < 500” like Fig. 100 shows.
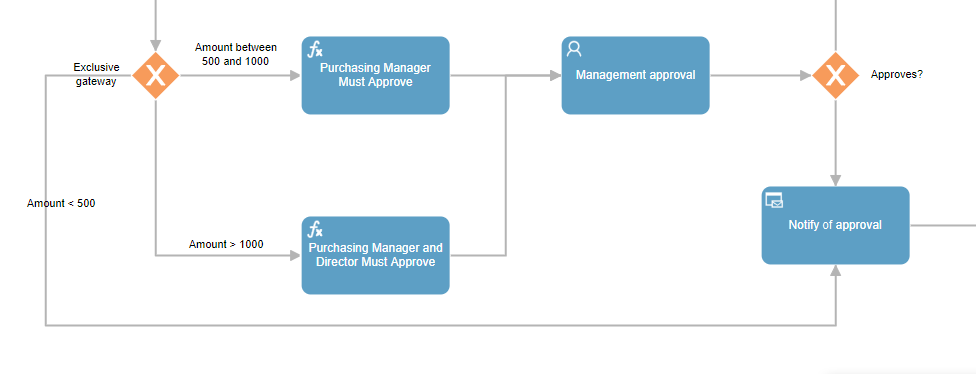
Fig. 100 The purchase approval notification is reached in 2 different ways
Qflow allows us to define a default connection in the event that no condition is met within the exclusive gateway. For this, we must select the connection corresponding to “Amount < 500” and change the type of connection (with the Change type tool) and select the default connection. Fig. 595 shows the default connection, this type of connection is seen by a diagonal line that cuts the connection between the exclusive gateway and the notify of approval task.
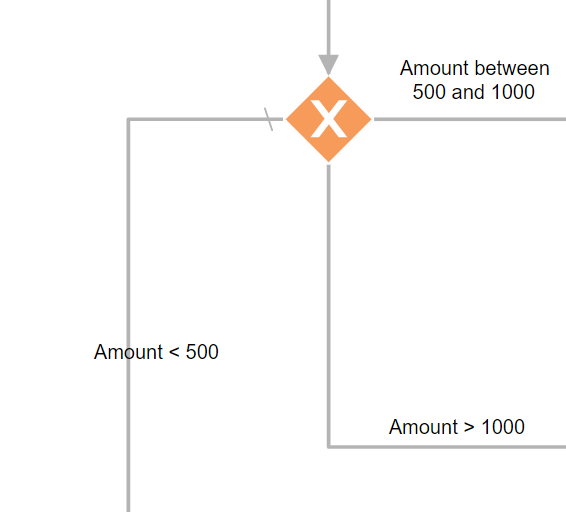
Fig. 101 Default connection (“Amount < 500”)
The process design should be similar to Fig. 102.
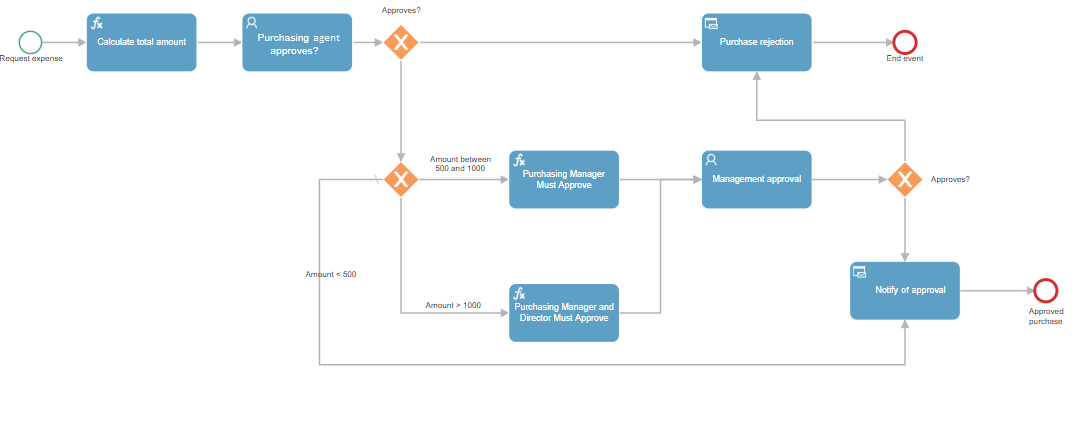
Fig. 102 Process graph
We still have to consider the expiration time of approvals. After 1 day, if there is no response from the approvers, the request must be rejected. User tasks allow this behavior by adding an edge timer event to it, which is added to the diagram by dragging the yellow circle icon (intermediate event) from the toolbar and placing it on the user task to which it is to be added, as shown by Fig. 103.
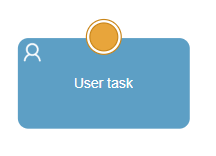
Fig. 103 User task with edge event
Once this is done, we must change the event type to an edge timer by selecting the event and modifying it with the change type tool. Then, we will connect the timer event (it is important that the connection is from the timer event and not the user task) with the purchase rejection task (Fig. 104). Repeat this for both user tasks in the process.

Fig. 104 The edge timer event with its connection to the expense rejection notification
The process graph should look similar to the one in Fig. 105.
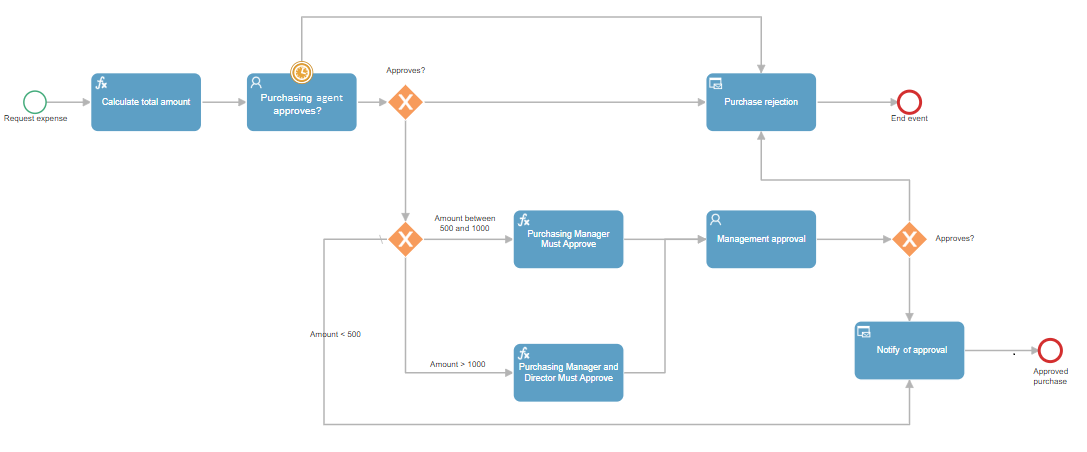
Fig. 105 Process diagram
Application data
Application data provides structured information on the process. Each datum is associated with a domain, which determines the possible values that it can take (text, number, etc.) and the control that will be displayed on Qflow Task for the datum (text box, combo box, etc.).
It can be modified throughout the process, both by users and by Qflow in automatic execution steps (those that do not require user intervention).
In interactive steps, such as the user task, a “scope” is defined for the datum. The scope specifies if a datum can be modified in a certain step, if it is displayed, but cannot be modified or if it is absent in that step.
In our process, when using the user task, we assume that the amount is in an application datum. Exclusive gateways and formula tasks are automatic steps that can evaluate conditions that require querying of application data. Therefore, in this process we create an application datum that represents the total amount of the products.
The default domain for data is “Text”. In this case we want the datum to have the “Number” domain. This allows you, among other things, to validate that only numeric values are entered for the datum. To add an application datum:
Right click on the process template in the solution explorer.
Select the “Check out” option.
Right click on the process template in the solution explorer again.
Select the “Items” option and then click on “Application Data” (Fig. 106).
In the new panel, click on the “+” icon.
Enter a name, domain and optionally a description for the datum and click on the tick icon (Fig. 107).

Fig. 106 Menu to add an application datum
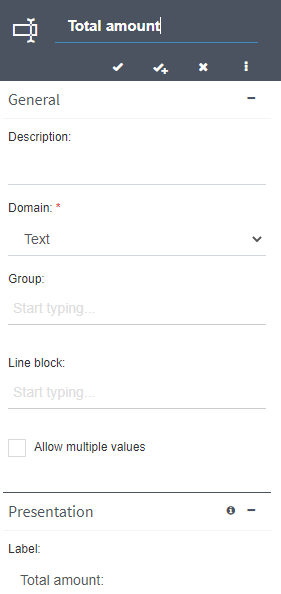
Fig. 107 Application data panel
After doing this, we will see that the datum has been added to the process template data list (Fig. 108). Note that the process design document is still open, but can be accessed by clicking on its tab (Fig. 109).

Fig. 108 Application data document
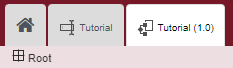
Fig. 109 Opened tabs
In many cases, it could be useful for managers to have the ability to make comments for the applicant to read. These could be used to provide an explanation in the case that the application is rejected. To configure comments, in each step that these are necessary you must go to the “Scope” tab and in the “Comment scope” section check the “Allow addition” option (Fig. 110).
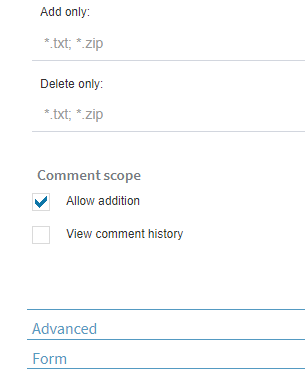
Fig. 110 Allow comment addition
For each response, you can configure whether it is necessary to add a comment when responding. You can also choose if you want the response key to be saved in the comments log when the task is responded. This can be done by checking the “Add response to comments” option (Fig. 111).

Fig. 111 Comment settings on responses
In addition to this data, it will be necessary to add data to detail each product that you want to add to the expense. For this, we must create three new pieces of application data. This data must have several values, depending on how many different products the applicant wants to add. For this reason, we must allow the data to admit multiple values and belong to a common line block, so that they are associated with each other. We will create the data “Name” and “Amount” of the Text and Number domain respectively, both belonging to the “Products” line block and with the “Accept multiple values” box checked (Fig. 112).
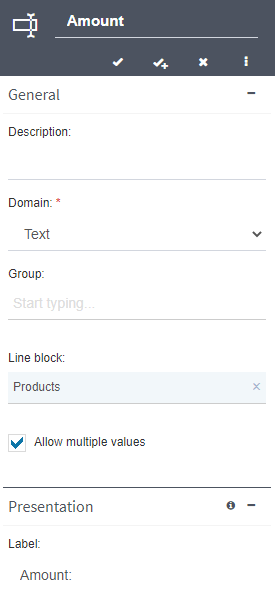
Fig. 112 Amount data that accepts multiple values with the line block to which it belongs
The third application datum corresponding to the product block is the product image. Qflow has a document type data domain that allows any file to be attached, but in our case, we only want image type files. For this reason, we will use a data domain created by ourselves. Data domains are added in a similar way to application data. To add a data domain:
Right click on the process template in the solution explorer (the process template must be in checked out mode).
Select the “Items” option and then click on “Data Domains”.
In the new panel, click on the “+” icon.
Enter a name, control type and data type, optionally add a description for the domain and click the tick icon (Fig. 113).
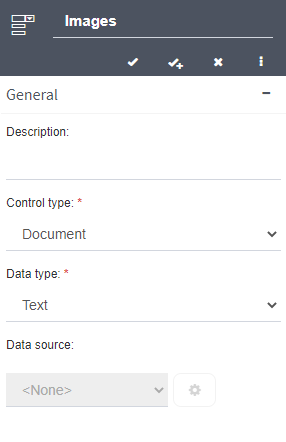
Fig. 113 Setting up a data domain
By double-clicking on the data domain, you can access the options. By selecting the  icon on the right, you can access the advanced options of the domain. In our case, we must select the Document control type, which allows us to attach files to the process and the “Text” data type. Additionally, we will display the “Properties” panel by clicking on it and within the Restrictions tab, we will add the following regular expression: “*.jpg; *.png; *.gif; *.jpeg” (without the quotes). This will allow us to limit the type of documents that are attached, so that only these types of extensions are admitted. We will also add the following error message: “The entered document must be an image” as shown in Fig. 114.
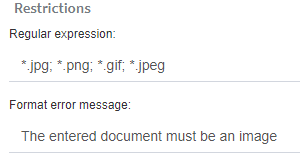
Fig. 114 Image data domain restrictions
Once the data domain is created, we can create a new application datum called Image with the same characteristics as Name and Amount, but with the Images data domain that we created earlier (Fig. 115).
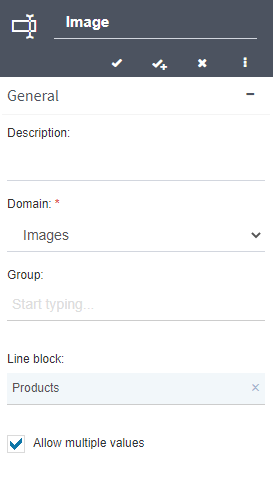
Fig. 115 “Image” application data properties
Finally, we will add a new application datum that will be a justification of the expense so that the applicant can explain the reasons why they want to incur the expense. We will call it “Purchase justification”, it will be from the “Text area” data domain. In this case, it will not belong to any line block or allow multiple values.
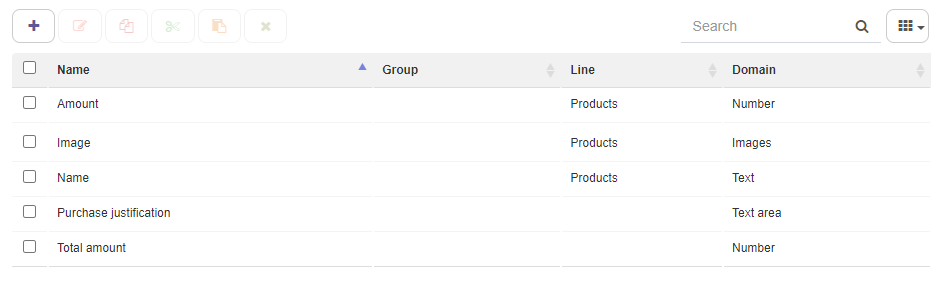
Fig. 116 Created application data
Process roles
Process roles are used as recipients for interactive steps. Roles are associated with users and they will be assigned a task by Qflow when a process reaches an interactive step. In the case of our process we have four roles:
Applicant, who is the one who starts the process by requesting the approval of an expense.
Purchasing agent, who will approve of or reject the request.
Purchasing manager, whose approval is requested in the event that the amount is greater than $500.
Director, whose approval is requested in the event that the amount is greater than $1000.
Process roles are added in a similar way to application data and data domains. To add a role to the process version:
Right click on the process template in the solution explorer (the process template must be in checked out mode).
Select the “Items” option and then click on “Process Roles”.
In the new panel, click on the “+” icon.
Enter a name, role members, if the role will allow multiple users and optionally a description for the role and click the tick icon.
The system will create two roles by default on the root package, one role that represents the user that has started the flow, and another role that represents the supervisor of said user. To represent the “Applicant” in our process, we can use the flow starter user role.
If we prefer to have this role defined in our template, such as to give it a more meaningful name in our process, we can also add a role that has the system role “Flow starter user” as a member. Once the flow is started, Qflow will assign the user to the process role.
To assign the user to the process role, in the role properties window (Fig. 118) go to the box corresponding to “Role members”.
Start typing “Flow starter user”. Qflow will show you a suggestion box with the members of your organization and other roles (Fig. 117).
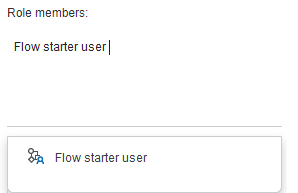
Fig. 117 Role members with their corresponding suggestion box
Select the “Initiator” option (Fig. 118).
Then click on the tick to confirm the changes made to the role.
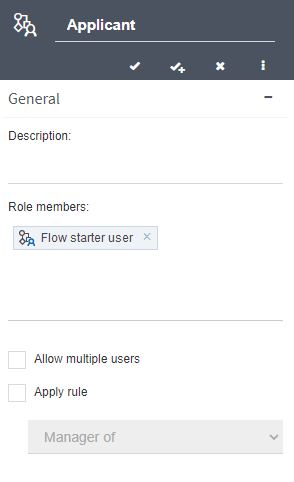
Fig. 118 Properties window of the “Applicant” process role
We will repeat the process for the “Purchasing agent, “Purchasing manager” and “Director” roles, but selecting your own user within the organization, so that you are the one who receives the questions in the different user tasks that we have already created. This will allow us to start the process and answer both the question that is directed to the purchasing agent and the one that is directed to management approval.
If the process were implemented in the real world, the “Purchasing agent” role would have to be assigned to the user corresponding to the Purchasing Manager and the “Purchasing Manager” and “Director” roles would have to be assigned to the user corresponding to the Purchasing Manager and director respectively. Those user accounts are created in the organizational model manager.
In order for both the “Purchasing Manager” and the “Director” to respond to the task, we must create a role that contains them, which we will call “Management Approver” with the particularities that the new role will allow you to have multiple assigned users ( check the box when creating the role) and you will not have any user assigned at the moment, we will do this later in the formula tasks added in the process.

Fig. 119 All process roles created
Detail the process
Now that we have defined the skeleton of the process and the resources that it involves, we still have to configure the steps, so that they have the desired behavior and use the roles and data that we have defined.
Let us start by reviewing each of the steps and looking at the properties that we need to configure in each one.
Request expense
In this step, the process starter must be able to enter several products with their corresponding cost and, if desired, their photo, as well as a justification of why they want to incur the expense. The data and roles involved in each step are defined within the scope of the step. To configure this, you must enter the advanced settings of the step by double clicking on it and then clicking on the  icon. Then the “Scope” tab must be opened and a tab like the one in Fig. 120 is displayed. The application data that we defined earlier is listed there along with the scope it has in the step. The default scope is “Missing” and for the “Purchase justification”, “Amount” and “Name” data we must change it to “Required”, so that the user who starts the process must enter a value for the data.
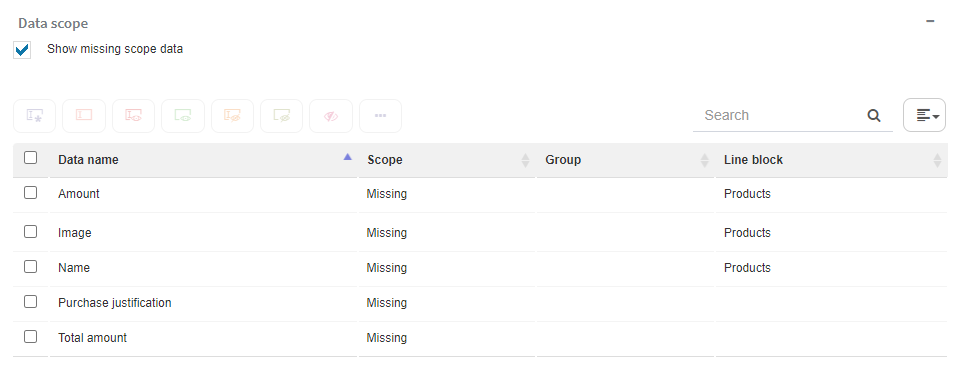
Fig. 120 Data scope
This is achieved by selecting the boxes corresponding to each of these pieces of data and clicking on the “Required” button (the option on the left). After this change we must select the “Image” data and give it the “Editable” scope so that the applicant can attach an image but is not obliged to do so if they do not want to. Finally, in the line instance configuration, the boxes to allow the addition and elimination must be selected in addition to changing the minimum number of instances from 0 to 1, this is achieved by double clicking on the 0 of the column and changing it to 1 (Fig. 121), so that the applicant must enter at least one product along with all the data required for that product. The scope of the step should look similar to Fig. 122. Click on the step tick to confirm the changes made to the step scope.

Fig. 121 Line Instance Configuration
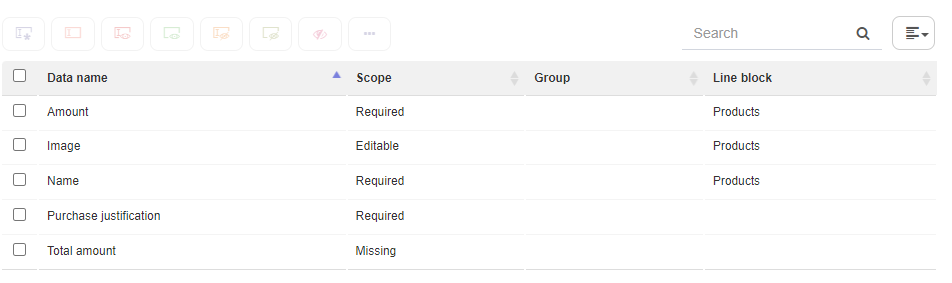
Fig. 122 Final status of data scope and product line block
An additional change that can be done on the fly is to change the start flag. This field provides additional information on the status of the process at the time of starting the step. To change the flag, open the properties panel (by double clicking on the step) and edit the “Start flag” field, entering the word “Authorizing”, as shown in Fig. 123. This change is not necessary for the process operation, but it will be useful when using Qflow’s statistics functionalities. Click the step tick to confirm the changes made to the start step.
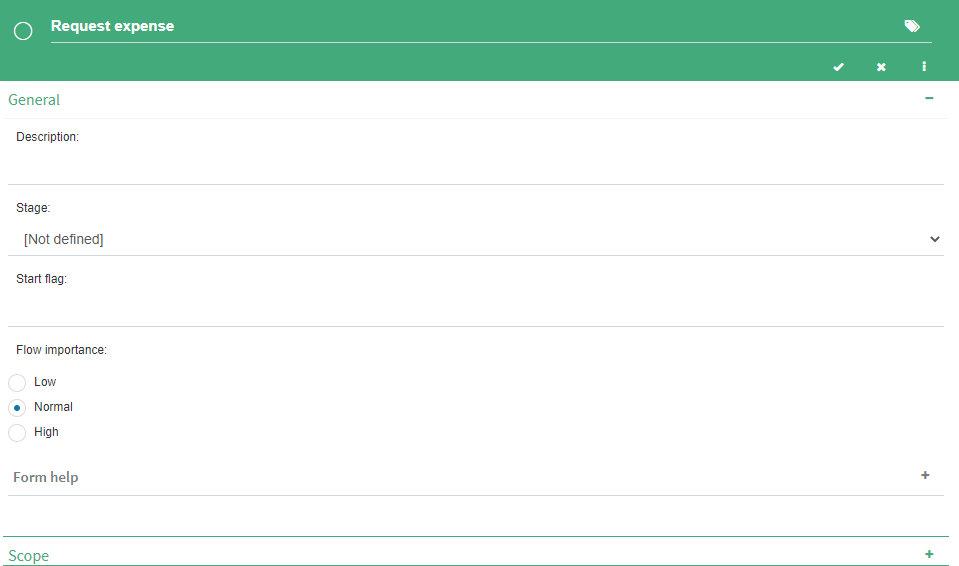
Fig. 123 Properties window of the Request Expense step
Calculate total amount
In this step we will sum all the product amounts and assign the sum to the “Total amount” datum.
For this, we must enter the step settings and expand the “Formula” view. Inside the operations table, which is empty, we must add a new operation with the “+” button (Fig. 124). This action will open a panel called “Formula Expression Builder”.
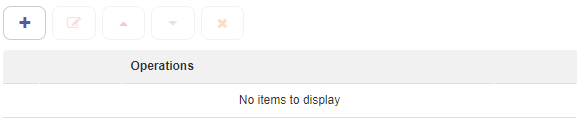
Fig. 124 Formula table
In the formula expression builder, we must write the target item, which in this case is the “Total amount” datum. In the operand box, we will use the “Amount” datum that contains all the amounts of the entered products and in transformation we will use “Sum” so that the values of the variable are added (Fig. 125).
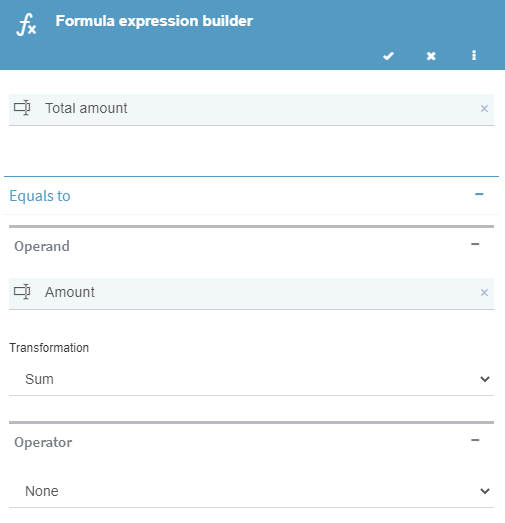
Fig. 125 Formula expression builder
When we click on the tick, we will see that the operations table of the formula step has been updated with the new formula that we just created. Clicking on the tick in this panel saves the step changes.
Purchasing agent approves?
We will call the first user task “Purchasing agent approves?” and we will make the following adjustments so that, in this step, the purchasing agent can answer whether or not to approve of the expense. To make the decision you can base yourself on the expense amount and enter a comment explaining your decision. You cannot, however, change the amount entered.
To achieve this, it is necessary to change the step scope (in a similar way as was done in the “Request expense” step), making the “Name”, “Amount”, “Image”, “Justification” and “Amount total” data have the “Read only” scope. If the data has the “Missing” scope, the purchaser will not be able to see it (Fig. 126).
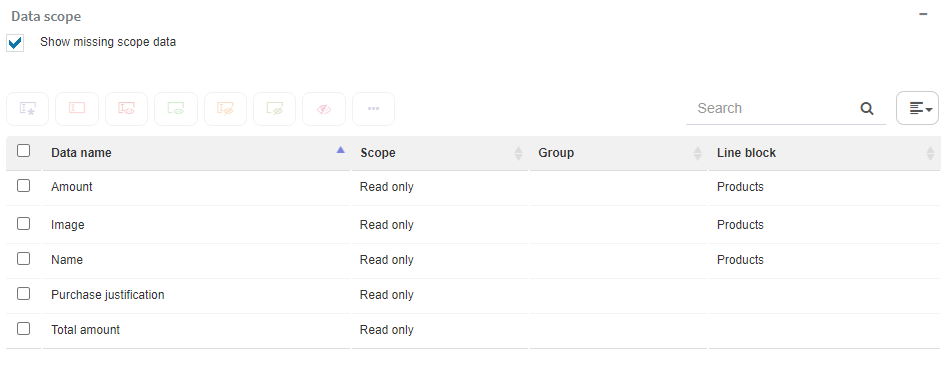
Fig. 126 Task data scope
In addition to this, you have to configure the question and the answers to it, in the next exclusive gateway, we will configure how the flow continues based on these answers.
The properties of the user task message are edited in the “Message” tab of the properties tab. The “Subject” field represents the title of the question and the subject of the e-mail that is sent to the task user. We edit it by writing the text “Expense request for”. Additionally, we will use the “Insert Tag” functionality to insert a tag with the “Applicant” user’s name at the end of the subject. Again Qflow offers us a table that gives us suggestions as we write text. To activate it, write “#” in the subject box or press the button to the right of the message box and write “Applicant”.
With this, the tag “#%Role:”Applicant”%#” will be added to the subject. During the process execution, Qflow will replace this label with the name of the “Applicant” role member.
The recipient of the task must be the “Purchasing agent” role. To enter the recipient:
Select the text box to enter the recipient.
Start typing “Purchasing agent”.
Select the “Purchasing agent” role from the box.
The answers to the question are configured in the “Answers” subsection. For this step we want two possible answers: “Approve” and “Reject”. To add the answers:
Click on “+”.
Enter the response key and value. The default key equals the value, and you do not need to change this.
In Fig. 127 it is shown what the “Message” tab of the step properties should look like.
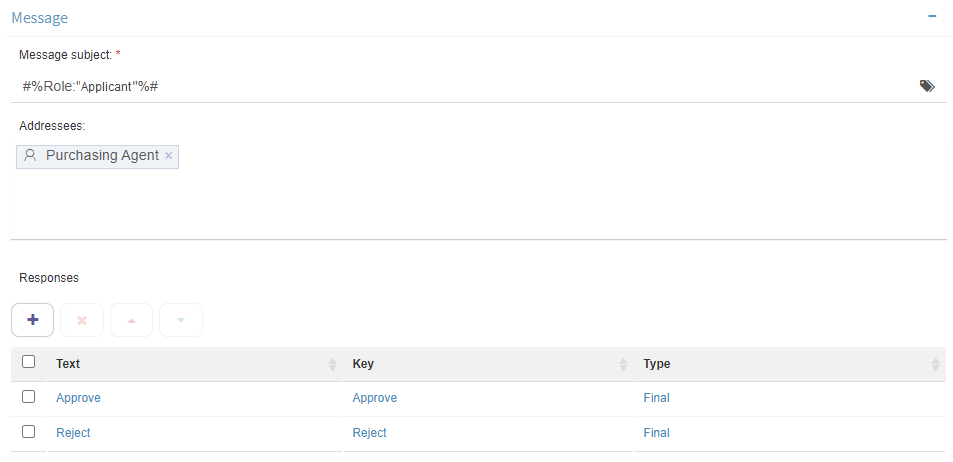
Fig. 127 Properties panel of the “Purchasing agent approves?” step - Message
The expiration of the question is configured in the “Time control” tab, which is accessed from the step’s advanced configuration panel (it is opened with the button). We want to create a temporary action of “expiration” type that is triggered one day after the question is submitted.
To create the new timer action (Fig. 128):
Click on “+”.
In the “Timed Action Settings” panel, select “Expiration” (the option on the far right).
Under “Timer information”, select “Fixed time”. Enter “1” in the number of time units and select “Days” as the time unit.
Click the tick to add the action to the time control table.
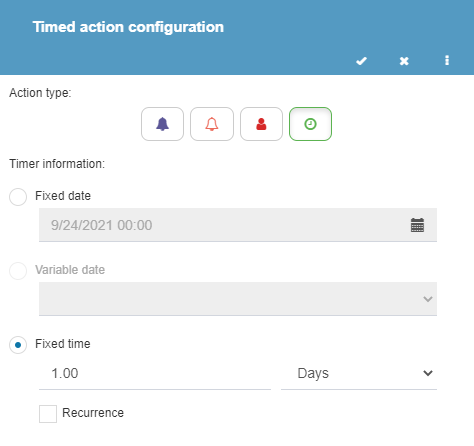
Fig. 128 Creation of expiration
After doing this, the temporary action will appear in the list of temporary actions for the step. In Fig. 129 the “Time control” submenu is shown, after having created the temporary action.
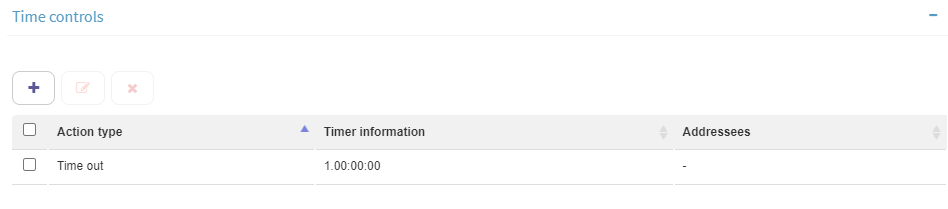
Fig. 129 Properties menu of the Purchasing agent approves? step - Time control
Approves?
In this step we will define if it is necessary to evaluate whether the purchasing manager and the director must answer the task or we must notify the applicant of the rejection. For this, we must open the advanced configuration of the exclusive gateway step and expand the “advanced” tab. Here we can see that it shows us the two connections that this step has (Fig. 130). This allows us to define the conditions that we want to be met so that the flow continues through that step.

Fig. 130 Exclusive gateway with the 2 steps it continues through
We must add a new condition for each step that, depending on the answer to the question in the previous step, goes in one direction or the other. For the “User notification task” step, we will add a new condition with the “+Condition” button and we will begin to type “Purchasing agent approves?” and we will select the task in the autocomplete box. Then, in the second text box we will begin to write the answer we want, in this case “Reject” as shown in the Fig. 131.

Fig. 131 Configuration of the exclusive gateway for the “Purchase rejection” task with its autocomplete box
For the exclusive gateway, we will repeat these same steps but change the answer in the second text box to “Approve”. The exclusive gateway’s configuration should look similar to Fig. 132.
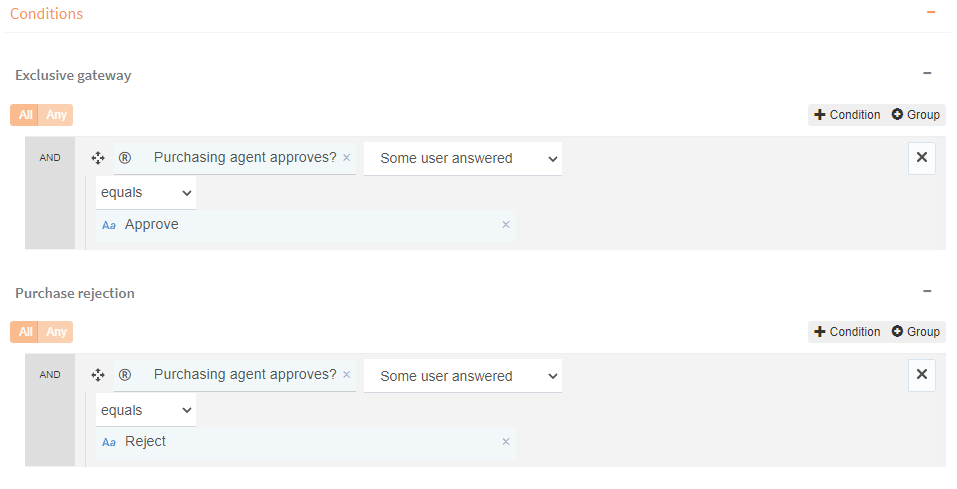
Fig. 132 Properly configured exclusive gateway
Exclusive gateway
The next step to configure is similar to the previous step, the difference is that we will configure it depending on an application datum instead of a task. In this case, we will see two of the three steps to which this gateway is connected, since the notification task was configured as the default connection when we designed the flow. The process will continue through this connection when none of the above conditions are met. Configuring the connections depending on the application datum is similar to a user task evaluation.
We must enter the exclusive gateway’s advanced configuration and for “Purchasing manager must approve”, we will add a new condition. In the first box, we must select the “Total amount” datum. We will change its operator to “Greater than” and in the second box we will write “500”. Then, we must add a second condition to this same task, which will also have the “Total amount” datum but with the “Less than or equal to” operator and in the second box “1000”.
For “Purchasing manager and director must approve”, we must add a single condition, again with the “Total amount” datum but with the “Greater than” operator and then “1000”. The result should be similar to Fig. 133.
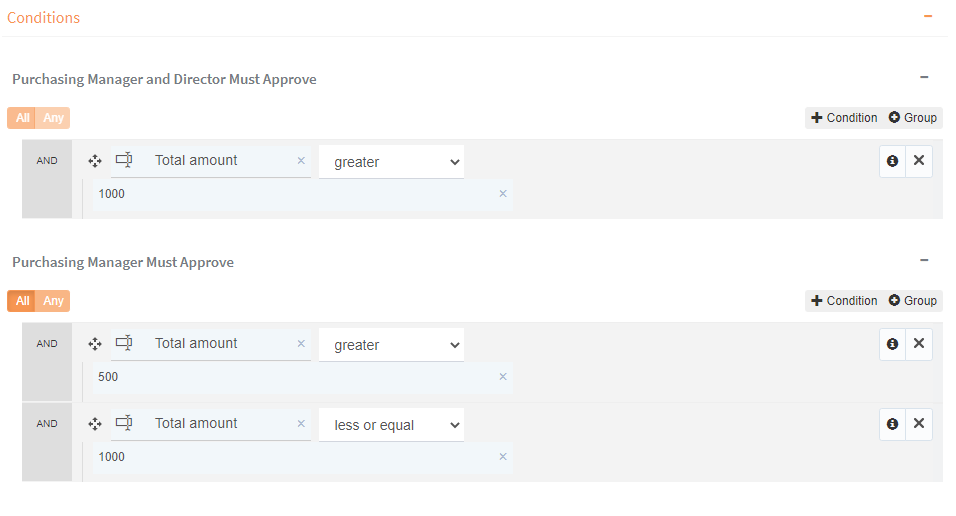
Fig. 133 Second Exclusive Gateway Configuration
Purchasing manager must approve
In this step, we will configure the manager approver role to be the same as the “purchasing manager” role. To do this, we must add a new operation in the same way as when we configured the “Calculate total amount” step.
Within the “Formula expression builder”, we can also select a role. In this case, we must select the “Management Approver” and in the operand, we will select the “Purchasing Manager” role (Fig. 134).
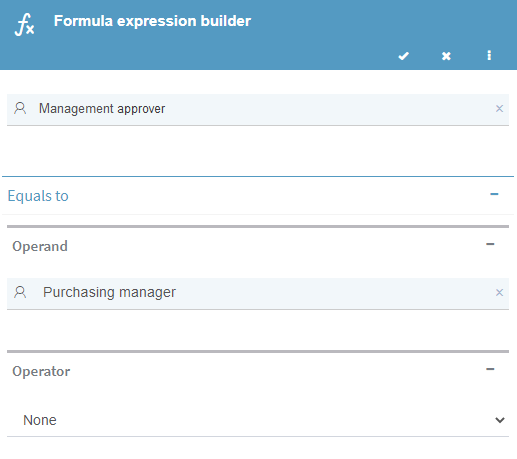
Fig. 134 Formula expression builder for Purchasing Manager
Purchasing manager and director must approve
In this step, we will configure the management approver role as in the previous step, only, it will have both the “Purchasing Manager” and “Director” roles.
In the “Formula expression builder”, we will select the “Management Approver” and in the operand, we will select the “Purchasing manager” role in the same way as we did with the previous step, but this time, we will also change the operator to “+”. Doing this will allow us to add a new operand, to which we will assign the “Director” role (Fig. 135).
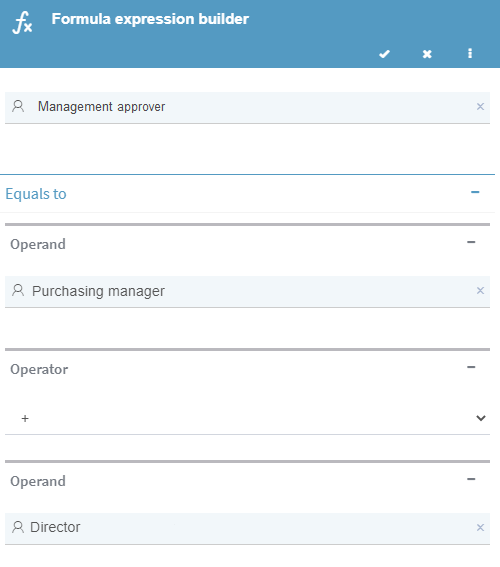
Fig. 135 Formula Expression Builder for Purchasing Manager and Director
Management approval
This step shares many characteristics with the “Purchasing agent approves?” step, Qflow allows you to copy steps including their configuration. You can do this by deleting the “Management Approval” step and then select the “Purchasing agent Approves?” step and pressing “Control + C” to copy and then “Control + V” to paste. Then in the configuration, we must adjust the name, so that it becomes “Management Approval” again and change the task recipient (in the “Message” tab) to be the “Management Approver”. In this way, the task will notify all users who are in the manager approver role, which can be only the purchasing manager or the manager and director. Also, within the message tab, we must change the multiple response criteria to “all users have answered” so that the task can only continue once all approvers have responded instead of just one (Fig. 136).
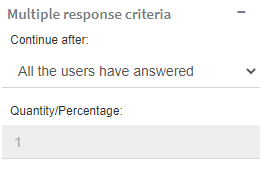
Fig. 136 Multiple response criteria
Once the task is configured, we must rejoin the task with the connections it previously had. Remember that the connection between the user task and the notification task corresponding to notifying the user of the rejection is created from the edge timer event and not from the task itself.
Approves?
For this exclusive gateway, we must add the conditions again for each step. In “Purchase rejection” we will add a new condition in the first box, we must select the “Management approval” step and in the second box the “Rejection” answer. For the second task, we will also use the “Management approval” step, but in this case, we must change the “Some user answered” option for “All users answered” since we want the expense to be approved if and only if all the approval’s participants approve of the expense. Finally, in the second box we will select “Approve” as shown in Fig. 137.
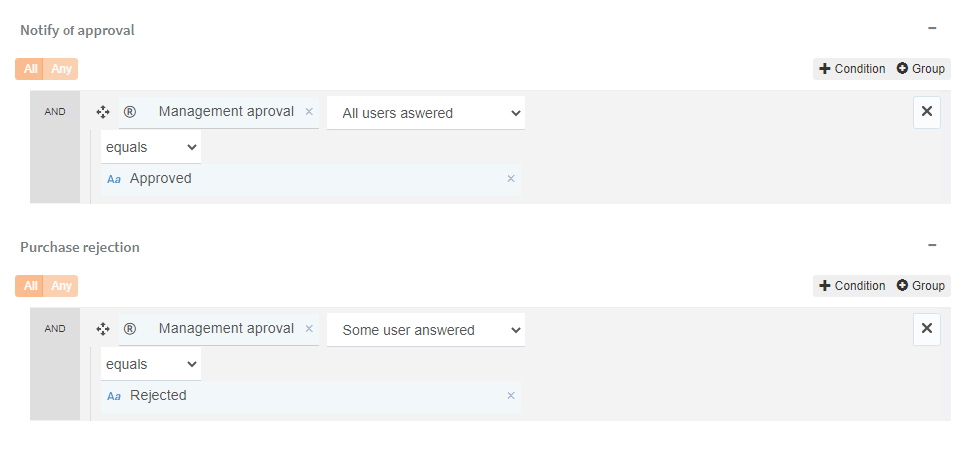
Fig. 137 Exclusive gateway step configuration for management approval
Purchase rejection
This step must be configured correctly so that the applicant receives a notification from Qflow, indicating that the request has been rejected. To achieve this, you must edit the “Message subject” and “Addressees” properties, which can be found in the “Message” tab, within the step’s properties menu.
This is done in an analogous way to what was already done in user tasks. In the subject, enter “Your request has been rejected” and select the “Applicant” role as the recipient. The properties tab of the step, with these changes, is shown in Fig. 138.
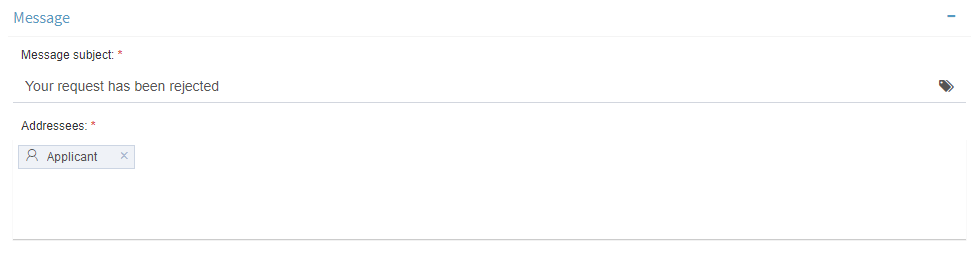
Fig. 138 Purchase rejection step properties menu - Message
In addition, you have to change the data scope in the step, since you want the applicant to be able to see all the data involved in this process. This is done by changing the data scope in the step to “Read Only”.
Notify of approval
This step is configured in the same way as the “Purchase rejection” step, except that the name of the step should be “Notify of approval” and the subject “Your request has been approved”.
Reject purchase
This is the step that marks the end of the process when the application is rejected. The “Start flag” can be used to distinguish the processes that ended in this step from those that ended in the other end step.
Open the step’s properties and type “Rejected” in the “Start flag” field. In addition to this, you can check the “Progress = 100%” option so that, at the end, the flow is marked with a 100% progress.
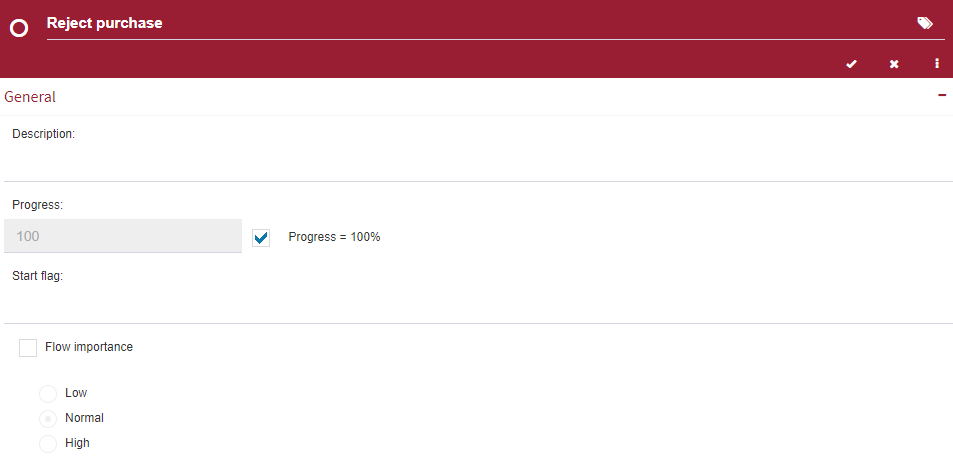
Fig. 139 Reject purchase step properties menu
Approve of purchase
This step is configured in the same way as the “Reject purchase” step, except that the name is different and the flag should be changed to “Approved”.
The final process design should look similar to Fig. 140.
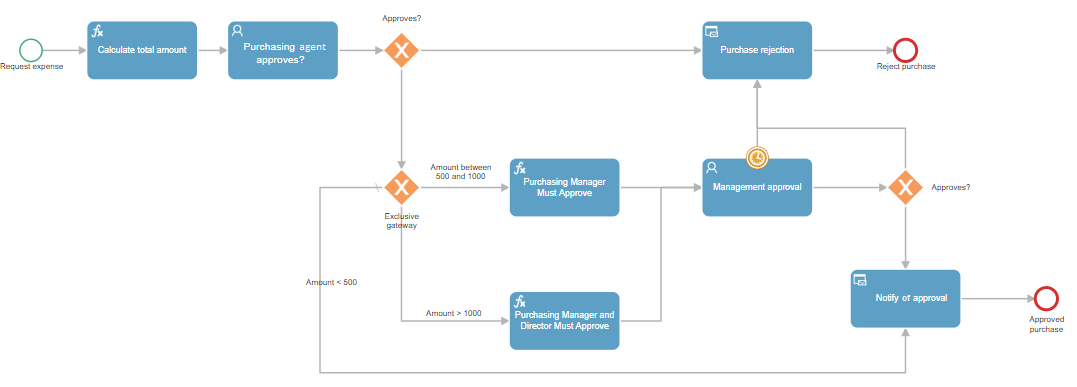
Fig. 140 Final process design
Set production version
Now that the process is complete, it is time to check it out and set it as the production version.
Checking in the template version is important, since the changes that have been saved while it was checked out were only saved for those who modified the template and have not yet been saved in the Qflow database. Before you check in the template version, you must check in the process template, which is the place where the application data and roles were stored. To check them in, right-click on the package in the solution explorer and select the Check in option from the menu. When you do this, a dialog will appear asking you to enter a comment. You can enter the text that seems appropriate, for example “first version”. Alternatively, you can check in and check out packages with the side menu to the left of the solution explorer. The icon with the diagonal arrow pointing down and to the right represents checking out a package, while the icon with the diagonal arrow pointing up and to the left represents checking in a package. For more information about the side menu, see the Qflow Design manual.
Finally, in order for processes of the template version to be started from Qflow Task, it is necessary to mark the newly created version as the production version of the process. This is accomplished by right-clicking the template version in the solution explorer and clicking “Set production version” After doing this, the template version in the solution explorer will appear in bold, as shown in Fig. 141.
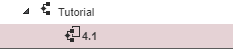
Fig. 141 Template production version
Process execution
This section describes how to run the process.
Entering Qflow Task
We enter it trough the tool navigation menu, like shown in the Fig. 142
Fig. 142 Tool navigation
Optionally, you can also access through the url http://{server}/QflowTask (if you access from the computer where the tool is installed , {server} must be ‘localhost’).
If the current Windows user is the one used in the installation, Qflow Task will be entered automatically, since integrated security is used.
On the other hand, if the current user does not have permissions, the credentials of a user who does have them will be requested, as shown in Fig. 143. In that case, the name and password of a user who has permissions to enter Qflow Task must be entered.
It also allows you to authenticate with Microsoft and Google accounts (only in the case that the user exists in the Qflow system)
Fig. 143 Login Qflow Task
Additionally, you have the option to choose the workspace where the user will log in, for this you must click on the button “Change” (Fig. 144). If this option does not appear, you can see the Qflow Admin manual to configure it.
Fig. 144 Request for credentials and workspace selection
Starting a process
Now we are in Qflow Task, as shown in the Fig. 145. This tool allows you to execute all kinds of operations related to running processes. Some of these operations are: start a process, answer questions or pending tasks and view received notifications.
Let us start by starting a process from the template we just created. For this we will go to “Start process”, which is in the menu on the left. There is a list of all the process templates that have a production version.
Clicking on a template in the list takes the user to the home page of the process. There you enter the general process information and values for the application data that were marked as editable in the template version start step. The form to be completed is shown in Fig. 146. Once we enter the data we will click on “Start” to begin the process.
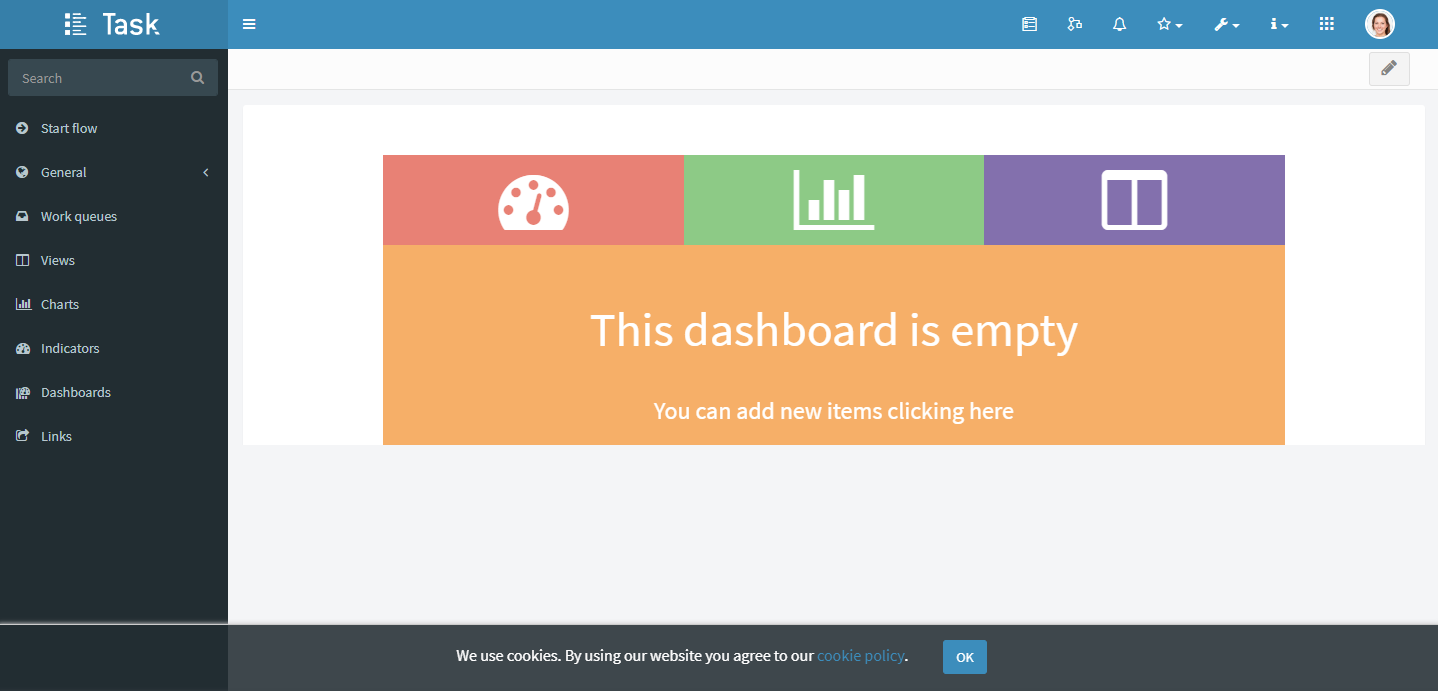
Fig. 145 Qflow Task home
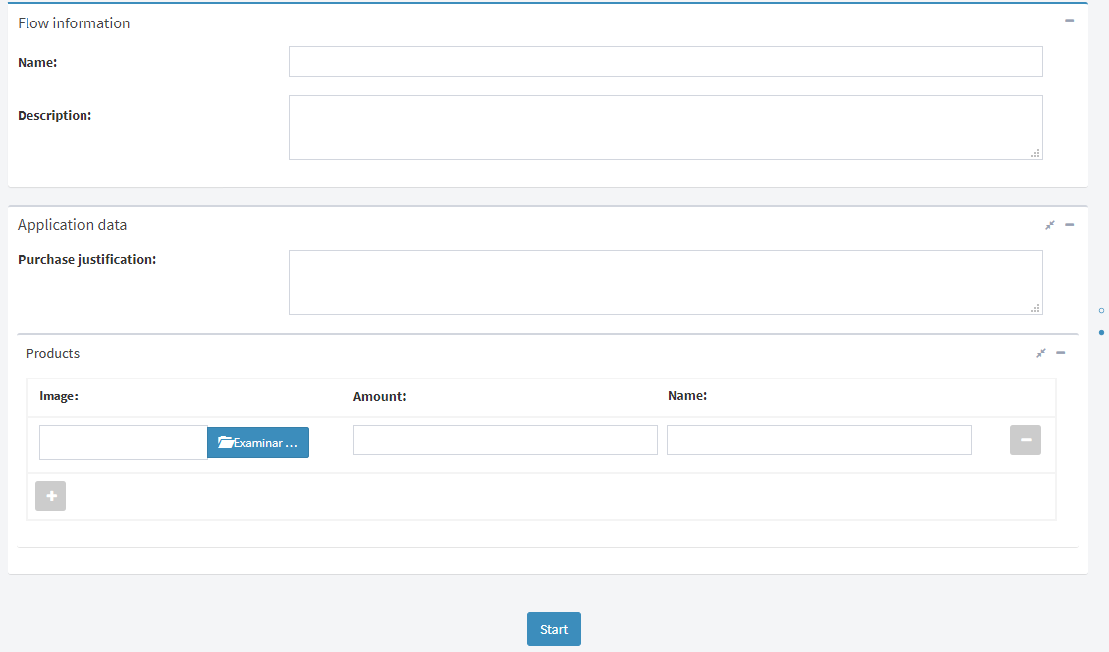
Fig. 146 Process start form for the created template
Answer questions
After starting the process, Qflow shows a page with information about the process that was started. This page shows detailed information about the process, which is separated into several tabs. In particular, it is interesting to observe the “General” tab, which shows a table with general information about the process and the “Design” tab (Fig. 147), which shows the process diagram and which steps have been executed. In this last tab it can be seen that the process is in the “Purchasing agent approves?” step. The process will stay in this step until the question is answered or the expiration is reached.
To go to the form used to answer the question, we can click on the question step in the “Design” tab and then on the task shown in the “Step tasks” table. An alternative is to click on the “Flow active tasks” link, found in the related pages menu in the upper right corner, and double click on the row shown in the view.
The question answer form is shown in Fig. 148.
There, the purchasing agent can see in the “Subject” field the name of the requesting user (remember that we had used a label) and the amount of the requested expense. You can also enter a comment if the step has the corresponding configuration. Then, you must choose what your response is, selecting “Approve” or “Reject” from the list from which the response can be selected. Finally, you must confirm your response by clicking on “Reply”. Enter a comment and respond to the question with the response “Approve”.
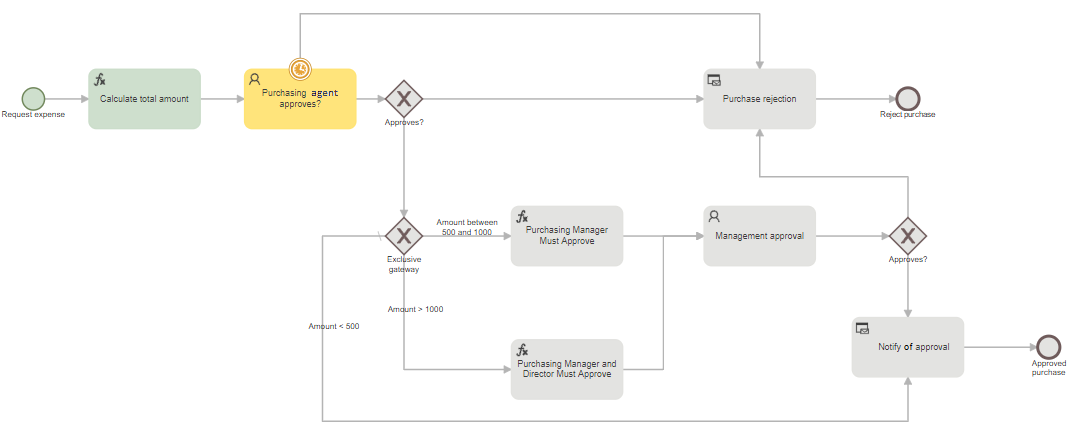
Fig. 147 Process details
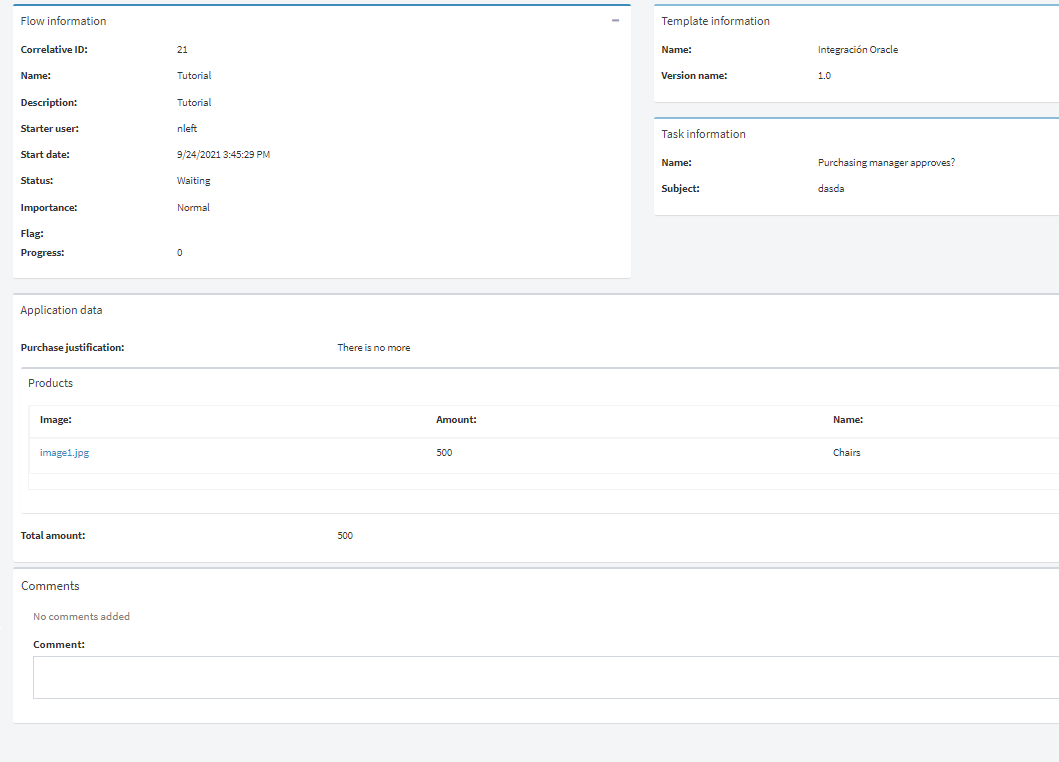
Fig. 148 Question response form
Observing notifications
After answering the question, go back to the process details page. Observe in the “Design” tab that the process has finished executing the “Purchasing agent approves?” step and the graph continued automatically, depending on the amount entered in the task, if the amount entered is less than $500, the task should have advanced to the “Notify of approval” step, in case you entered a value greater than $500, the task should have advanced to the “General Approval” step and you will need to answer this task in order to complete the process.
Once all the user tasks of the process have been answered, if you access the “General” tab, you can see that the “Status” is “Finished”. This indicates that the process has finished running.
What remains to be seen is the notification sent to the applicant, indicating that their expense request has been approved. This notification can be viewed by clicking the “Notify of Approval” step in the layout and then clicking the notification in the “Step Tasks” panel. In Fig. 149 the notification form is displayed. There, the applicant sees in the subjet that his application has been approved. You can also see the comment that the approver entered and the amount of the expense that the approver had requested.
It is recommended, at this time, to execute some processes, testing the different paths that we defined in the process design. For example, run processes where the amount is greater than 500, 1000, etc. and give different answers to the approval questions of the expense request.
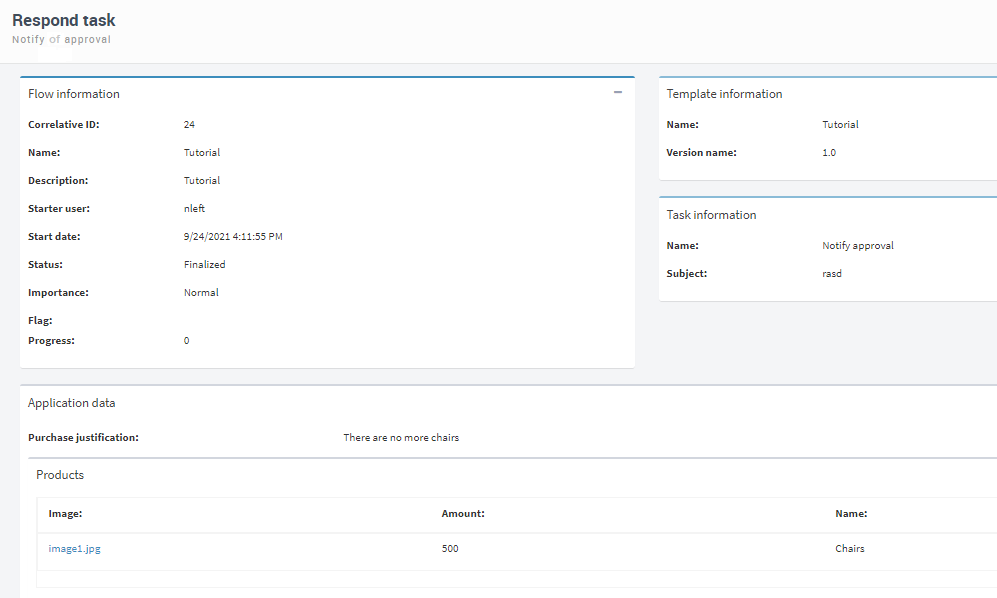
Fig. 149 Notification form
Comment log
If the settings for adding comments or adding comments to responses have been configured, the entries can be seen in the comment log. To access the comment log, you must go to a flow’s details and open the “Details” tab. Here you can see a timeline with the responses and comments that have been saved (Fig. 150).
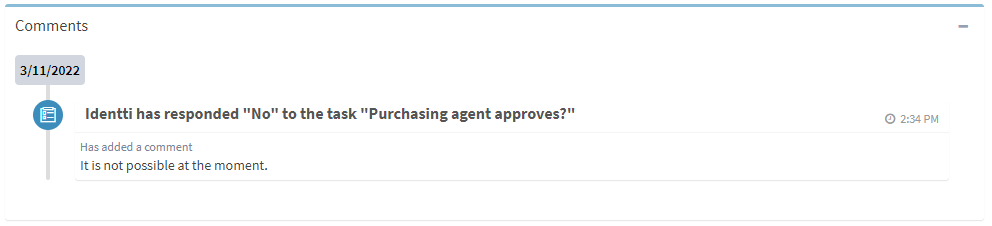
Fig. 150 Comment log
Views
We can create a custom view that shows only the flows of the process that we just created (the “Flows” view, which is already predefined, shows all flows). To go to the page where views are created, click on “Views”, in Qflow Task’s side menu. Once you have clicked on that link, Qflow displays a page with the available views.
To create a process view, click the “+” button. Doing this will show the package and item type selection page that will list the view as shown in Fig. 151. The default package is “Root” and that value will be left unchanged. As we wanted a view on processes, in the right panel we must select the “Flows” item and then click on “Continue”. This brings us to the edit page for the new view.
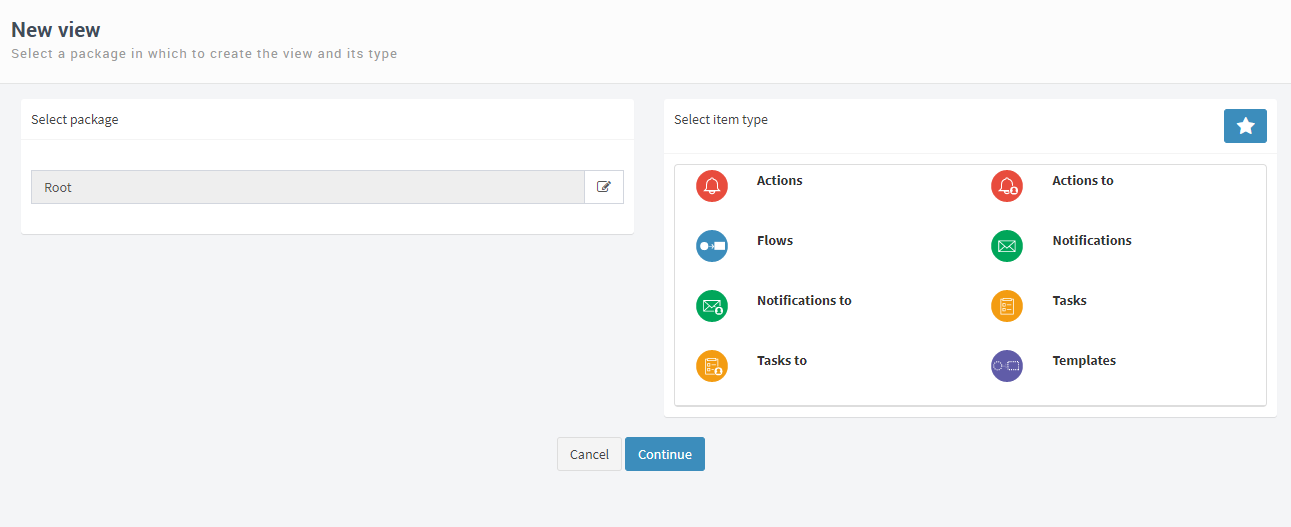
Fig. 151 Package and item selection for a new view
In the “Details” panel, enter, in the “Name” field, “Expense requests”, and check the “Featured view” option.
In the “Filters” panel we will add a filter so that the view only shows processes from the template that we created previously. To add a filter:
Click the “+” button in the “Filters” panel. That makes Qflow display a table with three tabs.
In the “System Columns” tab, double click on the “Template name” element. Doing so will add a row in the filter tree below.
In the added row, leave the default operator (“equal”) and in the field to the right of the operator enter the value “Tutorial”.
After that, the page should look like Fig. 152. Click “Done” to create the new view. Notice that the view appears in the side menu, under the “Views” group. By clicking on that link, you will be able to see the list of items in the view (Fig. 153).
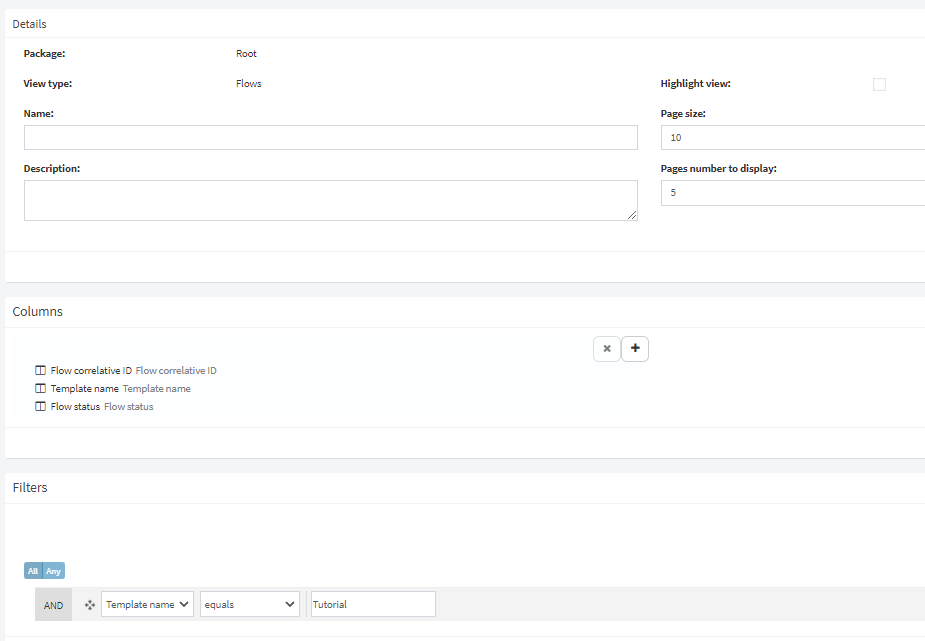
Fig. 152 Setting up a view
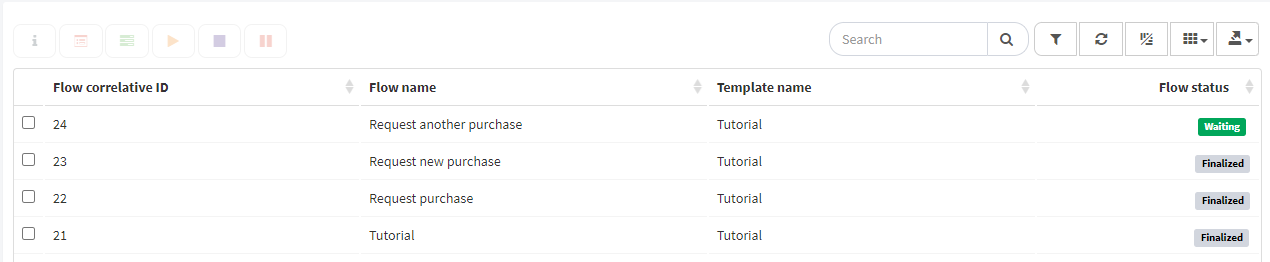
Fig. 153 View listing
Charts
We can create custom charts to track processes at a higher level. We will add a graph that shows the processes of the template that we created, discriminating by its flag.
To create a process chart, access the “Charts” link in the side menu and follow the same procedure as when you created a view. After selecting the “Root” package and the “Flows” item we find the edit page of the new chart.
In the “Details” panel, enter, in the “Name” field, “Flows by flag”.
In the “Appearance” panel select the “Clustered columns” chart type as shown in Fig. 154. In “Measure” select “Count” as the aggregation type and click the button in the bar below “Column” to display the types of columns available. Double click on the “Flow Correlative ID” item in the “System columns” tab so that it counts the number of processes distinguishing them by their identifier.
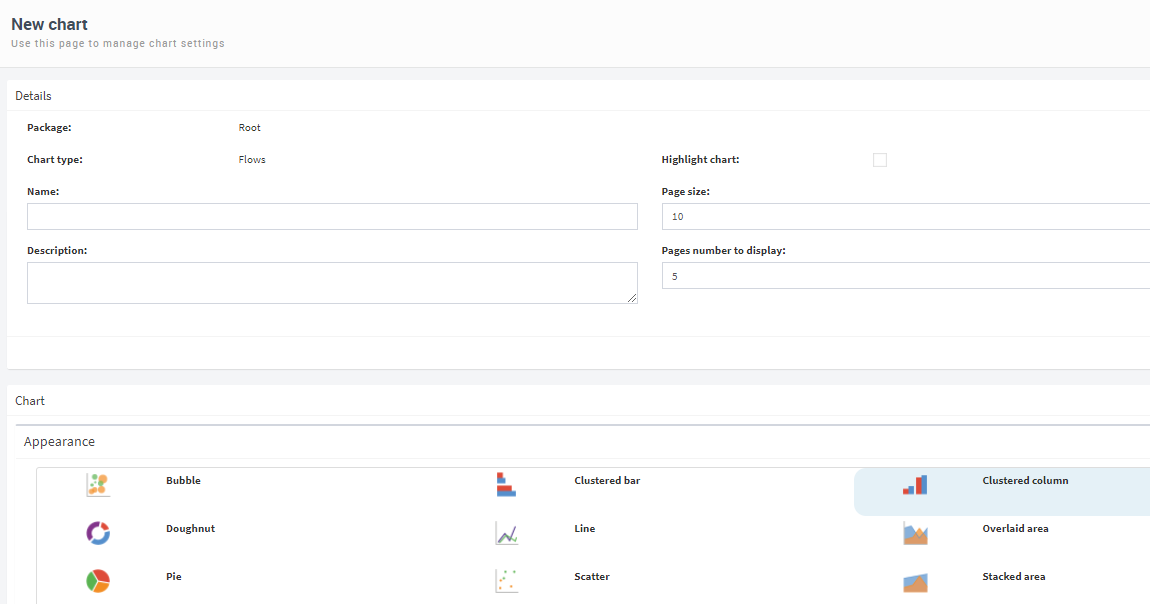
Fig. 154 Creating a chart: details and appearance selection
In the “Dimensions” panel, click the “+” button to add the “Flow flag” column as a dimension. Select it by double clicking on the list.
We must include columns that will be part of the view generated from the information in the graph and that provide us with useful information about each flow. To do this, in the “Columns” panel click on the “+” button and in the same way as with the dimensions, add the “Flow Correlative ID”, “Flow name”, “Flow start date”, “Flow status” and “Flow flag” names.
Finally, if we want the chart to reflect the data of the template processes we created, we must add a filter by template name in the same way as was done for the previous view.
Finally, the page should look like Fig. 155. To finish creating the graph, click on “Done”.
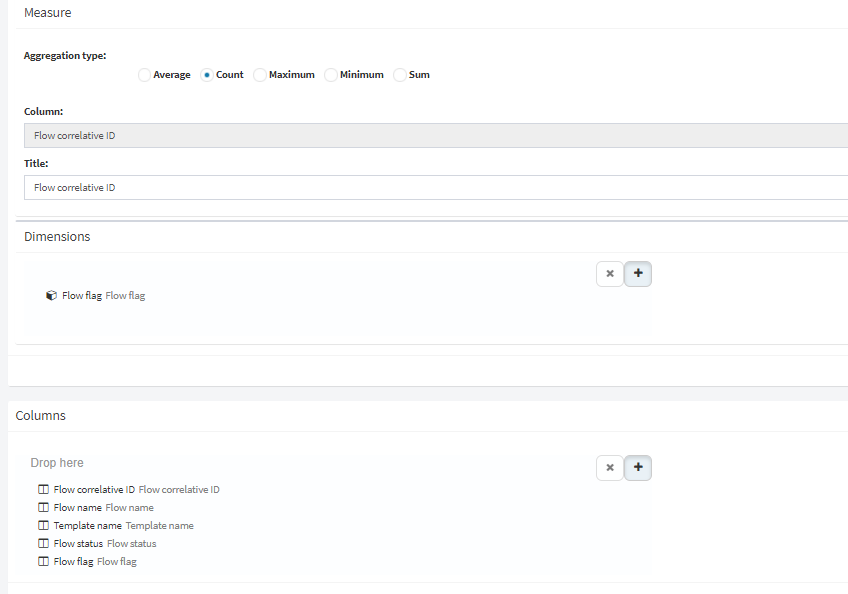
Fig. 155 Creating a chart: measure, dimension, and column settings
Main dashboard
There is a dashboard on Qflow’s main page, where you can have useful information at your fingertips. It is possible to add views, indicators and graphs that will always be updated.
We will add the view and the chart we created to the main dashboard. To do this, first you have to go to the home page, by clicking on the Qflow Task logo, which is on the header. Then you have to click on the pencil icon button to edit the dashboard, which is located in the upper right part of the main page. A table with three tabs will be displayed that lists the elements that can be added to the dashboard, and below it an area that will act as a container where the elements will be included, as shown in Fig. 156. In the “Views” tab we will navigate to the “Expense request” item and we will add it to the lower area either by dragging it, double clicking it, with the “Add” option from the item’s context menu or with the “+” button on the table. In the same way, in the “Charts” tab we select the “Flows by flag” chart and add it to the board.
After doing this, you can modify the chart and view’s layout and dimensions on the board so that they occupy the entire width of the page and are long enough to display all the content. Finally, to save the changes click the button with the floppy disk icon at the top right of the page and the main dashboard will look similar to Fig. 157.
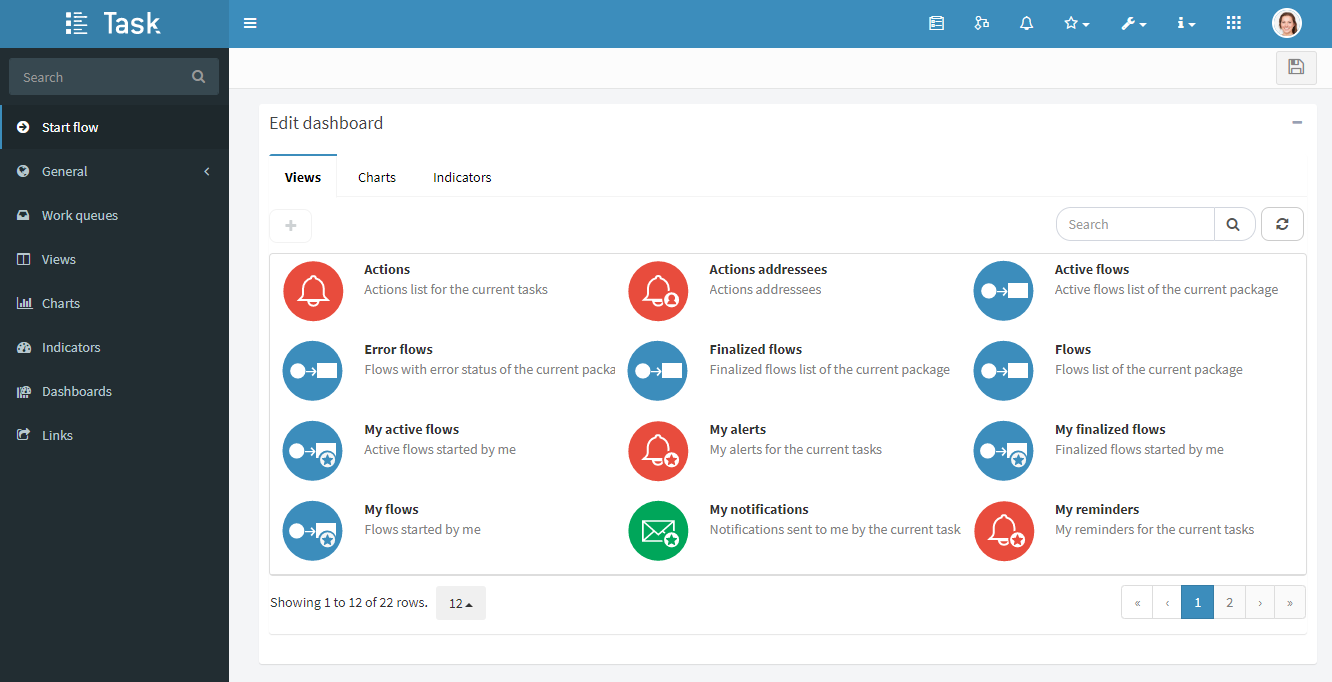
Fig. 156 Modification of the main dashboard
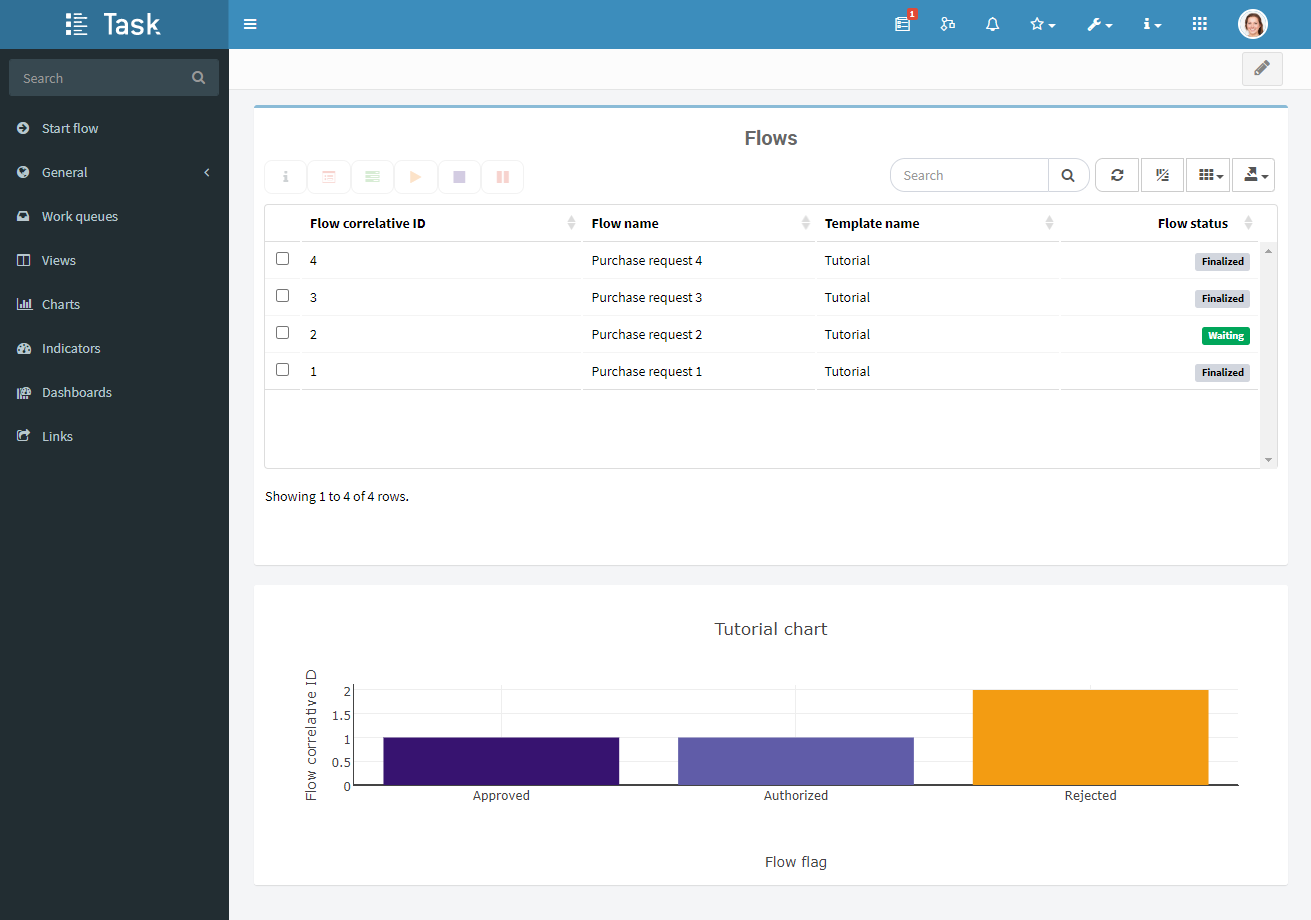
Fig. 157 Modified main dashboard